
Owner's manual

2
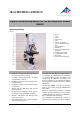
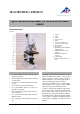
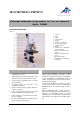
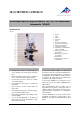
Stand: All-metal stand, arm firmly connected with
base, pinion knobs attached on both sides of the
stand for coarse and fine focusing
Tube: Monocular inclined 45°, head rotation 360°
Eyepiece: Widefield eyepiece WF 10x 18 mm with
pointer
Objectives: Revolver with 3 DIN achromatic objec-
tives 4x / 0.10, 10x / 0.25, 40x / 0.65 (with speci-
men protection)
Magnification: 40x, 100x, 400x
Object stage: 110 x 120 mm
2
with 2 specimen clips
Illumination: Adjustable LED lighting incorporated
into the base with a focussing lens in the lighting
shaft, power supplied by rechargeable battery, 115
V or 230 V, 50/60 Hz charger
Condenser: Bright-field condenser N.A. 0.65, iris
diaphragm, filter holder and blue filter
Camera sensor: 1/3” CMOS, 300 kPixels, colour
prints
Power supply: via USB 2.0
System requirements: WIN95, WIN98, WIN2000
and WINXP
Dimensions: 175 x 135 x 335 mm³ approx.
Weight: 3.1 kg approx.
3. Unpacking and assembly
The microscope is packed in a molded styrofoam
container.
• Take the container out of the carton remove
the tape and carefully lift the top half off the
container. Be careful not to let the optical i-
tems (objectives and eyepieces) drop down.
• To avoid condensation on the optical compo-
nents, leave the microscope in the original pa-
cking to allow it to adjust to room tempera-
ture.
• Using both hands (one around the pillar and
one around the base), lift the microscope from
the container and put it on a stable desk.
• The objectives will be found within individual
protective vials. Install the objectives into the
microscope nosepiece from the lowest magni-
fication to the highest, in a clockwise direction
from the rear.
• Insert the eyepiece into the tube.
4. Operation
4.1 General information
• Set the microscope on a level table.
• Place the object to be observed in the center of
the object plate. Use the clips to fasten it into
place. Make certain that the specimen is cen-
tered over the opening in the stage.
• Connect the mains adaptor, and switch on the
illumination.
Alternatively, the microscope can also be operated
without being connected to the mains. Note that
recharging of the batteries does not begin until
they are completely discharged.
• Make certain that the specimen is centered
over the opening in the stage.
• To obtain a high contrast, adjust the back-
ground illumination by means of the iris dia-
phragm and the variable illumination control.
• Rotate the nosepiece until the objective with
the lowest magnification is pointed at the
specimen. There is a definite “click” when each
objective is lined up properly.
NOTE: It is best to begin with the lowest power
objective. This is important to reveal general struc-
tural details with the largest field of view first.
Than you may increase the magnification as nee-
ded to reveal small details.
To determine the magnification at which you are
viewing a specimen, multiply the power of the
eyepiece by the power of the objective.
• Adjust the coarse-focusing-knob which moves
the stage up until the specimen is focused. Be
careful that the objective does not make con-
tact with the slide at any time. This may cause
damage to the objective and/or crack your
slide.
• Adjust the fine-focusing-knob to get the image
more sharp and more clear.
• Colour filters may be inserted into the filter
holder for definition of specimen parts. Swing
the filter holder out and insert colour filters.
4.2 Installation of the software
• Insert the installation CD into the computer’s
CD drive.
• Follow the installation instructions (see also
the description of the software on the installa-
tion CD).
4.3 Displaying images on the computer
• Connect the microscope to the computer using
the USB cable.
• Start up the software.
• After clicking on the camera icon in the tool-
bar, the image of the specimen will appear on
the computer screen.