INSTRUCTION MANUAL
IMPORTANT SAFETY INSTRUCTIONS This sewing machine is not a toy. Do not allow children to play with this machine. The machine is not intended for use by children or mentally infirm persons without supervision. This sewing machine is designed and manufactured for household use only. Read all instruction before using this sewing machine. DANGER – To reduce the risk of electric shock: 1. An appliance should never be left unattended when plugged in.
TABLE OF CONTENTS SECTION 1. KNOW YOUR MACHINE SECTION 4. UTILITY STITCHES Name of Parts ........................................................... 2 Basic Zigzag ............................................................ 18 Standard Accessories ................................................ 3 Overcasting ............................................................. 18 Accessory storage .................................................... 3 Knit Stitch ...........................................
SECTION 1.
w q r t u i !0 !1 Standard Accessories e q w e r t y u i o !0 !1 !2 y o !2 Zipper foot E Blind hemming stitch foot G Sliding buttonhole foot J Needles Bobbins Screwdriver Lint brush Seam ripper (buttonhole opener) Spool holder (large) Spool holder (small) Additional spool pin Felt cushion Accessory storage The standard accessories can be stored in the accessory storage box under the extension table. Draw out the storage box from the table as shown.
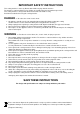
Free-arm sewing Free-arm sewing is used for stitching sleeves, waistbands, pant legs or any other tubular garments. It is also useful for darning socks or mending knees or elbows. SECTION 2. GETTING READY TO SEW q Connecting the Power Supply r z Turn the power switch off. x Insert the machine plug into the machine socket. c Insert the power supply plug into the wall outlet. v Turn the power switch on.
Controlling the Sewing Speed Foot control Sewing speed can be varied by the foot control. The harder you depress the foot control, the faster the machine runs. Reverse Stitch Lever Push the reverse stitch lever down to sew in reverse. The machine will sew in reverse while the lever is pushed. Dropping the Feed Dog The drop feed lever is located underneath the free-arm bed on the backside of the machine. q To drop the feed dog, push the lever in the direction of the arrow, as illustrated.
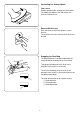
Raising and Lowering the Presser Foot The presser foot lifter raises and lowers the presser foot. e You can raise the foot about 1/4" (0.6 cm) higher than the normal up position for easy removal of the presser foot, or to help you place heavy fabric under the foot. q Lowered position w Normal up position e Extra up position e w w q Changing the Presser Foot To remove: Raise the needle to its highest position by turning the handwheel counterclockwise.
Changing Needles CAUTION: w q Always make sure to turn the power switch off and disconnect the machine from power supply before changing the needle. Raise the needle by turning the handwheel and lower the presser foot. Turn off the power switch. z Loosen the needle clamp screw by turning it counterclockwise. Remove the needle from the clamp. q Needle clamp screw x Insert a new needle into the needle clamp with the flat side of the needle to the rear.
Winding the Bobbin (A) Setting the spool Place a spool of thread on the spool pin with the thread coming off the spool as illustrated. A: Press the large spool holder firmly against the spool of thread. q Large spool holder q (B) B: For a small spool, use the small spool holder. w Small spool holder w Additional spool pin The additional spool pin is for bobbin winding without unthreading the machine. Insert the additional spool pin into the hole. Place the felt and a spool on the pin.
Winding the bobbin w e z x q w z Pull out the handwheel to disengage the clutch. q Handwheel c x Draw the thread from the spool. Guide the thread around the bobbin winder thread guide. w Bobbin winder thread guide e v b c Thread through the hole in the bobbin from the inside to the outside. Put the bobbin on the bobbin winder spindle with the free end of the thread coming out at the top. e Bobbin winder spindle n m v Push the bobbin to the right.
Inserting the bobbin q z z Place the bobbin in the bobbin holder with the thread running off as illustrated. q Thread x x Guide the thread into the front notch on the front side of the bobbin holder. Draw the thread to the left, sliding it between the tension spring blades. w Front notch e Tension spring blade w e c c Continue to draw the thread lightly until the thread slips into the side notch. r Side notch r v v Pull out about 4˝ (10 cm) of thread. Attach the hook cover plate.
c Threading the Machine z To set the needle thread: Raise the thread take-up lever to the highest position by turning the handwheel. Raise the presser foot. x v b q z z Draw the thread from the spool and pass it under the thread guide. Then draw it down along the right channel. q Thread guide w Right channel w x x Draw the thread up around the bottom of the thread guide plate.
Drawing up the Bobbin Thread z z Raise the presser foot and hold the needle thread lightly with your left hand. q Needle thread q x Turn the handwheel slowly toward you one complete turn. Bring the bobbin thread up by pulling the needle thread as illustrated. q Needle thread w Bobbin thread x w q c c Pull 4˝ (10 cm) of both threads back and under the presser foot.
Selecting the Stitch Pattern Raise the needle to its highest position. e Pattern Selector Dial w Turn the pattern selector dial to set the symbol of the desired stitch pattern at the setting mark. q Pattern selector dial w Setting mark CAUTION: Do not turn the pattern selector dial while the needle is in the fabric, otherwise the needle may bend or break. q To select the stretch stitch patterns, set the stitch length dial at S.S.
Adjusting stretch stitch balance If the stretch stitch patterns are uneven when you sew on a particular fabric, correct them by turning the stitch length dial. “–” “+” If the patterns are drawn out, correct them by setting the dial to the “–” side. If the patterns are compressed, correct them by setting the dial to the “+” side. Stitch Width Dial q Turn the stitch width dial to set the desired stitch width number at the setting mark.
Balancing Needle Thread Tension The thread tension should be adjusted depending on the sewing materials, layers of fabric and sewing method. To adjust the thread tension, turn the tension dial. q Tension dial q w t Balanced tension: r The ideal straight stitch has threads locked between two layers of fabric, as illustrated.
w r SECTION 3. BASIC SEWING e Straight Stitch Sewing Machine setting: q Stitch pattern: A w Stitch width: 0 or 5 e Stitch length: 1.5 – 4 r Thread tension: 2 – 6 t Presser foot: Zigzag foot A t Starting to sew Raise the presser foot and place the fabric under the foot. Lower the needle into the fabric. Lower the presser foot and smooth the threads toward the back. Depress the foot control. NOTES: Draw the threads to the left when sewing with the buttonhole foot.
Seam guides on the needle plate The seam guides on the needle plate help you to measure seam allowance. The numbers indicate the distance between the center needle position and the seam guide. q Seam guides Number Spacing (cm) q Spacing (inch) 15 20 4/8 5/8 6/8 1.5 2.0 1.3 1.6 1.9 1/2 5/8 3/4 Turning a square corner The cornering guide helps you maintain a 5/8˝ (1.6 cm) seam allowance when sewing a corner.
w q r SECTION 4. UTILITY STITCHES e Basic Zigzag Machine setting q Stitch pattern: C w Stitch width: 1–5 e Stitch length: 0.5 – 3 r Thread tension: 2 – 5 t Presser foot: Zigzag foot A t Simple zigzag stitching is widely used for overcasting, sewing on buttons etc. Adjust the stitch length to suit your sewing needs. NOTE: Use a stabilizer for stretch fabrics such as tricot and knits to prevent puckering.
Knit Stitch q w r e Machine setting q Stitch pattern: G w Stitch width: 5 e Stitch length: S.S. r Thread tension: 3 – 7 t Presser foot: Zigzag foot A t This stitch is ideal for finishing edges of stretch fabrics. It seams and finishes the fabric edges simultaneously. Tricot Stitch (Multiple Zigzag Stitch) q w r e Machine setting q Stitch pattern: D w Stitch width: 3–5 e Stitch length: 0.5 – 1.
q r w Straight Stretch Stitch e Machine setting q Stitch pattern: A w Stitch width: 0 or 5 e Stitch length: S.S. r Thread tension: 2 – 5 t Presser foot: Zigzag foot A t The pattern is sewn with two stitches forward and one stitch backward, forming a seam that does not rip easily. Use it to reinforce areas such as crotch and armhole seams. Also use it when constructing items such as backpacks for extra strength. Carefully guide the fabric while sewing as the fabric moves back and forth.
q Button Sewing w e r Machine setting q Stitch pattern: C w Stitch width: Adjust as necessary e Stitch length: Any r Thread tension: 3 – 7 t Presser foot: Zigzag foot A y Feed dog: Lowered t y Unthread the needle. Adjust the stitch width to match it with the span of the holes in the button. Turn the handwheel to check if the needle enters into each hole in the button. Lower the foot to hold the button in place. The holes in the button should align with the slot of the foot.
q 4-Step Buttonhole w Machine setting q Stitch pattern: w Stitch width: 4–5 e Stitch length: 0.5–1 r Thread tension: 1 – 5 t Presser foot: Sliding buttonhole foot J e t r z Set the pattern selector dial at “ ”. Carefully mark buttonhole length on fabric. Place the fabric under the foot with the buttonhole marking running toward you. Draw both of needle and bobbin thread to the left. Move the slider toward you so that the top mark w on the slider meets the start mark q.
Corded Buttonhole Machine setting q Stitch pattern: w Stitch width: 4–5 e Stitch length: 0.5–1 r Thread tension: 1 – 5 t Presser foot: Sliding buttonhole foot J w q e r t z With the buttonhole foot raised, hook the filler cord on the spur at the back of the foot. Bring the ends toward you under the foot, clearing the front end. Hook the filler cord into the forks on the front of the foot to hold them tight. q Spur w Forks z q w x x Draw both of needle and bobbin thread to the left.
Zipper Application w q e Machine setting q Stitch pattern: A w Stitch width: 5 e Stitch length: 1.5 – 4 r Thread tension: 3 – 6 t Presser foot: Zipper foot E t r Attaching the zipper foot A: To sew the left side of the zipper, attach zipper foot with the right side pin. w q (A) B: To sew the right side of zipper, attach the zipper foot with the left side pin. q Groove w Pin Fabric preparation (B) o z Add 3/8˝ (1 cm) to the zipper size. This is the overall opening size.
To sew q z z Attach zipper foot with the right side pin. Fold back the upper layer seam allowance. Fold back the lower layer seam allowance to leave a 1/8˝ (0.4 cm) margin of fabric. q Lower layer w End of the opening e Zipper teeth r 1/8˝ (0.4 cm) margin t Upper layer y Opening size u Folded edge i Basting e w r y t u i x Place zipper teeth next to margin edge and baste the zipper tape to the lower fabric layer. Align zipper foot with margin edge.
b Raise and release the foot, and re-attach it with the left side pin. Starting just below zipper bottom stop, sew across fabric to about 3/8˝ (1 cm) distance from the basting line. Turn fabric 90 degrees and sew a seam the entire length of the zipper tape. Before reaching the slider, stop the machine with needle in fabric and raise the foot. Use seam ripper to open a few inches of basting stitch. !3 Unstitch basting !4 3/8˝ (1 cm) b !4 !3 n Unzip a few inches to clear a path for stitching.
q Blind Hemming w r e Machine setting q Stitch pattern: w Stitch width: e Stitch length: r Thread tension: t Presser foot: t z z On heavy weight fabrics that ravel, the raw edge should be overcast first. Fold the hem under the fabric as illustrated for fine or medium fabrics. Fold a hem with the wrong side up forming a 1/8˝ (0.5 cm) allowance. q Wrong side of the fabric w 1/8˝ (0.
SECTION 5. DECORATIVE STITCHES q Decorative Satin Stitches w Machine setting q Stitch pattern: w Stitch width: e Stitch length: r Thread tension: t Presser foot: e r t J 3–5 0.5 – 1 1–4 Zigzag foot A Determine the appropriate stitch density by test sewing. For a delicate appearance on fabric such as chiffon, use a single layer with a tear-away backing, if necessary. Reduce the needle thread tension slightly to achieve the better result.
q Smocking w Machine setting q Stitch pattern: w Stitch width: e Stitch length: r Thread tension: t Presser foot: e r t D 5 S.S. 1–4 Zigzag foot A Step 1: Choose a soft and lightweight fabric such as batiste, gingham or challis. Cut the fabric three times wider than the project width. Increase the stitch length to “4” and loosen thread tension to “1”. Sew rows of straight stitches 3/8˝ (1 cm) apart across the area to be smocked. q 3/8˝ (1 cm) q Step 2: Knot the threads along one end.
q Pin Tucking w e Machine setting q Stitch pattern: w Stitch width: e Stitch length: r Thread tension: t Presser foot: r t Fold a fabric wrong side together and Lower the needle into the fabric 0.1 – 0.2 cm inside the folded edge. Lower the foot and turn the screw to align the guide on the foot with the folded edge. Sew slowly while guiding the folded edge along the guide. Open the fabric and iron press the tucks. q Screw w Guide e Folded edge q w e w q A 0 or 5 1.
Fagoting q w Machine setting q Stitch pattern: w Stitch width: e Stitch length: r Thread tension: t Presser foot: e r t H 3–5 1–3 1–4 Zigzag foot A Use this stitch to join two pieces of fabric to create an open work appearance, and add design interest. Fold under each fabric edge 1/2˝ (1.3 cm) and press. Pin the two edges to a piece of paper or tearaway backing 1/8˝ (0.3 cm) apart. q Paper Sew slowly, guiding the fabric so the needle catches the folded edge on each side.
SECTION 6. CARE AND MAINTENANCE WARNING: Turn the power switch off and unplug the machine before cleaning. NOTE: Do not dismantle the machine in any way other than what is explained in this section. Clean the outside of the machine with a soft cloth and mild soap. z Cleaning the Hook Race and Feed Dogs z Remove the presser foot and needle. Remove screw on the needle plate with the screwdriver. Remove the needle plate and take out the bobbin. q Screw q x x Lift up the bobbin holder and remove it.
Replacing the Bobbin Holder z z Insert the bobbin holder into the hook race. x x Make sure the knob of the bobbin holder fits next to the stopper on the race. q Knob w Stopper w q c c Replace the bobbin. Attach the needle plate, inserting the two guide pins into the holes in the needle plate. Tighten the screw firmly with the screwdriver. e Guide holes r Screw e r e Replacing the Light Bulb WARNING: When replacing the bulb, switch off and unplug the machine.
Troubleshooting Cause Condition The needle thread breaks. 1. 2. 3. 4. 5. The needle thread is not threaded properly. The needle thread tension is too tight. The needle is bent or blunt. The needle is incorrectly inserted. The needle thread and the bobbin thread are not drawn to the rear and set properly under the presser foot when starting sewing. 6. The fabric is not drawn to the rear when sewing is finished. 7. The thread is too heavy or too fine for the needle.
507-800-XXX (EN) Printed in Thailand