
User Manual

2
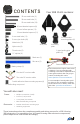
You may have opted to also receive:
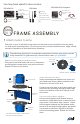
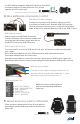
FRAME ASSEMBLY
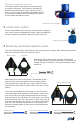
1 Attach motors to arms
Each arm of your Y6 will have a top motor and a bottom motor attached to the arm using
co-axial motor mounting plates. To ensure motors are securely bolted to arms, apply a small
amount of threadlock to each bolt before fastening.
Threadlocking compound is an important component to ensure your motors remain
firmly attached! For application tips, check out this video: goo.gl/bM3MA.
Attach mounting plates to bottom motors:
Using two 6 mm steel bolts and one co-axial motor
mounting plate, fasten motor onto plate as shown.
Repeat for three of six motors.
Attach
motor
here
Bottom motor assembly
Secure with
6 mm bolts
Attach top motors to arms:
Insert mounting plate between top motor and
arm. Make sure motor cables protrude in the
direction of the end of the arm.
Fasten motor and plate to arm using two 6 mm
steel bolts by accessing through the two large
holes in the bottom of the arm. Repeat for all
three arms.
Top and bottom motors attached to
arm with mounting plates
Top motor
Mounting
plates
Bottom
motor
25 mm
bolts
19 mm hollow
spacers
6 mm bolts
Secure mounting plates together:
Place mounting plates with bottom motors
attached on underside of arm so that the three
outer holes in the plates align. Insert a 19 mm
hollow spacer between top and bottom holes;
thread a 25 mm bolt through spacer and plates.
Secure with a metal nut. Repeat for all three
holes on mounting plates. Repeat for all three
arms.
Micro USB cable
4 mm JP1
jumper connector
6 mm PPM
jumper connector
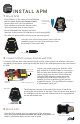
3DR APM 2.6:
Telemetry adapter
cable
3DR APM 2.6
3DR uBlox GPS+Compass:
3DR uBlox GPS
board with compass
6-position to
5-position GPS
cable
4-position compass
cable
3DR Radio:
Radios (2)
Antennas (2)
Micro-USB cable
Android OTG cable
Autopilot connectors