
User Manual

3
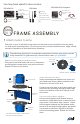
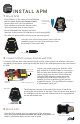
Attach a threaded collet to the top of each motor using the
four small screws included with collets. Apply threadlock to
each screw before fastening. Repeat for all six motors.
Completed motor assembly
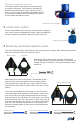
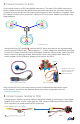
3 Attach top and bottom plates to arms
Attach black arm here
Attach top and bottom plates together through the
four aligning holes near the front ends of the plates as
shown using a 25 mm bolt, 19 mm hollow spacer, and
metal nut.
Top plateBottom plate
Attach at four points
25 mm bolt + 19 mm spacer + metal nut
Next attach the arms to the plates. The black arm will
attach to the narrowest angle of the triangular plates.
The two blue arms indicate your copter’s front-facing
direction and will attach to either side of the front of the
plates.
Place the arm between the two plates so the two holes
in the arm align with the holes in the plates. Insert a bolt
into each hole from under the bottom plate and secure
with nuts above the top plate. For inner holes use 35 mm
bolts and metal nuts; for outer holes on blue arms use 30
mm bolts and thumb nuts; for the outer hole on the black
arm use a 25 mm bolt and metal nut. Insert bolts from
below the bottom plate so that nuts are attached above
the top plate.
Attach blue arms here
25 mm bolt + arm + metal nut
Inner holes use: Outer hole (black arm) use:
35 mm bolt + arm + metal nut
The top and bottom plates will form the main frame of your copter. We’ll attach these plates
both to each other and to your copter’s arms.
Install motor collets2
Motor collet assembly
30 mm bolt + arm + thumb nut
Outer holes (blue arms) use:
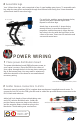
Thread motor cables through arms:
Thread the cables from the top motors through
the ends of the arms. You’ll want to distinguish
between top and bottom motor cables, so use a
pen or piece of tape to mark the protruding ends of
the top motor cables before threading the bottom
motor cables through the arms.