'ODEV ,QF *UDSKLFV $FFHOHUDWRU &DUG 8VHU·V 0DQXDO 3Dlabs,® Inc. 480 Potrero Avenue Sunnyvale, CA 94086 408 - 530 - 4700 www.3dlabs.
Copyright 2000 by 3Dlabs, Inc. 3Dlabs, GLINT and Permedia are registered trademarks, and Oxygen and PowerThreads are trademarks of 3Dlabs, Inc. or 3Dlabs Inc. Ltd. Pentium is a registered trademark of Intel. OpenGL is a registered trademark of Silicon Graphics, Inc. Soft Engine is a trademark of Vibrant Graphics, Inc. AutoCAD is a registered trademark of AutoDesk Inc. Colorific is a registered trademark of E-Color, Inc.
&217(176 Introduction ............................................................................................v Welcome to 3Dlabs! .............................................................................vi System Requirements ..........................................................................vi Chapter 1 – Installation ......................................................................... 1 Installing the Hardware .......................................................................
Chapter 3 - Troubleshooting................................................................. 17 Troubleshooting................................................................................. 18 Monitors and Display Resolutions ..................................................... 18 Systems and Networks ...................................................................... 18 Online Information ............................................................................ 19 Appendix B - Software License ..
,1752'8&7,21
Introduction :HOFRPH WR 'ODEV Thank you for selecting a 3Dlabs® Graphics Accelerator Card! This User Manual is designed to provide information common to all 3Dlabs Graphics Accelerator Cards. In addition to this guide you are strongly encouraged to use the on line help included in the 3Dlabs driver software Help screens. 6\VWHP 5HTXLUHPHQWV Before installing your 3Dlabs Graphics Accelerator Card it is important that your system meets the minimum system requirements for your card.
&+$37(5 ² ,167$//$7,21
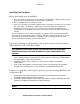
Installation ,QVWDOOLQJ WKH +DUGZDUH Before you begin your installation: 1. Save any work in progress and exit any open applications. Always back up your system before you install any new hardware or software. 2. Have a Phillips-head screwdriver ready. 3. Take every possible precaution against static electricity as you prepare to install the card: static can damage components. If an anti-static wrist strap was included in your box, please use it during your hardware installation.
Installation Installing your 3Dlabs Graphics Accelerator Card 1. Determine whether your 3Dlabs Graphics Accelerator Card is designed to fit into either an AGP/AGP Pro slot or a PCI slot in your computer. Note: If your card is configured with a factory installed daughter card attached, then the base (or larger) card is an AGP and/or AGP Pro compatible card. If the daughter card includes a card edge connector, the daughter card is a PCI compatible card and must be inserted in the adjacent PCI slot.
Installation 4. Remove the cover from your system so you can access the slot(s) into which you will be installing your 3Dlabs Graphics Accelerator Card. If you have not already removed any existing graphics card from your system, then do so now. 5. If necessary, remove the back panel cover(s) from the slot(s) into which you are going to install your 3Dlabs Graphics Accelerator Card, using the Phillips-head screwdriver you should have handy. 6.
Installation 8. Place the card into the correct slots(s) and seat it/them firmly. See your system documentation for instructions on securing the card to the chassis. Loose cards and connections can cause grounding and operating problems. Single slot card 9. Dual slot card Remove the anti-static wrist strap, if used, and replace the cover on your system. Connecting one or more VGA or Digital Flat Panel (DFP) monitors 1. 2.
Installation 3. If your board contains either two VGA connectors or two DVI connectors (or two of each), you must always connect your first or only monitor to the connector marked “1” and then you can connect your second monitor (if used) to the connector marked “2”. VGA connector s 1 2 1 DVI connectors 2 Attaching a Stereo Device If your 3Dlabs Graphics Accelerator Card supports stereo viewing connect the stereo hardware to the round, stereo connector on the card.
Installation ,QVWDOOLQJ WKH 'ULYHU 6RIWZDUH Your product CD includes 3Dlabs PowerThreads driver software, which lets you set image quality and performance preferences for your card. It also includes the Soft Engine AutoCAD accelerator and productivity tool package, and Colorific screen-toprint color matching software. Installing Soft Engine on your AutoCAD equipped system will improve graphics performance by up to four times, however it will only improve performance with AutoCAD R14 or earlier versions.
Installation 5HJLVWHULQJ
&+$37(5 62)7:$5( &21),*85$7,21
Software Configuration 7KH 'ODEV *UDSKLFV $FFHOHUDWRU &DUG 'ULYHU The 3Dlabs driver software lets you optimize the working relationship between your card, your system and your applications. The 3Dlabs Display Control Panel allows you to customize and create driver settings. The Taskbar based Configuration Manager provides quick and convenient access to most of the Display Control Panel features, and allows you to quickly switch between alternative driver settings.
Software Configuration 7KH 'LVSOD\ &RQWURO 3DQHO Access the configuration tools through the Display Properties Control Panel. If you are running Windows NT 4.0: 1. Click the desktop with your right mouse button to display the panel. 2. Select Properties from the menu that appears, then select the 3Dlabs tab. If you are running Windows 98,Windows Me, or Windows 2000: 1. 2. 3. 4. Click the desktop with your right mouse button to display the panel. Select Properties from the menu that appears.
Software Configuration The introductory page provides the software version and basic hardware specifications, and a point-of-entry to the full set of 3Dlabs driver customization tools.
Software Configuration &RQILJXULQJ 0XOWLSOH 0RQLWRUV To configure a second monitor in Windows NT: 1. In the Display Properties Control Panel, click the Settings tab. 2. Click List All Modes.
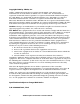
Software Configuration 3. In the List of Valid Modes, click a resolution and then click OK. Select a resolution that is twice the width of your current resolution. For example, if your current resolution is 1024 x 768, select 2048 x 768, 75 Hertz for your new resolution. 4. On the Display Properties Panel, click Test. This tests the new mode on the second monitor screen for five seconds. 5. Click OK to test the new mode. 6. Click OK if you saw the test bitmap correctly. 7.
Software Configuration &RQILJXULQJ \RXU 'ODEV *UDSKLFV $FFHOHUDWRU &DUG IRU 6WHUHR 9LHZLQJ If your 3Dlabs Graphics Accelerator Card is equipped with a VESA standard stereo sync signal connector (3-pin mini-DIN), then it supports 3D stereo viewing. To view stereoscopic images on your Windows PC, you will need to connect the appropriate equipment such as stereo glasses to the 3-pin mini-DIN connector on the card.
Software Configuration 5. In the OpenGL Support screen, click Advanced. 6. 7. 8. 9. Click the checkbox to the right of Stereo View Support to select it. Click Apply and then click OK. In the Display Settings Control Panel, click the Settings tab. For information on suitable frequency please refer to the documentation for your stereo glasses.
&+$37(5 7528%/(6+227,1*
Troubleshooting 7URXEOHVKRRWLQJ If you have trouble using your 3Dlabs Graphics Accelerator Card or a 3D application, you may find the answer to your problem in the following sections. Always start your problem- solving efforts with the simplest solution and work up to the more complex ones. 0RQLWRUV DQG 'LVSOD\ 5HVROXWLRQV Question:My monitor is either blank, or the displayed image is distorted, scrambled or smaller than I expected.
Troubleshooting Question:Since installing the 3Dlabs Graphics Accelerator Card, my system either hangs or crashes to a blue screen when I try to start up, or the system starts up but VGA graphics don’t display. Solution: Try to disable “VGA Palette Snoop.” Follow these steps. 1. Remove the 3Dlabs Graphics Accelerator Card and reinstall your old graphics card. See Chapter 1- Installation, for instructions. 2. Restart your system and enter Setup at the on-screen prompt.
Software License $33(1',; % 62)7:$5( /,&(16( 3Dlabs Graphics Accelerator Card User's Manual 21
Software License 62)7:$5( /,&(16( $*5((0(17 THIS IS A LEGAL CONTRACT BETWEEN YOU, THE END USER, AND 3DLABS, INC. BY USING THE SOFTWARE ACCOMPANYING THIS GUIDE OR PRE- INSTALLED ON YOUR SYSTEM, YOU ARE ACCEPTING AND AGREEING TO BE BOUND BY THE TERMS OF THIS SOFTWARE LICENSE AGREEMENT.
Software License /LPLWHG :DUUDQW\ 3Dlabs, Inc. warrants that the SOFTWARE AND FEATURES licensed to you under this AGREEMENT will perform in accordance with 3Dlabs, Inc. published specifications for use on the same operating system as used by you at the time of purchase of the SOFTWARE or the system on which the SOFTWARE is initially mounted or installed (WARRANTY) for a period of ninety (90) days after the date of delivery to you as evidenced by your receipt (WARRANTY PERIOD).
Software License AGREEMENT. Upon such termination, you agree to destroy all copies, mergers and modifications of the SOFTWARE and FEATURES and accompanying documents. You agree that a breach of this AGREEMENT will result in irreparable damages to 3Dlabs, Inc. This AGREEMENT is the entire agreement between you and 3Dlabs, Inc.
$33(1',; & 5(*8/$725< 67$7(0(176
Regulatory Statements 'HFODUDWLRQ RI &RQIRUPLW\ We, 3Dlabs, Incorporated, 480 Potrero Avenue Sunnyvale, CA 94086 Phone 408-530-4700 Fax 408-530-4701 United States of America declare under our sole responsibility that the 3Dlabs Graphics Accelerator product(s) to which this declaration relates are in conformance with the following standards: EN 55024:1998, clause 4.2.1 EN 55024:1998, clause 4.2.2 EN 55024:1998, clause 4.2.3 EN 55024:1998, clause 4.2.3.2 EN 55024:1998, clause 4.2.
,1'(;
Index 3D stereo viewing, 15 Windows 2000, 15 Windows NT, 15 BIOS, 20 Configuration Manager, 10, 19 Direct3D, 12, 19 Display Control Panel, 10, 11, 19 configuration tools, 11 Windows 2000, 11 Windows 98, 11 Windows Me, 11 Windows NT 4.