
Owner manual


Troubleshooting
3Dlabs Graphics Accelerator Card User's Guide
31
oÉáåëí~ääáåÖ=íÜÉ=sáÇÉç=aêáîÉê=
oÉáåëí~ääáåÖ=íÜÉ=sáÇÉç=aêáîÉê=oÉáåëí~ääáåÖ=íÜÉ=sáÇÉç=aêáîÉê=
oÉáåëí~ääáåÖ=íÜÉ=sáÇÉç=aêáîÉê=
Note: You must have the correct driver for the Windows NT 4.0 or Windows 2000 operating system. If
you are unsure, refer to the README.TXT file located on the driver delivery media for this information.
Refer to the Microsoft Windows NT 4.0 or Windows 2000 documentation and online Help for more
information on installing drivers and software application programs.
If you are installing the Wildcat II 5110 driver, you must remove the current driver prior to installing the
update.
Removing the existing Wildcat II 5110 driver under Windows NT
1. Log on using an account that has administrative privileges.
2. From the operating system Start menu, go to Settings/Control Panel and double-click
Add/Remove Programs.
3. On the Add/Remove Programs Properties Install/Uninstall tab, highlight the Wildcat II
5110 Display Driver and click Add/Remove.
4. Click Yes when prompted to confirm the driver removal, and follow the prompts.
Reinstalling the video driver under Windows NT
1. Log on using an account that has administrative privileges.
2. Insert the delivery media into the appropriate device (for diskettes or CD).
3. From the operating system Start menu, go to Settings/Control Panel/Display and click the
Settings tab.
4. Click Display Type, then click Change.
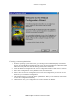
5. In the Change Display dialog box, click Have Disk.
6. In the Install From Disk dialog box, type the path to the directory that contains the delivery
media.
7. In the Change Display dialog box, verify that the Wildcat II 5110 driver is highlighted,
then click OK.
8. Click Yes when asked if you want to install a third-party driver. The files are copied from
the delivery media.
9. After the driver files are copied, a message that the driver successfully installed displays.
Click OK.
10. Click Close to exit the Display Type dialog box.
11. Click Close to exit the Display Properties dialog box.
12. When told that the workstation must be restarted for the new settings to take effect, remove
the diskette from the workstation’s floppy disk drive, if applicable. Click Yes to restart the
workstation.
13. After the system restarts and you log in, a message displays stating that a new display
driver has been installed, and that you should use the Display option in the Control Panel to
select the preferred display resolution. Click OK.