
Use and Care Manual


Not all painting projects are
the same. The type of painter’s
tape you should use, and
how you prep for painting will
vary from room to room and
surface to surface. Textured
ceilings, bathrooms and
accent walls present unique
challenges but with these tips,
your finished project will look
like it was done by a pro.
Step-By-Step Guide:
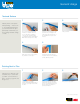
General Usage
Remove the tape at a 45-degree
angle, and at a moderate speed.
Just pull the tape back on itself. If
adhesive sticks to the surface, try a
90-degree angle. If paint is pulling
up with the tape, try scoring the
edge of the tape with a razor blade
before pulling further.
TM
1
5
32
Pull tape off the roll a few feet
at a time. Lay it onto surface
depressions. Press down as you go.
Avoid stretching the tape; this can
cause it to lift up or break.
(Steps continued on next page)
Make sure you’re using the best
tape for the job. Check out our
Tape Selector Chart to see which
ScotchBlue
™
Painter’s Tape best
suits your project.
Clean the surface, and make sure
it is dry and dust-free. This will help
the tape stick properly.
4
Secure the tape by pressing the
edge down with a flexible putty
knife or 5-in-1 tool. If the surface is
textured, seal the edge of the tape
with the existing base color of the
wall. This will prevent the new paint
color from seeping under the tape.
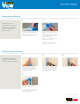
Good masking is the key to
sharp, professional paint lines
and an overall neat, finished
look. A great paint job begins
with knowing which tape to
use, how to mask properly
and how to remove the tape.
It also can help avoid rework
by preventing paint drips,
spatters and accidental
brush strokes.
Mask Like a Pro