3M Telecommunications Instructions de montage Installation instructions Installationsanweisung OSSC One Step Small Closure 1Î1 and 1Î2 ti
1 F Réaliser l'épissurage. L’espace maxi d’épissurage est de 60mm. GB Prepare the cables and finish the splicing. Splice opening is max 60 mm. D Bereiten Sie die Kabel vor und setzen Sie die Spleißverbindungen. Der Platz für die Spleiße ist begrenzt auf 60 mm. 2* F Enlever l'adhésif du boitier. GB Take off the tape on the closure. D Entfernen Sie den Klebestreifen von der Muffe.
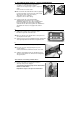
4 – For Cable tie fixing versions – Version mit Kabelbinder F Pousser le 1er cable bien au fond de la chicane en veillant à ce que l’extrémité de la gaine soit dans la zone d’épissurage. Couper le surplus du collier. Faire de même avec l'autre cable. GB Place and fix the first cable with the cable tie (supplied) to the bottom. Make sure that end of the cable sheath fully enters the splice area. (See pictures) Trim out the excess of cable tie. Repeat the same for other cable(s).
GB Press-open the latches one after the other. (see Picture) * Take care to keep the sealing area clean during the installation and re-entering. After re-entry, follow the related steps from 1 to 6 to re-complete installation. D Drücken Sie zum Öffnen auf die Verriegelungsklammern (siehe Bild). Eine nach der anderen. * Achten Sie darauf, dass der Spleißbereich während der Arbeiten an der offenen Muffe sauber bleibt. Nach dem Wiederöffnen befolgen Sie wieder die Schritte 1 bis 6.