Check Weighing Scales FS-6Ki FS-15Ki FS-30Ki 1WMPD4001332
This Manual and Marks All safety messages are identified by the following, “WARNING” or “CAUTION”, of ANSI Z535.4 (American National Standard Institute: Product Safety Signs and Labels). The meanings are as follows: WARNING CAUTION A potentially hazardous situation which, if not avoided, could result in death or serious injury. A potentially hazardous situation which, if not avoided, may result in minor or moderate injury. This is a hazard alert mark.
Contents 1. COMPLIANCE ................................................................................................. 2 2. INTRODUCTION .............................................................................................. 3 3. UNPACKING .................................................................................................... 3 4. CAUTION ......................................................................................................... 4 4-1.
1. COMPLIANCE Compliance with FCC rules Please note that this equipment generates, uses and can radiate radio frequency energy. This equipment has been tested and has been found to comply with the limits of a Class A computing device pursuant to Subpart J of Part 15 of FCC rules. These rules are designed to provide reasonable protection against interference when equipment is operated in a commercial environment.
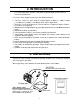
2. INTRODUCTION This manual describes how this scale works and how to get the most out of it in terms of performance. FS-i series check weighing scales have the following features: The FS-i series has three kinds of weight display resolution, 1/3,000, 1/6,000 (~1/7,500) and 1/12,000 (~1/15,000) to cover various applications. There are 2 sizes of weighing pan. The FS-30Ki has a larger pan and the FS-6Ki / FS-15Ki has a smaller pan.
4. CAUTION 4-1. Precautions for Installing the Scale Ground the scale so that the user will not be subjected an electric shock. Do not handle the main power cord with wet hands. The AC plug is not water-resistant. Install it in an area where it does not get wet. Do not install the scale where there is flammable or corrosive gas present. Do not install the scale under water. Do not pull, fold or arrange cables forcibly. Consider following conditions to get the most from your scale.
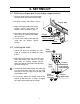
5. SETTING UP 5-1. Attaching a display pod to the display support column 1. Take out whole of the scale from the box taking care not to pull the load cell cable. 2. Remove 2 clamps and 2 M4x12 screws. Display pod 3. Attach the display pod to the display support column and tighten the M4x12 screws removed at step 2. 4. Attach the clamps and tighten them after tilting the display pod where you like to use.
6.
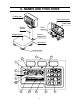
1 WEIGHT DATA DISPLAY. This display shows the weight on the weighing pan. 2 WEIGHING UNIT INDICATOR. This display area shows the weighing unit in use. 3 ANALOG WEIGHT DISPLAY. This scale has a 60 segments analog sweep display representing zero to full scale when the simple weighing mode display is selected. In the limit check weighing display mode, this display shows comparison limits and results. 4 OVER RANGE INDICATORS.
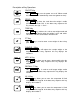
Description of Key Operations ON/OFF Key The ON/OFF key turn the power on or off. When turned on, the scale will be automatically set to zero (power-on zero). ZERO / ± Key The ZERO key zeros the scale when the weight is stable (STABLE annunciator ON). In the data entry sequence this key switches the sign “+” and “-”. TARE Key The TARE key switches the scale to net weight mode and zeros the weight display when the weight is plus and stable. The ZERO and NET annunciators will come ON. PT Key The PT pad.
STORE / 4 Key The STORE key is used to store target weight and/or HI/LO limits. In the data entry sequence this key displays the number 4. DISP. / 3 Key When the DISP. key is pressed the analog weight display steps through the 4 available modes of simple weighing, target weighing, limit check weighing and display off. In the data entry sequence this key displays the number 3. UNITS / 1 Key The UNITS key is used to select the desired weighing unit .
7. BASIC OPERATION 7-1. Turning the power ON and OFF 1. Press the ON/OFF key to turn the power ON. All the display symbols are displayed and the scale waits for the weighing data to become stable. After the weighing value internally becomes stable, the display turns off for a moment and zero is shown with the ZERO annunciator (power-on zero). If the weighing value is unstable, the display will continue to “88888888”. Check if anything touches the weighing pan, or check if there is strong wind or vibration.
Note for the Legal for Trade Models The range for power-on zero is within ±10% of the weighing capacity around the calibrated zero point. The ZERO key will zero the scale if the weight is within ±2% of the weighing capacity around the power-on zero point. The ZERO annunciator turns on. When the weight exceeds ±2% of the weighing capacity, the key does not work. 7-4. Weighing with Preset Tare Using PT key, known tare weight can be entered via the 10-key pad. 1. Remove everything on weighing pan. 2.
7-6. Weight display resolution The FS-i series has three kinds of weight display resolution, NORMAL, HIGH and HIGHER. The following is about “kg” and “lb” display for reference. See the “12. SPECIFICATIONS” in detail. NORMAL: HIGH: HIGHER: 1/3,000 1/6,000 ~ 1/7,500 (depending on capacity) 1/12,000 ~ 1/15,000 (depending on capacity) The factory setting is the NORMAL resolution, but it is possible to change by Function “F2”. Set this function according to the application.
8. CHECK WEIGHING The FS-i series provides for easy check weighing of products. There are two comparison modes according to number of parameters to set, “Target weight setting mode” and ”Upper & lower limits weight setting mode”. The comparator results are indicated by HI (yellow), OK (green) or LO (red) lights on the display. The results are also audible by the buzzer inside the scale. The analog sweep display will help to see where the weight is in the OK range or how far from the OK range. See “19.
Setting the target weight by sample 1. Press the ZERO necessary. key to zero the weight display if 2. Place the sample on the weighing pan. The display shows the sample item’s weight. 3. Press the SAMPLE key. The sample weight flashes and the central part of analog display turns on. Press the ON/OFF key or without anything changed. SAMPLE -000. 000 Ż -003.000 -003.000 key to exit 4. Wait for the STABLE annunciator to come on and press the ENT key to store the sample weight in memory.
3. Press the ENT key to store the HI limit weight in memory. for a few seconds and -5tored 5. Press the LO key. Then, the last LO limit weight entered will flash and the left part of analog display turns on. -000.040 6. Enter the LO limit weight via the 10-key pad. -000.030 4. The display shows 5tored returns to weighing mode. If you hit the wrong key, press the C key and the LO limit weight is re-displayed. Continue data entry again. You cannot enter the “+” or “-” sign for the LO limit. 7.
5. Press the LO key. Then, the last LO % weight entered will flash and the left part of analog display turns on. -0000.60 6. Enter the LO limit weight via the 10-key pad. -0000.50 If you hit the wrong key, press the C key and the LO limit % is re-displayed. Continue data entry again. You can not enter the “+” or “-” sign for the LO limit. 7. Press the ENT key to store the LO limit % in memory. 8. The display shows 5tored returns to weighing mode.
3. Press the ENT key to store the HI limit weight in memory. for a few seconds and -5tored 5. Press the LO key and the last LO limit weight entered will flash. -003.560 4. The display shows 5tored returns to weighing mode. 6. Enter the LO limit weight via the 10-key pad. If you hit the wrong key, press the C key and the LO limit weight is re-displayed. Continue data entry again. You can enter minus value using the key toggles the sign. 7. Press the ENT ± -002.950 key.
Recalling a set of limits from memory 1. Press the RECALL show rd 00 . key. Then the display will 2. Press the memory number, for example 3. If you stop to recall, press the returns to the weighing mode. 3. Press the ENT C key, the scale -frd-00 -frd-03 key to recall the data from the memory. 4. The display shows a set of data for a few seconds one by one and returns to weighing mode. TARGET WEIGHT (Target weight setting mode only) -003.000 HI LIMIT -000.050 LO LIMIT -000.
9. ANALOG SWEEP DISPLAY The FS-i series has a 60 segments analog sweep display. The its display mode. DISP. key switches Simple weighing display Target weighing display Except the UPPER & LOWER LIMIT WEIGHT SETTING MODE (F07-0). Limit check weighing display Analog display OFF It is possible to specify the display mode that will be shown first when the power is switched on. See the Function F16. Use the analog sweep display with positive target and limit weights. 9-1.
9-2. Example of the analog sweep display Simple weighing display mode FS-30Ki / d=0.01 kg TARGET WEIGHT SETTING MODE (F07-1 or F07-2) Target weight Target weight = 15.00 kg. Net weight display (tare entered) -00005.00 NET Ż ZERO Ż FS-30Ki / d=0.01 kg UPPER & LOWER LIMIT WEIGHT SETTING MODE (F07-0) -00015.00 Target weighing display mode FS-30Ki / d=0.01 kg TARGET WEIGHT SETTING MODE (F07-1 or F07-2) Target weight Target weight = 15.00 kg. -00010.
FS-30Ki / d=0.01 kg UPPER & LOWER LIMIT WEIGHT SETTING MODE (F07-0) Target weight = 5.00 kg. Upper limit HI = 10.10 kg, LO = 9.91 kg Below the lower limit -00009.80 Lower limit Within the limits -00010.00 Above the upper limit -00010.20 Outside the range of the analog sweep display FS-30Ki / d=0.01 kg NET Ż TARGET WEIGHT SETTING MODE ZERO Ż (F07-1 or F07-2) Target weight = 5.00 kg. HI = 0.10 kg, LO = 0.09 kg Lower than range Below the lower limit -00000.00 Above the upper limit -00005.
10. CALIBRATION This function adjusts the scale for accurate weighing. Calibrate the scale in the following cases. When the scale is first used. When the scale has bee moved. When the ambient environment has changed. For regular calibration. Calibration (CAL) switch CAL switch cover Loose the lock screws on the rear side of the display pod, and remove the CAL switch cover. Then, there is a calibration switch inside. 10-1. Calibration using a weight 1.
7. To calibrate with the different weight, change the displayed value using the 10-key pad. -00020.00 If you hit the wrong number, press the C key. The value returns to the capacity and enter again. 8. Place the calibration weight on the pan with the same value as displayed, and wait until the STABLE annunciator turns on. 9. Press the ENT key. The scale calibrate SPAN and end will appear. Remove the weight from the pan, and turns the power off.
11. FUNCTIONS The scale has Function settings to expand your applications. The parameters set in the Function settings are maintained even if the power switched off. -f01-01 Function number Parameter 11-1. The procedure for setting parameters 1. Turn the power off. 2. Press and hold the ZERO key and turn the power on via the ON/OFF key. Then the fist function number is displayed. 3. Enter the Function number using the 10-ley pad. 4. Press the appears. ENT key. Then the parameter stored is 3.
11-2.
Function number Item Stability detection f11- 0 width f11- 1 f11- 2 Stability detection f12- 0 time f12- 1 f12- 2 Zero tracking f13- 0 f13- 1 f14- 0 Key operation f14- 1 Description Condition to detect stability Narrow Wide Short Long Zero tracking OFF Zero tracking ON All keys enabled ON/OFF, ZERO, TARE, SAMPLE & PRINT/ENT only enabled.
12. SPECIFICATIONS 12-1. Specifications MODEL Capacity kg Min. display Capacity g Min. display Capacity lb Min. display Capacity oz Min. display Capacity Min. display Repeatability (Std. deviation) Linearity error Span drift lb-oz Display Display update Operating temp. Power supply Weighing pan size Dimension FS-6Ki 6 0.002 * 0.001 0.0005 6000 2* 1 0.5 15 0.005 * 0.002 0.001 240 0.1 * 0.05 0.02 15 0.1 0.001 kg 0.002 kg FS-30Ki 30 0.01 * 0.005 0.002 30000 10 * 5 2 70 0.02 * 0.01 0.005 1120 0.
12-2.
13. GRAVITY ACCELERATION MAP Values of gravity at various locations Amsterdam Athens Auckland NZ Bangkok Birmingham Brussels Buenos Aires Calcutta Cape Town Chicago Copenhagen Cyprus Djakarta Frankfurt Glasgow Havana Helsinki Kuwait Lisbon London (Greenwich) Los Angeles Madrid 9.813 m/s2 9.807 m/s2 9.799 m/s2 9.783 m/s2 9.813 m/s2 9.811 m/s2 9.797 m/s2 9.788 m/s2 9.796 m/s2 9.803 m/s2 9.815 m/s2 9.797 m/s2 9.781 m/s2 9.810 m/s2 9.816 m/s2 9.788 m/s2 9.819 m/s2 9.793 m/s2 9.801 m/s2 9.812 m/s2 9.796 m/s2 9.
World map 30
MEMO 31
MEMO 32