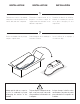
INSTALLATION GUIDE GUIDE D’INSTALLATION GUÍA PARA INSTALACIÓN CLAWFOOT BATHTUB BAIGNOIRE SUR PATTES BAÑERA CON PATA ESTILO GARRA A&E BT-830-SKR Bath & Shower Bain et Douche
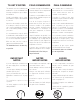
TO GET STARTED POUR COMMENCER PARA COMENZAR This manual covers the installation and maintenance of your new bathtub. Read it through carefully before proceeding to the installation. Ce manuel renseigne sur l’installation et l’entretien du bain. Lire au complet avant de procéder à l’installation. Este manual cubre la instalación y mantenimiento de su nueva bañera. Leerlo minuciosamente antes de continuar con la instalación.
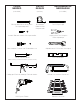
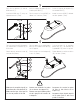
TOOLS NEEDED OUTILS REQUIS HERRAMIENTAS NECESARIAS (not included) (non inclus) (no incluidas) Masonry drill bit | Mèche de maçonnerie Broca para mampostería Measuring tape Ruban à mesurer Cinta para medir Pencil | Crayon | Lápiz Screw bit | Embout de tournevis | Broca para atornillar Longnose pliers | Pince à long bec Pinzas de punta larga Short screwdriver | Tournevis court | Desatornillador corto Adjustable wrench | Clé à molette | Llave inglesa Silicone | Silicone | Silicona Level | Niveau
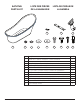
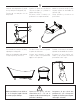
BATHTUB PARTS LIST LISTE DES PIÈCES DE LA BAIGNOIRE LISTA DE PIEZAS DE LA BAÑERA 2 1 5 Item 1 2 3 4 5 6 7 8 9 10 11 12 4 6 7 8 3 9 10 4 11 12 Description Qty/Qté Bathtub shell / Coquille de la baignoire / Concha de la bañera 1 Anchoring bracket / Support d’ancrage / Soporte de anclaje 4 Leg bracket / Support de patte / Soporte de la pata 4 Leg / Patte / Pata 4 M10 Nut / Écrou M10 / Tuerca M10 8 M12 Lock washer / Rondelle frein M12 / Arandela de seguridad M12 4 M10 Flat washer / Rondelle pla
INSTALLATION INSTALLATION INSTALACIÓN 1 Determine the location of the bathtub, taking into account the position for the faucets, drain, and other components. Déterminer l’emplacement de la baignoire en tenant compte de l’emplacement de la robinetterie et des différentes composantes. Determinar la ubicación de la bañera, tomando en consideración la posición de los grifos, el desagüe y los otros componentes. 2 Remove the bathtub from the package and place it upside down.
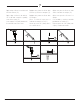
3 Place the leg brackets (3) and the M10 washers (7). Insérer les supports des pattes (3) et les rondelles plates M10 (7). Colocar los soportes de las patas (3) y las arandelas M10 (7). Install with M10 nuts (5) using an adjustable wrench (17mm). Fixer le tout avec les écrous M10 (5) en utilisant la clé a molette (17mm). Instalar las tuercas M10 (5) utilizando una llave ajustable (17mm). 4x 5 7 3 4 Place the legs (4), the M12 flat washers (8), and the M12 lock washers (6) on the brackets.
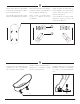
Install the anchoring brackets (2) under the legs using the leveling pads (10). Turn the tub over and place it in its final position. 5 Installer les patins de nivellement (10) sous les pattes en y insérant les supports d’ancrage (2). Instalar los soportes de anclaje (2) bajo las patas usando las almohadillas de nivelación (10). Retourner le bain à l’endroit et le positionner à son emplacement final. Voltear la bañera y colocarla en su posición final.
7 Apply a drop of silicone in each hole and insert the anchors (12). Appliquer une goutte de silicone dans les trous et y insérer les ancrages (12). Aplicar una gota de silicona en cada orificio e introducir los anclajes (12). Apply a drop of silicone in the anchors. Appliquer une goutte de silicone dans les ancrages. Aplicar una gota de silicona a los anclajes. Visser à l’aide de la perceuse et l’embout de tournevis les vis (11). Con un taladro y una broca atornillar parcialmente los tornillos (11).
8 Slide the tub so that the screws installed in the previous step fit inside the gap of the anchoring brackets (2). Glisser le bain pour que les vis installées à l’étape précédente s’insèrent dans la fente des supports d’ancrage (2). Place the tub in its final position. Assure that the anchoring brackets are parallel. Arrêter le bain à sa position finale, lorsque les supports d’ancrage sont parallèles.
MAINTENANCE ENTRETIEN MANTENIMIENTO Daily care Entretien quotidien Cuidado diario Wipe with a soft towel after each use. Use mild dishwashing detergent to keep surfaces bright and clean. Rinse well and dry with a clean cloth. Après chaque utilisation, essuyer avec un chiffon doux. Limpiar con una toalla suave después de cada uso. Utilizar detergente suave para lavar trastes para mantener las superficies limpias y brillantes. Enjuagar bien y secar con un paño limpio.
WARRANTY A&E Shower and Baths Inc. (hereafter “A&E”) offers the following limited warranty on each of its products. This warranty extends only to the original owner/end-user for personal household use. A&E warrants their products to be free from defects in workmanship and materials under normal use and service for a period of one (1) year from the original date of purchase by the owner/end-user.