INSTALLATION GUIDE GUIDE D’INSTALLATION GUÍA PARA INSTALACIÓN ONE PIECE DUAL FLUSH TOILET TOILETTE UNE PIECE A DOUBLE CHASSE INODORO DE DESCARGA DOBLE DE AGUA DE UNA PIEZA
TO GET STARTED POUR COMMENCER PARA COMENZAR Before you begin, read all instructions carefully. Avant de débuter les travaux, lisez attentivement les instructions d’installation. Leer todas las instrucciones cuidadosamente antes de empezar. Consult local building codes to ensure that installation complies with standards in your area. Inspect unit carefully to ensure there is no damage or defects. If such is the case, contact your distributor.
TOOLS NEEDED OUTILS REQUIS HERRAMIENTAS NECESARIAS (not included) (non inclus) (no incluidas) Masonry drill bits | Forets de maçonnerie | Brocas de masonería Screwdriver | Tournevis | Desatornillador flon te Drill bits | Forets | Brocas Pencil | Crayon | Lápiz Drill | Perceuse | Taladro Utility Knife | Couteau à lame rétractable | Navaja multiusos Adjustable Wrench | Clé à Mollette | llave inglesa Wax ring | Anneau de Cire | Anillo de Cera Caulking gun | Pistolet de calfeutrage Pistola de calafa
PARTS LIST LISTE DE PIÈCES LISTA DE PIEZAS 2 11 12 3 5 1 6 7 8 4 9 10 Item 4 Description Qt.
PREPARATION PRÉPARATION This is a 12” rough-in toilet from finished wall to center of the drain. (no less than 12”) Make sure your ground flange (not included) sits on your finished floor and securely attached to your floor. The surface must be cleaned off any remaining wax seal before installing your new toilet. Cette toilette est pour une installation de 12" de mur fini au centre du drain.
INSTALLATION INSTALLATION INSTALACION INSTALACIÓN 1 Attach flexible water supply line (not included) to the fill valve inlet and hand tighten only. Do not attach the supply line to the shut off valve until instructed. 6 Fixez le raccord flexible d’alimentation d’eau (non incluse) à l’entrée de la vanne de remplissage et serrez à la main seulement. Ne raccordez pas le raccord ‘alimentation à la vanne d’ arrêt tant que les instructions ne sont pas indiquées.
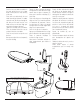
Push the two seat holder assemblies in the holes behind the seat as in figure below. Do not place the metal cover(5) at this step. Place your seat attached with the seat holder assembly on the bowl. The rubber expansion nuts (9) will pass through the two holes on the bowl, and the seat holder will stay on the bowl. Align your seat with the contour of the bowl. Tighten the screws(6) with a screwdriver. Press the buttons behind the seat to unattach it from the seat holder.
3 Lay your toilet to its side on a soft floor to protect the glazed finish from the tile floor. The wax ring must be pressed onto the toilet base with the tapered side facing the toilet before setting it on the ground flange. Posez la toilette sur le côté sur une surface mou tel qu'une serviette ou un carton. L’anneau de cire doit être pressé sur la base de la toilette avec le côté conique orienté vers la toilette avant de la poser sur la bride de base.
4 Lift the toilet by the sides. You may straddle the toilet with your bowed legs to center the weight of the toilet. Lower toilet gently onto T-bolts and set it on the closet flange. Have a helper to guide you because you cannot see the bolts while holding the toilet. When the wax ring touches the ground flange, press down firmly on the toilet to fully seat it on the closet flange. Your wax ring should create a watertight and airtight seal.
5 Place your washers and nuts (not included) over the T-bolts. Tighten the nuts alternately until toilet is firmly seated on the floor. Do not over tighten the nuts. this may cause serious damage to your toilet. Attach your seat back on if you have removed it on step 2. 10 Placez vos rondelles et écrous (non inclus) sur les boulons en T. Serrez les écrous alternativement jusqu’à ce que la toilette soit fermement assise sur le sol. Ne serrez pas trop les écrous.
6 Connect the flexible water supply line to the shut-off valve. Put the tank lid on top of the tank. Flush the toilet a few times to check for leaks. Tighten the coupling nut securely. To ensure both push rods flush the toilet correctly, the bottom of each push rod must be flush with the top surface area of the valve cylinders. If not, adjust the length of each rod by turning the adjustment nut on each push rod. Raccordez le raccord d'alimentation d’eau flexible à la vanne d'arrêt.
7 Install your plastic caps to cover the holes on the two sides of the toilet as shown in the figure below. It is recommended to apply a bead of silicone caulking around your toilet base leaving the back of the toilet uncovered. Installez vos bouchons en plastique pour couvrir les trous sur les deux côtés de la toilette comme indiqué dans la figure ci-dessous. Il est recommandé d'appliquer du silicone autour de votre base de toilette sauf l'arrière de la toilette.
MAINTENANCE ENTRETIEN MANTENIMIENTO Daily care Entretien quotidien Cuidado diario Wipe with a soft towel after each use. Use mild dishwashing detergent to keep surfaces bright and clean. Rinse well and dry with a clean cloth. Après chaque utilisation, essuyez avec un chiffon doux. Limpiar con una toalla suave después de cada uso. Utilizar detergente suave para lavar trastes para mantener las superficies limpias y brillantes. Enjuagar bien y secar con un paño limpio.
WARRANTY GARANTIE GARANTÍA A&E Shower and Baths Inc. (hereafter “A&E”) offers the following limited warranty on each of its products. This warranty extends only to the original owner/end-user for personal household use. A&E warrants their products to be free from defects in workmanship and materials under normal use and service for a period of one (1) year from the original date of purchase by the owner/end-user.