
Installation Guide

A. O. Smith Corporation | P.O. Box 1597
Johnson City, TN 37605-1597 | 877.333.7108
• Conforms to NSF/ANSI Standards 42, 53, 401, and NSF Protocol
P473 for the specific performance claims as verified and
substantiated by test data. See performance data sheet for
individual contaminants and reduction performance.
• Systems certified for cyst reduction may be used on disinfected
waters that may contain filterable cysts.
• Rated capacity: 500 Gallons (1892 Liters).
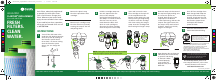
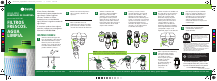
Turn off the cold water valve
under the sink. Release pressure
from the system by turning on
the filtration system faucet.
Once there is no water coming
from the filtration system
faucet, you can change the
filters.
1
Remove the plastic wrap
from the replacement filter
cartridges.
2
Hold the cartridge sump over
the sink. Separate the two
pieces of the sump by
turning the bottom portion of
the sump in a counterclockwise
direction. Pour any excess
water down the drain. Pull
down on each cartridge to
disconnect the filter cartridge
from the top half of the sump.
4
Insert and connect the new
filter cartridge to the top half
of the sump. Reattach the
bottom of the sump to the top
half by turning and tightening
clockwise. Insert the cartridge
with clear netting into Stage 1
sump. Insert the cartridge with
blue netting into Stage 2 sump.
5
Reattach sump to the bottom of
the top housing by making sure
all connection points are
aligned. Push the top of the
sump up into the bottom
of the top housing, and turn the
sump to the right. Ensure that
the sump is fully attached and
locked in. Stage 1 on the left,
Stage 2 on the right.
6
Remove each cartridge sump
from the filtration system by
rotating the sump to the left
and pulling down.
3
Open battery door and remove
old battery. Place new battery
in, positive side facing
to the back. When
inserted properly,
your system will
beep (5 times) and
blink red.
7
Once all filter cartridges have
been changed and sumps are
securely attached to the top
housing, slowly turn the cold
water valve back on. Turn off
the filtration system faucet
and inspect the filtration
system for leaks.
8
Allow the filtered water to run
10 minutes before drinking.
9
For use with municipally treated water only. Do
not use with water that is microbiologically unsafe
or of unknown water quality without adequate
disinfection before or after the system.
NEED HELP? GIVE US A CALL 877.333.7108NEED HELP? GIVE US A CALL 877.333.7108
Fresh filters, obsessively engineered
to provide you with clean water.
Take a few minutes. Change your
filters. Whatever your water need -
enjoy the next round of clean water.
If you need help or have a question,
we’ve got you covered. Give us a call
at 877.333.7108.
INSTRUCTIONS:
AO-US-200-R
CLARYUM
®
REPLACEMENT
for use with AO-US-200
FRESH
FILTERS.
CLEAN
WATER.
2
1
NOTE: If using the undercounter wrench provided
with the original system, follow these steps.
Tested and Certified by NSF International against
NSF/ANSI Standards 42, 53, 401 and conforms to
NSF Protocol P473 in model AO-US-200 for the
reduction of the claims specified on the
Performance Data Sheet and at www.nsf.org.
Do not use tools other than undercounter wrench to remove or tighten sumps. Over tightening can cause damage and result in leaking.
REPLACEMENT
ELEMENT
AO-US-200-R_20180504
2
1
1
3
3
3
1
3
3
1
1
2
3
3
3
1
3
3
2
1
1
3
3
3
1
3
3
1
1
2
3
3
3
1
3
3
2
1
1
3
3
3
1
3
3
1
1
2
3
3
3
1
3
3
2
1
1
3
3
3
1
3
3
1
1
2
3
3
3
1
3
3
2
1
Warranty information can be found at
www.AOSmithatLowes.com
C
M
Y
CM
MY
CY
CMY
K
AO-US-200R_replacement instructions_5-4-18.ai 1 5/4/18 2:03 PMAO-US-200R_replacement instructions_5-4-18.ai 1 5/4/18 2:03 PM