
Operating Guide

20 • Residen al Electric Water Heater Use and Care Guide
Rou ne Maintenance
Rou ne maintenance will help your
water heater last longer and work bet-
ter. If you can’t perform these rou ne
maintenance tasks yourself, contact a
qualifi ed person.
Water Heater Maintenance
A er the fi rst six months, drain and
fl ush the water heater and inspect the
anode rod. Depending on the hardness
of your water, repeat this process at
least annually, or more frequently if
needed. From me to me, you may
need to replace a hea ng element or
a thermostat. All three maintenance
tasks are described below.
Draining and Flushing the
Water Heater
Tap water contains minerals that can
form lime deposits on hea ng ele-
ments or sediment in the bo om of
the tank. The amount of lime deposits
or sediment depends on the hardness
of your tap water. The rate at which
sediment builds up depends on water
quality and hardness in your area,
the temperature se ngs, and other
variables. We recommend draining and
fl ushing the water heater a er the fi rst
six months of opera on to determine
the amount of sediment build up.
Draining sediment extends the life of
the tank, hea ng elements, and drain
valves.
• In areas with very hard water,
remove and check the heating
elements whenever you drain the
tank. If you have heavy lime depos-
its on heating elements, you will
need to replace them more often.
• Sediment may form large masses that
can prevent the tank from draining.
Have a qualified person use a de-lim-
ing agent suitable for potable water
to remove the sediment buildup.
• In most cases, it is easier and
cheaper to replace lime-encrusted
elements than trying to remove
heavy lime deposits.
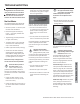
To drain and fl ush the tank:
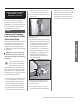
1
Locate the water heater’s
circuit breaker and turn it OFF
(or remove the circuit’s fuses).
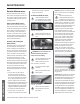
Figure 24 - Circuit Breaker
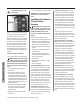
2
Open a hot water faucet and
let the hot water run un l it is
cool.
Figure 25 - Water Faucet
WARNING! Be sure the water runs
cool before draining the tank to
reduce the risk of scalding.
3
Connect a garden hose to the
drain valve and place the
other end of the hose in a
drain, outside, or in buckets.
4
Turn the cold water supply
valve OFF.
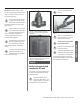
5
Open the drain valve on the
water heater.
Figure 26 - Drain Valve
6
Open a hot water faucet to
help the water in the tank
drain faster.
NOTICE: DO NOT turn electrical power
back on unless the tank is completely
full of water.
7
Remove and inspect the
anode rod (see Repair Parts
Illustra on on back cover for
loca on of the anode rod). Replace the
anode rod if it is depleted. Turn power
off . Run hot water un l it’s cool. Turn
cold water supply valve off . Open a hot
water faucet to depressurize tank.
Locate and remove the black plas c
cover marked “Anode” Use a “key
hole” saw or similar tool to remove the
foam insula on covering the anode
rod. Once the anode rod is exposed,
use a 1 1/16” socket wrench with an
extension to remove it. Inspect the
anode rod and replace if depleted.
Apply Tefl on® tape or pipe joint
compound and reinstall the anode rod
ghtly. It is not necessary to replace
the foam removed to access the
anode. Turn cold water supply valve
on. When hot water runs full, close hot
water faucet. Check for leaks and
repair if necessary. Turn power on.
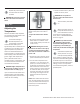
Figure 27 - Anode Rods from new (top) to
partially depleted (middle) to fully depleted
stage (bottom)
Anode Rod. The anode rod is a sacrifi cial
metal rod that helps reduce corrosion
and premature failure (leaks) in the tank.
The anode rod is a consumable item.
Inspect the anode rod a er the fi rst six
months of opera on when you drain and
fl ush the tank. Replace the anode rod if
it is substan ally worn out or depleted.
Therea er, inspect the anode rod annu-
ally or more frequently if needed. If you
use a water so ener, your anode rod will
deplete faster than normal. Inspect
MAINTENANCE
MAINTENANCE