
User Manual

Installation and Maintenance of
A.R.I.’s D-050 Combination Air Valves
A. Installation
A.1 The air valve will be mounted on a riser,
connected to the top of the pipe.
A.2 An isolating valve will be installed below the air
valve.
B. Basic, Periodic, Maintenance
B.1 Shut the isolating valve below the air valve.
B.2 Unscrew the body of the plastic air valve (1).
B.3 Remove the Clamping Stem (3) and the float (4),
and wash the inside of the body, the Clamping
Stem, the float, and the Rolling Seal (2), with
clean water.
B.4 Check to make sure the Rolling Seal is
unharmed (not torn or cracked) and is attached
precisely in the middle of its groove in the float.
B.5 Unscrew the bolts (11) that connect the main
valve cover (7) to its body (13).
B.6 Wash the body and the cover in clean water in
order to remove coarse grime or accumulated
scale. Wash the nozzle seal and the float too.
B.7 Reinstall in reverse order and fasten and tighten
all bolts. Make sure to re-assemble the upper air
valve correctly:
First, insert half the length of the rolling seal tail
into its groove in the body (1), and then, push the
rest of the way, to the end of the groove, using
the Clamping Stem (3). Make sure the Rolling
Seal is set in place.
B.8 Open the isolating valve beneath the air valve.
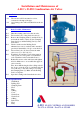
Parts Specification
1. S-050 Body
2. Rolling Seal
3. Clamping Stem
4. Float
5. Base
6. O-Ring
7. Cover
8. Nozzle Seat
9. Nozzle Seal
10. O-Ring
11. Bolt & Nut
12. Float
FLOW CONTROL ACCESSORIES
Tel. 972-4- 6761980 Fax.972-4- 6763402
A.R.I.
13. Body