6-HEAD LED DECORATIVE TRACK LIGHT MODEL #19808-000 ATTACH YOUR RECEIPT HERE Serial Number Purchase Date 1
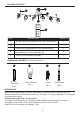
PACKAGE CONTENTS A D B 1 C 3 2 4 5 6 PART ON OFF + - 1 2 3 4 5 6 Recall Save E DESCRIPTION QUANTITY A Mounting Bracket (preassembled to Fixture Assembly (B)) 1 B Fixture Assembly 1 C Canopy Nut (preassembled to Fixture Assembly (B)) 2 D Ceiling Support Stem Bushing (preassembled to Fixture Assembly (B)) 2 E Remote (CR2025 battery included) 1 HARDWARE CONTENTS (not shown actual size) AA Junction Box Screw Qty. 2 CC BB Wire Connector Qty.
SAFETY INFORMATION Please read and understand the entire manual before attempting to assemble, operate or install the product. WARNING • Before assembling the lighting fixture, refer to the caution titled ELECTRICAL CONNECTIONS. If you feel you do not have enough electrical wiring experience, refer to a • do-it-yourself wiring handbook or have the fixture installed by a qualified, licensed electrician.
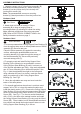
ASSEMBLY INSTRUCTIONS 1. Unscrew canopy nuts (C) from fixture assembly (B) and detach mounting bracket (A). Attach mounting bracket (A) to the junction box (not included) with junction box screws (AA). Note: The preassembled screws on mounting bracket (A) should protrude out from the junction box. Hardware Used EAA Junction Box Screw x2 1 A AA 2 2. Attach hook on inside of canopy of fixture assembly (B) to loop on hanging strap of mounting bracket (A), allowing for hands-free wiring.
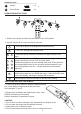
Hardware Used CC Anchor x2 DD Wood Screw x2 4 OPERATION INSTRUCTIONS 1 2 3 ON OFF + - 1 2 3 4 5 6 Recall Save 4 5 E 6 1. Switch on the power and leave the wall switch in the “ON” position. 2. Use the remote (E) to control the fixture functions. -- Turn 'ON' all lamps to full brightness at the same time. ON -- Turn 'OFF' all lamps at the same time. OFF + - 1 2 3 4 5 6 SAVE Recall -- Press and hold to increase or decrease the light intensity for all lamps.
CARE AND MAINTENANCE • Clean this unit periodically. Clean the surface finish only a mild cleanser, dry with a soft cloth. • Never use rough cloth, abrasives or chemical cleaners containing acids or harsh solvents. • TROUBLESHOOTING PROBLEM Light will not turn on. POSSIBLE CAUSE 1. Power is off. 2. Bad main supply wiring. 3. Defective switch. CORRECTIVE ACTION 1. Make sure power supply is on. 2. Consult a certified professional electrician. 3. Consult a certified professional electrician. 4.