
Instructions / Assembly


E
ASSEMBLY INSTRUCTIONS
AA
x 2
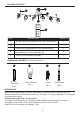
Hardware Used
1. Unscrew canopy nuts (C) from fixture assembly (B)
and detach mounting bracket (A). Attach mounting
bracket (A) to the junction box (not included) with
junction box screws (AA).
Note: The preassembled screws on mounting
bracket (A) should protrude out from the junction box.
Junction
Box Screw
Wire Connector
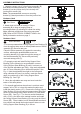
BB
x 3
Hardware Used
2. Attach hook on inside of canopy of fixture
assembly (B) to loop on hanging strap of
mounting bracket (A), allowing for hands-free wiring.
Make electrical connections using wire connectors
(BB). Refer to ELECTRICAL CONNECTIONS in the
Safety Information section on page 3.
1
2
3
2
3
34
35
AA
A
A
A
B
B
C
BB
6
DD
CC
B
B
D
D
D
D
B
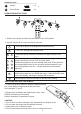
6. For drywall applications where there is no direct wood
support, drill a 7/32 in. hole at this marked location and
install the plastic anchor (CC). Remove the Ceiling Support
Stem Bushing (D) from the knurled support stem fitting and
secure to the ceiling using Plastic Anchor (CC) with Wood
Screw (DD). See Fig. 6. For direct-to-wood installations
drill a 1/16 in. pilot hole at the marked location and install
the Ceiling Support Stem Bushing (D) using only the Wood
Screw (DD). Once installed, move the adjustable arm back
into position and thread the knurled support stem nut onto
Ceiling Support Stem Bushing (D) to secure.
4.To properly mark and install Ceiling Support Stem
Bushing (D) the following is recommended: unscrew
Ceiling Support Stem Bushing (D) until it is almost out
of the knurled adjustable arm fitting. Align each adjustable
arm of Fixture Assembly (B) to the desired position. See
Fig. 4. Hold the adjustable arm tight to the ceiling and
using a Number #2 pencil (or similar), mark the outside
edge (circumference) of the Ceiling Support Stem
Bushing (D). See Fig.5
5. Move the adjustable arm away and now locate the
center of this hole pattern.
3. Unscrew preassembled Ceiling Support Stem Bushing (D)
from the support stem nuts on the adjustable arms of fixture
assembly (B). Save for later use.
Place the fixture assembly (B) against the mounting
surface, allowing the preassembled screws on
mounting bracket (A) to pass through the canopy of
the fixture assembly (B). Secure with previously
removed canopy nuts (C).
4
D