
Instructions / Assembly


4
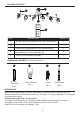
Anchor
CC
x 2
Hardware Used
Wood Screw
DD
x 2
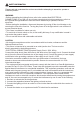
OPERATION INSTRUCTIONS
ON
-- Turn 'ON' all lamps to full brightness at the same time.
-- Turn 'OFF' all lamps at the same time.
-- Press and hold to increase or decrease the light intensity for all
lamps.
-- Press 1 - 6 once to turn 'ON' the single corresponding track head
- press a second time to turn 'OFF' the track head.
To adjust the brightness of any individual track head: Press and hold
the corresponding button for two seconds; the track head will cycle
from full brightness to low dim - release the button at the desired
brightness.
Once you have set the individual track heads to the desired 'ON' / 'OFF'
and dimming range you may SAVE this setup: Press the SAVE button
to store this setting - subsequent settings will be erased.
OFF
+
-
1 2
3
4
5 6
Recall
SAVE
Press RECALL to turn on the fixture to the last SAVE setting.
1
2
3
4
5
6
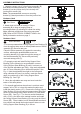
REPLACING BATTERY FOR REMOTE
C
R
2
0
2
5
H
L
3
V
L
I
T
H
I
U
M
B
A
T
T
E
R
Y
+
+
CR2025
FRONT “+”
①
①
②
②
1. Push the lock tab towards the battery compartment and
pull out the battery compartment at the same time.
See illustration ① and ②.
2. Remove the old battery and replace with a new 3 Volt
CR2025 cell battery (not included).
Restore the battery compartment in place.
CAUTION:
1. Do not short circuited, recharge, heat, disassemble nor dispose in fire.
2. Do not make the anode and the cathode reversed.
3. Keep battery out of children’s reach.
4. Do not store batteries near an oven, stove, or other heat source.
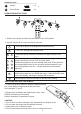
E
1 2
3
4
5 6
SaveRecall
OFFON
+
-
1. Switch on the power and leave the wall switch in the “ON” position.
2. Use the remote (E) to control the fixture functions.
5