® Add iPod Capability to Your Factory Radio Owner’s Manual PXDP SoundByte iSimple Solutions®, A division of AAMP of America™ 13160 56th Court Clearwater, Florida 33760 Ph. 866-788-4237 support@isimplesolutions.com ©2009 AAMP of Florida, Inc.
Table of Contents Pages CHAPTER 1-Getting Started 1.1 Introduction 1.2 Precautions 1.3 Configuration & Harnesses 1.4 Programming the PXDP 4 4 5 6 CHAPTER 2-General Installation 2.1 Installation Location 2.2 Pre-Installation Checklist 2.3 Wiring Connections 2.4 Installation at Changer Location 2.5 Installation at Radio 7 8 8 10 11 CHAPTER 3 -Operation 3.1 Operation 3.2 Troubleshooting 3.3 Warranty 3.4 Warning 3.
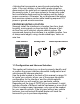
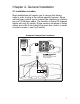
PXDP Connections Factory Radio (not included) Vehicle Specific Harness ( actual harness may vary) PXDP Interface iPod Input
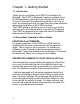
Chapter 1- Getting Started 1.1 Introduction Thank you for purchasing the PXDP iPod Interface, by iSimple®. The PXDP is designed to provide endless hours of listening pleasure through most vehicles’ factory radios. To ensure that your iPod performs correctly in your car or truck, we recommend that you read this entire manual before attempting installation of the PXDP interface. The PXDP interface will allow you to connect your iPod to a factory radio that has the ability to control a CD changer.
•Vehicles that incorporate a security-code protecting the radio. If the car’s battery or the radio’s power plugs are disconnected, the radio will not operate without re-entering the security-code. If you have access to the security-code, feel comfortable disconnecting the battery and the radio’s power connectors. Otherwise, do not disconnect the battery and exercise extreme caution while handling exposed 12V power or ground wires/connectors.
As you consult the application guide, please take a moment to review our IMPORTANT COMPATIBILITY NOTES listed with each of the vehicle manfactuers. These notes will inform you of any issues or circumstances that can affect the compatibility of our product with your factory audio system and accessories. Some situations result in the loss of use of some factory audio players. Please read and understand these notes before proceeding with the installation. 1.
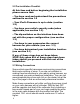
Chapter 2- General Installation 2.1 Installation Location Most installations will require you to remove the factory radio in order to plug in the vehicle specific harness. Some vehicles may require you to connect the interface to a factory pre-run CD changer cable. The location of these CD changer cables will vary by vehicle. Some common locations of these cables are in the trunk, behind the glove box, and in or under a center console. ( see Fig.
2.2 Pre-Installation Checklist At this time and before beginning the installation please ensure that: • You have read and understand the precautions outlined in section 1.2 • Your iPod’s Firmware is up to date. (section 1.2) • You have your radio’s security code.(when applicable, see section 1.2) • The dip-switches on the interface have been set with the proper configuration. (see section 1.3) • You have in your possession the correct harness for your vehicle. (see sec. 1.
Once you’ve identified the constant 12V+ circuit, strip back about 1/8” of the insulation. Now take the positive test lead and insert it into the wire stranding so that you can now probe for a suitable ground location in the dash cavity using the negative test lead. Bare chassis metal is the recommended ground spot. The voltmeter will read a constant 12 volts or higher when you have found a good ground point.
2.4 Installation at the CD Changer Location In this section you will learn how to install the PXDP in the factory CD changer location. If your vehicle is equipped with a factory CD changer you will need to disconnect it from the factory pre-run harness in order to connect the PXDP interface. If your vehicle is not equipped with a factory CD changer, you will need to locate the factory pre-run harness. This may involve the removal of the; center console, glove box, or carpeted side panels in the trunk.
4. Decide on a convenient location to mount your iPod. 5. Run the docking cable from the interface to the desired mounting location. Use caution to not cut, pinch, or crimp the cable during this step. Avoid moving parts, vehicle wiring harnesses and areas of excessive heat when routing the cable. 6. Secure the interface in the vehicle using; double sided tape, Velcro or wire ties. Make sure to check for proper clearance and avoid moving parts.
4. Now that the interface is connected to the radio, you will need to test the operation of the interface before permanently running the black iPod docking cable or reassembling the dash. First, connect the black iPod cable to the iPod. The iPod should indicate that it is being charged. Turn on the factory radio and press the button that would activate the factory CD changer to select the iPod.
Chapter 3- Operation 3.1 Operation SELECTING THE IPOD To select the iPod from the radio, press the button that would normally activate the factory CD changer. This button varies by vehicle manufacturers. In some applications the PXDP is accessed like an XM reciever, In these cases you will press the appropriate activation button. Some radio models require pressing the “Seek >” button once, after pressing the CD button. Yet, it may also be necessary to press Play on the iPod itself to begin playback.
RADIO DISPLAY DURING IPOD OPERTION Some factory radio’s may show DISC and TRACK numbers on the display of the radio. The PXDP interface does not send any information from the iPod to the radio. This means that the DISC and TRACK numbers shown on the display will not and can not reflect the song number on the iPod due to the complex nature of the music library. Some factory radio’s may flash zero’s on the display of the radio, or toggle back and forth between 1:00 and 2:00.
3.2 Troubleshooting Symptom Cause Remedy No Power Blown fuse in vehicle fuse block. Replace fuse with same amp rating. If the fuse blows again, call tech support. No Power Bad connection. Check cable and wiring connection. Alternator noise is heard (Changes with Engine RPM) Improper wiring creates a ground loop. Install a Ground loop isolator or seek professional service from a local car audio shop. You can hear music from the iPod but you cant control it from the radio.
3.3 Warranty One Year Limited Warranty The quality controls used in the manufacture of this product This warranty covers any supplied or manufactured parts of this product that, upon inspection by iSimple authorized personnel, is found to have failed in normal use due to defects in material or workmanship. This warranty does not apply to installation expenses. Attempting to service or modify this unit, operating this unit under conditions other than the recommended voltage will render this WARRANTY VOID.
3.5 FCC Class B Radio Frequency Interference Statement This equipment has been tested and found to comply with the limits for a Class B digital device, pursuant to Part 15 of FCC rules. These limits are designed to provide reasonable protection against harmful interference in a residential installation. This equipment generates, uses, and can radiate radio frequency energy and, if not installed and used in accordance with the instructions, may cause harmful interference to radio communications.
Dipswitch Settings & Harness Applications Make Acura Model CL CL Integra Integra Legend RL RL RSX TL TL Vigor All Models MDX SLX NSX Year 1998-2000 1996-1997 1998-2001 1992-1997 1992-1995 1998-2002 1996-1997 2002 1999-2002 1996-1997 1992-1994 2003-2007 All Years All Years All Years Part # PXDP PXDP PXDP PXDP PXDP PXDP PXDP PXDP PXDP PXDP PXDP Not Compatible Not Compatible Not Compatible Not Compatible Harness PXHHD1 PXHCH2 PXHHD1 PXHCH2 PXHCH2 PXHHD1 PXHCH2 PXHHD1 PXHHD1 PXHCH2 PXHCH2 Dip Switch Se
Make Buick Model Century Le Sabre Park Ave Rainier Regal Rendezvous Riviera Roadmaster Allure LaCrosse Year 1997-2003 1999-2002 1995-2005 2005 1995-2003 2003-2005 1996-1999 1995-1996 2005 2005 Part # PXDP PXDP PXDP PXDP PXDP PXDP PXDP PXDP Not Compatible Not Compatible Harness PXHGM1 & GMH32T PXHGM3 PXHGM1 & GMH32T PXHGM3 PXHGM1 & GMH32T PXHGM3 PXHGM1 & GMH32T PXHGM1 & GMH32T Dip Switch Settings* 3,8 ON 1,3,8 ON 3,8 ON 1,3,8 ON 3,8 ON 1,3,8 ON 3,8 ON 3,8 ON Vehicle Specific Notes Must use GMH32T "T"-h
Make Chevrolet Model Monte Carlo Silverado Silverado Suburban Suburban Tahoe Tahoe Trailblazer Venture Venture Year 2000-2005 1996-2002 2003-2006 1995-2002 2003-2006 1995-2002 2003-2006 2002-2007 1997-1999 2004-2005 Part # PXDP PXDP PXDP PXDP PXDP PXDP PXDP PXDP PXDP PXDP Harness Dip Switch Settings* PXHGM3 3,8 ON PXHGM1 3,8 ON PXHGM3 1,3,8 ON PXHGM1 3,8 ON PXHGM3 1,3,8 ON PXHGM1 3,8 ON PXHGM3 1,3,8 ON PXHGM3 1,3,8 ON or 2,3,8 ON PXHGM1 3,8 ON PXHGM3 1,3,8 ON or 2,3,8 ON IMPORTANT CHEVROLET APPLICAT
Make Ford Model Crown Victoria Crown Victoria Crown Victoria Escape Econoline Econoline Escort Excursion Expedition Expedition Explorer Explorer Explorer Freestar F-series Pick Up F-series Pick Up Focus Mustang Ranger Ranger Sport Trac Taurus Thunderbird Windstar Year 1998-2003 1995-1997 1995-1997 2001-2004 1998-2004 1997 1997-2004 2000-2004 1999-2002 1997-1998 1998-2004 1995-1997 1995-1997 2004 1998-2003 1995-1997 2000-2003 2001-2003 1998-2004 1995-1997 2000-2004 1996-2005 2000-2004 1999-2004 Part # PXD
Make Honda Model Accord Accord Civic Civic CRV CRV Del Sol Element Insight Odyssey Odyssey Passport Prelude Prelude S2000 All Models Accord Pilot Ridgeline S2000 Year 1998-2002 1992-1997 1998-2004 1992-1997 1998-2004 1997 1993-1997 2002 2001-2004 1995-1997 1998-2004 1998-2002 1998-2001 1992-1997 2000-2003 2005-2007 2003-2004 All Years All Years 2004 Part # PXDP PXDP PXDP PXDP PXDP PXDP PXDP PXDP PXDP PXDP PXDP PXDP PXDP PXDP PXDP Not Compatible Not Compatible Not Compatible Not Compatible Not Compati
Make Jeep Model All Models All Models All Models Year 2002-2005 1999*-2001 1995-1999* Part # PXDP PXDP PXDP Harness Dip Switch Settings* Vehicle Specific Notes Must be non-CANBUS, if radio is an REF,REC,RAQ, RAK series, vehicles are not compatible PXHCH3 4,8 ON PXHCH2 4,8 ON *1999 Radios with rounded corners use PXHCH2 PXHCH1 1,4,8 ON *1999 Radios with square corners use PXHCH1 IMPORTANT JEEP APPLICATION INFORMATION PXDP: Not compatible with any factory external audio source such as: XM tuner, CD chang
Make Oldsmobile Model Achieva Alero Alero Aurora Aurora Bravada Bravada Cutlass Cutlass Supreme Eighty-Eight Intrigue LSS Regency Silhouette Silhouette Year 1996-1998 2003-2004 1999-2000 2001-2004 1995-1999 2004 1997-2001 1997-1999 1995-1997 1996-1999 1998-2001 1996-1999 1997-1998 2004 1996-1999 Part # PXDP PXDP PXDP PXDP PXDP PXDP PXDP PXDP PXDP PXDP PXDP PXDP PXDP PXDP PXDP Harness Dip Switch Settings* PXHGM3 1,3,8 ON PXHGM3 2,3,8 ON PXHGM2 3,8 ON PXHGM2 3,8 ON PXHGM2 3,8 ON PXHGM3 1,3,8 ON or 2,3
Make Saturn Model All Models Year 1995-1999 Part # PXDP Harness Dip Switch Settings* PXHGM1 3,8 ON IMPORTANT SATURN APPLICATION INFORMATION Vehicle Specific Notes PXDP: Not compatible with any factory external audio source such as: XM tuner, CD changer, or Cassette player. These devices must be disconnected during the installation and will no longer function.
Make Toyota Model Sienna Solara Solara Supra T100 Tacoma Tacoma Tercel Tundra Prius Highlander Year 2006-2007 1999-2005 2006-2007 1998 1998 1998-2005 2006-2007 1998 2000-2007 All Years 2008 Part # PXDP PXDP PXDP PXDP PXDP PXDP PXDP PXDP PXDP Not Compatible Not Compatible Harness PXHTY3 or PXH2TY1 PXHTY3 PXHTY3 or PXH2TY1 PXHTY3 PXHTY3 PXHTY3 PXHTY3 or PXH2TY1 PXHTY3 PXHTY3 Dip Switch Settings* 1,2,4,8 ON 1,2,4,8 ON 1,2,4,8 ON 1,2,4,8 ON 1,2,4,8 ON 1,2,4,8 ON 1,2,4,8 ON 1,2,4,8 ON 1,2,4,8 ON Vehicl
Notes ____________________________________________________ _ ____________________________________________________ _ ____________________________________________________ _ ____________________________________________________ _ ____________________________________________________ _ ____________________________________________________ _ ____________________________________________________ _ ____________________________________________________ _ ____________________________________________________ _ ___________
www.isimplesolutions.com iSimple Solutions®, a division of AAMP of America™ 13160 56th Court Clearwater, Florida 33760 Ph. 866-788-4237 support@isimplesolutions.com ©2009 AAMP of Florida, Inc. For Best Performance Have It Professionally Installed.
6 09098 79572 Made in CHINA 2