Configuration Manual Cordless Phones DT69X/DT390 23/1531-ANF 901 43 C1 2013-01-04
Configuration Manual Cordless Phones DT69X/DT390 Copyright © Copyright Aastra Technologies Limited, 2013. All rights reserved. Disclaimer No part of this material may be reproduced in any form without the written permission of the copyright owner. The contents of this document are subject to revision without notice due to continued progress in methodology, design and manufacturing. Aastra shall have no liability for any error or damage of any kind resulting from the use of this document.
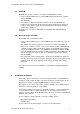
Configuration Manual Cordless Phones DT69X/DT390 1 Introduction This document is a guide for installing, configuring and maintaining functionality of the DT690, DT692 and DT390 cordless phones. The DT69X/DT390 can be used straight away in your system but it is highly recommended to install the Windows Portable Device Manager (WinPDM) or the Centralized Portable Device Manager (CPDM3).
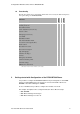
Configuration Manual Cordless Phones DT69X/DT390 1.2 Functionality DT692 Functions DT690 DT390 The following matrix shows which functionalities that can be used by the different telephones and require settings via WinPDM/CPDM3. Company phonebook x x x Central phonebook - x x Personalized menus x x x Audio adjustment (side tone etc.) x x x Custom sounds - x x Messaging (text size etc.
Configuration Manual Cordless Phones DT69X/DT390 2.1 WinPDM WinPDM runs on a PC. The phone is configured via WinPDM as follows: • Connect a Desk PDM charger or a Rack PDM Charger via USB to the computer running WinPDM. • Start WinPDM. • Place the phone in this charger which shall be connected to WinPDM. The telephone can either be turned off or turned on when placing it in the charger. A telephone that is turned off will start up automatically and the battery charging symbol will be displayed.
Configuration Manual Cordless Phones DT69X/DT390 It is recommended to use the CPDM3 to install and maintain phones in a large system. The reason is that it enables to install, upgrade and configure a large amount of phones simultaneously. Another benefit is that the collection of the phones from the user is not needed. They can be maintained while placed in network connected Desk PDM Chargers on the users desks. Network connected Rack PDM Chargers can also be used, or over the air in the case of IP-DECT.
Configuration Manual Cordless Phones DT69X/DT390 • • • • 3.3.1 Creating DECT extensions (including authorization codes and the IPEI codes of the handsets) in the PBX. Subscribing the handsets to the PBX, using the authorization codes and, if applicable, the PARK code.
Configuration Manual Cordless Phones DT69X/DT390 4 Place the handset in a desktop or rack charger connected to CPDM3 over the LAN. The Found new hardware wizard is opened. 5 In the wizard, select “Do nothing” and click OK. 6 Open the “Device” tab and verify that the handset is online. 7 Open the “Numbers” tab 8 In the list, select the number to associate with the handset. 9 On the Number menu, select “Associate with device...”. 10 Select the handset and click OK. 11 Configure the handset.
Configuration Manual Cordless Phones DT69X/DT390 3.4 6 Open the “Device” tab and verify that the handset is online. 7 Create a set of numbers, see “ Create New Numbers”, in Installation and Operation Manual, CPDM3. 8 Associate the numbers with the handsets according to “Associate Numbers with a device” in Installation and Operation Manual, CPDM3 9 Configure the handsets. For information on how to configure handsets, see “Phone Configuration” on page 15.
Configuration Manual Cordless Phones DT69X/DT390 8 Right-click the handset and select “Assign number”. (Assigning a number to a handset is a one-step procedure for both creating a number in CPDM3 and associating a handset to this number). 9 In the “Assign number to device” dialog box, enter the directory number of the DECT extension created in step 1. The function “Easy registration” as described in Chapter 3.4.5 uses this number.
Configuration Manual Cordless Phones DT69X/DT390 7 Create a new number in CPDM3 (it is highly recommended to use the same number as the created IP extension). For more information, see “Create New Numbers” on page 55. 8 In the list of available numbers, select the created number. 9 On the Number menu, select “Associate with device...”. 10 Select the handset and click OK. 11 Configure the handset. For information on how to configure handsets, see “Phone Configuration” on page 15. 3.4.
Configuration Manual Cordless Phones DT69X/DT390 1 If needed, switch off the handset by pressing the On-Hook key. 2 Switch on the handset by pressing On-hook key. 3 Select language to be used by or press “Cancelf Cancel is pressed, the default language (English) will be used. If Cancer n the File menu, select Import > Packages. 4 The handset starts to search for IP-DECT systems and will subscribe to the system when it is found.
Configuration Manual Cordless Phones DT69X/DT390 The software download capacity depends on call traffic stated below. The table below is not applicable for DC4 charger connected to WinPDM since IPBS or CPDM3 is not needed. Table 1. Download times during calls IPBS 0-4 simultaneous downloads depending on call traffic as follows: No. of calls No. of possible simultaneous downloads 0 4 1 3 2 2 3 1 4> 0 Device Man- Max. 10 simultaneous downloads (max. 20 when using an external web server). ager 4.
Configuration Manual Cordless Phones DT69X/DT390 • • 4.5 If the electrical connection is damaged, it might not be possible to follow the Easy Replacement procedure. Depending on fault, it might work to do a replacement via WinPDM/CPDM, see 4.5 Replacement of phone with the Device Manage (CPDM3) on page 12 or 4.6 Replacement of the phone with WinPDM on page 13. If two phones and their settings shall be switched between two users, follow 4.
Configuration Manual Cordless Phones DT69X/DT390 Note: The User ID can be viewed in the phone by navigating to the menu Admin menu > Device info > User ID 3 Insert the phone into a desktop charger or rack charger connected to Device Manager (not needed if an over the air connection is used). Navigate to the Numbers tab in CPDM3 Device Manager. The new phone now has the same User ID as the old phone.
Configuration Manual Cordless Phones DT69X/DT390 4.6.1 3 Phone replacement with Win-PDM, Scenario 1 Unsubscribe the old telephone (integrated DECT). If the unsubcribtion cannot be performed in the phone, unsubscibe it via the IP-DECT interface. See corresponding IP- DECT documentation.Subscribe the new phone with the same extension number as the old phone. During the subscription procedure WinPDM identity (User ID) will automatically be set to be the same as the extension number.
Configuration Manual Cordless Phones DT69X/DT390 1 Enter the Admin Menu, see 6 Administration on page 25. 2 Select “Frequency band” and select the desired band. • • • • • EU US China (default) LA (Latin America) Brazil 1900-1920 MHz Multifrequency 3 Restart the telephone. 4 Register the telephone. 5 The frequency band option will no longer be available. Note: The selection is persistent and will stand a factory reset. 4.7.
Configuration Manual Cordless Phones DT69X/DT390 template, the same configuration can easily be applied to many phones simultaneously. Templates are also an efficient way to get good control over which changes that are applied to each phone. Templates enables configuration of all aspects of a phone from sound volume to keypad shortcuts. Your supplier can provide example templates for different PBX:s. The phone will have full functionality towards the PBX even without such a template.
Configuration Manual Cordless Phones DT69X/DT390 2 Open WinPDM or the Device Manager in the CPDM3. 3 Open the Numbers tab and select the phone you want to save as a template. 4 Make a right-click and select “Use as a template...”. Enter a descriptive name for the template. 5 The Edit template window is opened. By default, all parameters are selected and are saved when clicking on “OK”. If one or more parameters should be excluded, remove them by clearing the checkbox next to the parameter. 6 5.1.
Configuration Manual Cordless Phones DT69X/DT390 The parameter can be set specifically for each PBX subscription on the phone and is accessed from Systems > System x > PBX Settings > Numbers. "System x" is replaced with the subscription (System A - System H) that is configured. 5.5 Company Phonebook It is possible to create a phonebook that is administered centrally and uploaded to the phone from WinPDM/CPDM3. If this feature is used, entries from Contacts and Company Phonebook are merged.
Configuration Manual Cordless Phones DT69X/DT390 5.6.1 Create a Local Phonebook File The contact file is created by using an Excel file provided by your supplier. 5.6.2 Upload a Local Phonebook File Note: When uploading a local phonebook file, local phonebook entries (if any) in the telephone will be replaced by the entries in the file. 5.7 1 In WinPDM or the Device Manager in the CPDM3, go to the Numbers tab and select telephone(s). 2 In the Number menu, select Import contacts > From file.
Configuration Manual Cordless Phones DT69X/DT390 5.8 Call Diversion It is possible to configure user friendly call diversion menus in the telephone using PDM/CPDM3. These menus can then be selected in the telephone by selecting Calls > Call services > Divert calls. It is for example possible to divert calls to another number configured in the PBX when receiving a call. Beside the default call diversion menus, it is possible to define 10 extra system specific services codes, see 5.6 Call Services.
Configuration Manual Cordless Phones DT69X/DT390 5.10 In Call Menu In Call Menu is a configurable menu in the phone.
Configuration Manual Cordless Phones DT69X/DT390 In order for this feature to work, numbers must be stored in the phonebook in international format with a "+" sign for the international access code. Also, the Own Line parameters must be configured with WinPDM/CPDM3. For instructions on how to work with WinPDM/CPDM3, see Installation and Operation Manual, WinPDM or Installation and Operation Manual, CPDM3. 5.13 Uploadable language It is possible to upload one additional language to the phone.
Configuration Manual Cordless Phones DT69X/DT390 A missed call is by default indicated by a Missed call window. It is possible to hide this window and is recommended if a user has, for example, both a handset and a mobile. Example: If configured in the PBX, an incoming call to the handset can either be answered using the handset or mobile. If the user answers the call using the mobile, the Missed call window will not be displayed in the handset. 1 Select Settings > Answering.
Configuration Manual Cordless Phones DT69X/DT390 5.17 Set action when phone is placed in charger The phone can be configured to perform an action when it is placed in a charger. The selected action is only performed when no call is established. When the phone is removed from the charger, it returns to previous settings. 1 Select Connections > In Charger.
Configuration Manual Cordless Phones DT69X/DT390 5.18 Clear lists when inserted in charger Note: this feature is applicable for DT692 only. The phone can be configured to clear lists when placed in a charger. The following lists will then be cleared: • • • • • Inbox Unsent Sent Call list Missed calls Note: Both call lists and message lists will be cleared.
Configuration Manual Cordless Phones DT69X/DT390 An approximate location of the telephone is possible to sent along with an alarm. The telephone evaluates the field strength ratio of the individual radio Base Stations and sends the best-rated Base Station ID to indicate an approximate location of the telephone. In addition, a system can also request the Base Station ID regardless if an alarm is sent or not. See 5.22 Poll Location. 1 Select "Location".
Configuration Manual Cordless Phones DT69X/DT390 5.24.1 Push Button Alarm It is possible to configure how alarms shall be handled in a system.
Configuration Manual Cordless Phones DT69X/DT390 5.25.3 Create Customized Ring Signals Note: This feature is applicable for DT690 and DT692 only. It is possible to create custom sounds that can be used as ring signals. The ring signals must first be created before them can be selectable in 5.25.2 Set Ring Signal. Note: Custom sounds can also be used as message alerts. It is recommended to not use same sounds as ring signals and message alerts in order to distinguish them from each other.
Configuration Manual Cordless Phones DT69X/DT390 • • Text size Size of the message text when viewing and writing messages. Message List representation Can be set to text or number.
Configuration Manual Cordless Phones DT69X/DT390 5.26.1 Configure Message Alerts with Beep Codes The telephone can map beep codes sent from a system/an application to different message alerts as follows: Beep code sent from system/application DT690 plays DT692 plays Beep code 0 No message alert is played No message alert is played Beep codes 1 - 6 2 beeps 1 - 6 beeps Beep code 7 Siren Siren 1 Select Settings > Sound and Alert.
Configuration Manual Cordless Phones DT69X/DT390 • • Style - The ratio of note to rest period to be used when playing the sound. Instrument - The instrument to be used when playing the sound. Map Beep Codes to Customized Sounds 1 Select Sound and Alerts > Custom Message Alert 2 In the Beep code drop-down lists, select the customized sounds to be used for respectively beep codes. Enable Customized Sound 1 Select Settings > Sound and Alert.
Configuration Manual Cordless Phones DT69X/DT390 The default setting is "microphone on a boom", which means that the audio is optimized for using a headset with microphone on a boom. The headset profile can be changed in the phone menu or in a template/Number via WinPDM/CPDM3 in: Connections > Headset > Headset type If the preconfigured headset profiles does not match the headset or the audio performance is bad, it is possible to configure a headset profile.
Configuration Manual Cordless Phones DT69X/DT390 configuring the Phone call function, the following values can be entered: Digits 0-9, #, *, P ‚- pause, H ‚- hook, U1 ‚- the handset prompts for user input with the possibility to enter numerical characters before establishing a call (procedure call). Shortcuts are configured via parameters in the "Shortcuts" folder. Note: When programming Soft keys both name and function must be set. Note: It is also possible to configure shortcuts via the phone menu.
Configuration Manual Cordless Phones DT69X/DT390 The following figure shows the menu tree for the Admin menu in DT690/DT692. Figure 2. • Device info —> • Software • Hardware • IPEI/IPDI • User ID • DECT info —> • Link • System • Centr.
Configuration Manual Cordless Phones DT69X/DT390 6.3 IPEI *#34# or *#06# IPDI *#34# or *#06# User ID *#34# LED indications The following table shows the LED indications that are used for DT69X/DT390. LED indication 7 Description None Switched off. Green, fixed Phone fully charged and in charger. Green, flashing Switched on, but not in charger. Orange, fixed Charging. Orange, flashing (1000 ms on, 1000 ms off) Software download. Red, fixed Software error. Service needed.
Configuration Manual Cordless Phones DT69X/DT390 There is no ring signal (1)The telephone is muted (2) Ring volume is set to silent (3) The telephone cannot play a customized ring signal. (4) Faulty telephone (1) Press and hold the Mute button/Sound off key. (2) Increase volume (Settings > Sound & Alerts > Volume). (3) Check that the custom sound is correctly configured. Only the characters specified in Appendix A: Programming Custom Sound are supported. (4) Send the telephone for service. 7.
Configuration Manual Cordless Phones DT69X/DT390 Enter PIN code Phone lock is activated. Enter the required PIN code. If the PIN code has been lost, enter a new PIN code via WinPDM/CPDM3 or do a factory reset via WinPDM/ CPDM3. Battery low, charge now The battery level is low. DT690/DT692: Charge the battery while it is in the phone, or remove the battery and replace, or charge it separately. DT390: Charge the battery while it is in the phone, or replace the battery.
Configuration Manual Cordless Phones DT69X/DT390 8 Related Documents Battery Pack Rack Charger 22/1531-ANF 901 43 Desk PDM Charger 20/1531-ANF 901 43 Rack PDM Charger 21/1531-ANF-901 43 User Manual, Cordless Phone DT690/692 1424-EN/LZT 103 088 User Manual, Cordless Phone DT390 1424-EN/LZT 103 087 Installation and Operation Manual, WinPDM 12/1531-ANF 901 43 Installation and Operation Manual, CPDM3 19/1531-ANF 901 43 Site Survey Tool for DECT 33/1531-ANF 901 43 23/1531-ANF 901 43 C1 2013-01
Configuration Manual Cordless Phones DT69X/DT390 Appendix A: Programming Custom Sound Before starting programming custom sound, it is recommended to have basic knowledge of notes. The melody in a custom sound is represented by a text string consisting of several elements as follows: Element Note > Subelement Values Octave-prefix *0 (A=55Hz) *1 (A=110Hz) *2 *3 *4 (default) *5 *6 *7 *8 (A=14080 Hz) If no octave prefix is added, the prefix *4 will be used.
Configuration Manual Cordless Phones DT69X/DT390 Element Subelement Values Repeat N/A @0 (repeat forever) @, for example: "@2" repeats the melody string 2 times.