PCMCIA Fax Modem 56K Quick Installation Guide M73-APO02-420
FCC REGULATORY STATEMENTS FCC Part 68 Registration This device complies with FCC Part 68 rules, and the use of this device is subject to the following restrictions: 1. The FCC has established rules which permit this device to be directly connected to the telephone network. Standardized jacks are used for these connections. This equipment should not be used on party lines or coin phones. 2.
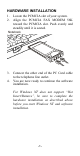
HARDWARE INSTALLATION 1. 2. Locate the PCMCIA slot of your system. Align the PCMCIA FAX MODEM 56K toward the PCMCIA slot. Push evenly and steadily until it is seated. Notebook 3. 4. Connect the other end of the PC Card cable to the telephone line outlet. You are now ready to continue the software installation. For Windows NT does not support “Hot Insert/Remove”, be sure to complete the hardware installation as described above before you start Windows NT and software installation.
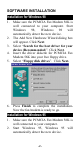
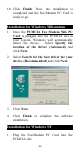
SOFTWARE INSTALLATION Installation for Windows 98 1. 2. 3. 4. 5. 6. Make sure the PCMCIA Fax Modem 56K is well connected to your computer. Start Windows 98, Windows 98 will automatically detect the new device. The Add New Hardware Wizard dialog box will appear. Click Next. Select “Search for the best driver for your device (Recommended)”. Click Next. Insert the driver diskette for PCMCIA Fax Modem 56K into your free floppy drive. Select “Floppy disk drives”. Click Next.
3. 4. 5. 6. The New Hardware Found dialog box will appear. Select Driver from disk provided by hardware manufacturer, and click OK. Insert the device driver diskette for the PCMCIA Fax Modem 56K. Type A:\, and Windows 95 will install the modem driver for you autmatically. Connect the FAX/MODEM interface cable and hook up the RJ-11 plug to the telephone line outlet. Restart Windows 95. Now your fax/ modem is ready to go. Note: Insert FAX/MODEM before running the communication program.
10. Click Finish. Now, the installation is completed and the Fax/Modem PC Card is ready to go. Installation for Windows Millennium 1. Once the PCMCIA Fax Modem 56K PC Card is plugged into the PCMCIA slot of your system, Windows will automatically detect the device. Select Specify the location of the driver (Advanced) and click Next. 2. Select Search for the best driver for your device. (Recommended) and click Next. 3. Click Next. 4. Click Finish to complete the software installation.
2. Run Windows NT 4.0. 3. Double click the Modem Icon in Control Panel. 4. In the Install New Modem window, press the Next button to detect the modem automatically. 5. Press the Change button to change the modem type. 6. Press the Have Disk... button. 7. Insert the INF file disk bundled with the fax/modem PC Card to the floppy drive. 8. Enter the path A:\ and press OK button. 9. Press OK to accept the modem type “PCMCIA 56Kbps FAX + Modem”. 10. Press Finish button.
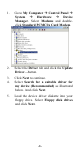
1. Go to My Computer Æ Control Panel Æ System Æ Hardware Æ Device Manager. Select Modems and doubleclick Standard PCMCIA Card Modem. 2. Select the Driver tab and click the Update Driver…button. 3. 4. Click Next to continue. Select Search for a suitable driver for my device (Recommended) as illustrated below. And click Next. 5. Load the device driver diskette into your floppy drive. Select Floppy disk drives and click Next.
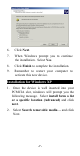
6. Click Next. 7. When Windows prompt you to continue the installation. Select Yes. 8. Click Finish to complete the installation. 9. Remember to restart your computer to activate this new device. Installation for Windows XP 1. Once the device is well inserted into your PCMCIA slot, windows will prompt you the following message. Select install form a list or a specific location (Advanced) and click next. 2. Select Search removable media… and click Next.
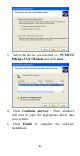
3. Select the device you inserted, i.e., PCMCIA 56Kbps FAX+Modem and click next. 4. Click Continue anyway. Then windows will start to copy the appropriate driver into your system. 5. Click Finish to complete the software installation.