Kombisignalgeber Installationsanleitung Flash and sounder Installation Guide ............................................................. 5 Sirène d'alarme Instructions d’installation .................................................. 9 Segnalatore combinato Istruzioni per installazione ............................................. 13 Combisignaalgenerator Installatie-instructies ...................................................... 17 Kombi-alarmsirene Installationsvejledning ...........................
Vorwort Sehr geehrte Kundin, sehr geehrter Kunde, wir bedanken uns für den Kauf dieses akustischen, bzw. optischakustischen Kombisignalgebers. Mit diesem Gerät haben Sie ein Produkt erworben, das nach dem heutigen Stand der Technik gebaut wurde. Dieses Produkt erfüllt die Anforderungen der geltenden europäischen und nationalen Richtlinien. Die Konformität wurde nachgewiesen, die entsprechenden Erklärungen und Unterlagen sind beim Hersteller hinterlegt.
Beschreibung 1 2 2 1 2 3 4 5 8 6 7 8 9 9 2 3 4 5 6 7 Gehäusedeckel Montagelöcher Sirene Befestigung Schutzhaube Befestigung Gehäusedeckel Deckelkontakt Befestigung Wandabrisskontakt Schraubklemmleiste Schutzhaube 2 Masse Anschluss Blitz 12V Anschluss Blitz (SG1660) Masse Anschluss Sirene 12V Anschluss Sirene Nicht belegt Deckelkontakt NC Deckelkontakt NC Wandabrisskontakt (intern) Wandabrisskontakt (intern) Wandabrisskontakt (intern) 3
Installation 1. 2. 3. 4. 5. Benutzen Sie die Rückseiten des Signalgebergehäuses zum Markieren der Befestigung (2). Bohren Sie dann die Haltelöcher. Führen Sie das Anschlusskabel durch die vorgesehene Öffnung. Befestigen Sie die Rückwand und den Abrisskontakt (7) an der Wand. Stellen Sie die Verbindungen an der Klemmleiste (8) wie beschrieben her. Setzen Sie die Schutzhaube (9) und den Gehäusedeckel (1) wieder auf und ziehen Sie die Halteschrauben fest.
Flash and sounder Installation guide Kombisignalgeber Installationsanleitung ....................................................... 1 Sirène d'alarme Instructions d’installation .................................................. 9 Segnalatore combinato Istruzioni per installazione ............................................. 13 Combisignaalgenerator Installatie-instructies ...................................................... 17 Kombi-alarmsirene Installationsvejledning .................................
Preface Dear Customer, Thank you for purchasing this acoustic or optical/acoustic flash and sounder equipment. You made the right decision in choosing this state-ofthe-art technology, which complies with the current standards of domestic and European regulations. The CE has been proven and all related certifications are available from the manufacturer upon request. To maintain this status and to guarantee safe operation, it is your obligation to observe these operating instructions.
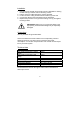
Description 1 2 2 1 2 3 4 8 5 6 7 8 9 9 2 3 4 5 6 7 Housing cover Mounting screw holes Sounder Fastening Protective cover Fastening Housing cover Cover contact Fastening Removal contact Screw terminal block Protective cover 2 Ground contact – flash (SG1660) 12V contact – flash (SG1660) Ground contact – sounder 12V contact – sounder Not used Cover contact – NC Cover contact – NC Removal contact (internal) Removal contact (internal) Removal contact (internal) 7
Installation 1. Use the back of the flash and sounder case as a template for marking the drill holes (2). Drill the holes for the fixing screws. 2. Pull the connector cable through the opening provided. 3. Fix the rear of the casing and the removal contact (7) to the wall. 4. Connect the cables to the terminal block (8) as described . 5. Replace the protective cover (9) and the casing cover (1) and tighten the fixing screws.
Sirène d’alarme Instructions d’installation Kombisignalgeber Installationsanleitung ....................................................... 1 Flash and sounder Installation Guide ............................................................. 5 Segnalatore combinato Istruzioni per installazione ............................................. 13 Combisignaalgenerator Installatie-instructies ...................................................... 17 Kombi-alarmsirene Installationsvejledning ......................
Préface Chère cliente, cher client, Nous vous remercions d’avoir porté votre choix sur cette sirène d'alarme acoustique ou visuelle et acoustique. Par l’achat de ce produit, vous disposez maintenant d’un appareil faisant appel à une technologie de pointe. Ce produit est conforme aux exigences des directives européennes et nationales en vigueur. La conformité de ce produit a été prouvée. Les déclarations et documents correspondants ont été déposés chez le fabricant.
Description 1 2 2 1 2 3 4 8 5 6 7 8 9 9 2 3 4 5 6 7 Couvercle du boîtier Trous de montage Sirène Fixation du capuchon protecteur Fixation du couvercle du boîtier Contact du couvercle Fixation du contact anti-arrachement Réglette de borniers à vis Capuchon de protection 2 Connexion neutre du flash (SG1660) Connexion 12 V du flash (SG1660) Connexion neutre de la sirène Connexion 12 V de la sirène Libre Contact du couvercle NC Contact du couvercle NC Contact anti-arrachement (interne) Contact anti-a
Installation 1. 2. 3. 4. 5. Utiliser la face arrière du boîtier de la sirène pour marquer les trous de fixation (2). Percer ensuite les trous de fixation. Introduire le câble de raccordement par l’ouverture prévue à cet effet. Fixer la face arrière et le contact anti-arrachement (7) au mur. Raccorder, comme indiqué, les bornes de la barrette (8). Remettre le capuchon protecteur (9) et le couvercle du boîtier (1), puis serrer fermement les vis de fixation.
Segnalatore combinato Istruzioni per l‘installazione Kombisignalgeber Installationsanleitung ....................................................... 1 Flash and sounder Installation Guide ............................................................. 5 Sirène d'alarme Instructions d’installation .................................................. 9 Combisignaalgenerator Installatie-instructies ...................................................... 17 Kombi-alarmsirene Installationsvejledning ................
Prefazione Egregio Cliente, La ringraziamo per aver acquistato questo segnalatore ottico-acustico. In questo modo Lei ha acquistato un prodotto realizzato secondo l'attuale stato della tecnica. Questo prodotto risponde ai requisiti richiesti dalle vigenti direttive europee e nazionali. La conformità è stata comprovata e le dichiarazioni e la documentazione relative sono depositate presso la ditta produttrice.
Descrizione 1 2 2 8 9 2 34 5 6 7 1 Coperchio alloggiamento 2 Fori di montaggio 3 Sirena 4 Fissaggio calotta di protezione 5 Fissaggio coperchio alloggiamento 6 Contatto coperchio 7 Fissaggio Contatto per il distacco da soffitto 8 Morsettiera a vite 9 Calotta di protezione 2 Lampeggiatore collegato a massa (SG1660) Lampeggiatore collegato a 12V (SG1660) Sirena collegata a massa Sirena collegata a 12V Libero Contatto coperchio NC Contatto coperchio NC Contatto per il distacco da soffitto (interno) C
Installazione 1. 2. 3. 4. 5. Utilizzare il lato posteriore dell'alloggiamento per marcare i fissaggi (2). Praticare i fori per il supporto . Far passare il cavo di collegamento attraverso l'apertura prevista. Fissare la parete posteriore e il contatto antidistacco (7) alla parete. Collegare alla morsettiera (8) come descritto. Inserire la calotta di protezione (9) e il coperchio (1) e serrare le viti.
Combisignaalgenerator Installatie-instructies Kombisignalgeber Installationsanleitung ....................................................... 1 Flash and sounder Installation Guide ............................................................. 5 Sirène d'alarme Instructions d’installation .................................................. 9 Segnalatore combinato Istruzioni per installazione ............................................. 13 Kombi-alarmsirene Installationsvejledning ...........................
Voorwoord Geachte klant, Wij bedanken u voor de aankoop van deze akoestische, of optischakoestische combisignaalgenerator. Met dit toestel heeft u een product gekocht, dat met de allernieuwste techniek werd gebouwd. Dit product voldoet aan de eisen van de geldende Europese en nationale richtlijnen. De overeenstemming werd aangetoond, de overeenkomstige verklaringen en documenten zijn bij de fabrikant gedeponeerd.
Beschrijving 1 2 2 1 2 3 4 8 9 2 3 4 5 6 7 Deksel van huis Montagegaten Sirene Bevestiging beschermkap 5 Bevestiging deksel van huis 6 Dekselcontact 7 Bevestiging Lostrekcontact 8 Schroefklemmenstrip 9 Beschermkap 2 Massa aansluiting flits 12V aansluiting flits (SG1660) Massa aansluiting sirene 12V aansluiting sirene Niet toegewezen Dekselcontact NC Dekselcontact NC Lostrekcontact (intern) Lostrekcontact (intern) Lostrekcontact (intern) 19
Installatie 1. Gebruik de achterkanten van het sensorhuis voor het markeren van de bevestiging (2). Boor dan de houdergaten. 2. Steek het aansluitsnoer door de daarvoor bestemde opening. 3. Bevestig de achterwand en het lostrekcontact (7) op de wand. 4. Sluit de verbindingen op de klemmenstrip (8) zoals beschreven aan. 5. Zet de beschermkap (9) en het deksel van het huis (1) er weer op en draai de borgschroeven vast.
Kombi-alarmsirene Installationsvejledning Kombisignalgeber Installationsanleitung ....................................................... 1 Flash and sounder Installation Guide ............................................................. 5 Sirène d'alarme Instructions d’installation .................................................. 9 Segnalatore combinato Istruzioni per installazione ............................................. 13 Combisignaalgenerator Installatie-instructies ...........................
Forord Kære kunde, tak fordi du har valgt at købe denne akustiske hhv. optisk-akustiske kombialarmsirene. Dette apparat er et produkt, som er bygget iht. den nyeste tekniske udvikling. Produktet opfylder kravene i de gældende europæiske og nationale retningslinjer. Produktet er i overensstemmelse med gældende bestemmelser, hvilket er dokumenteret i erklæringer og materiale, der opbevares hos fabrikanten.
Beskrivelse 1 2 2 1 2 3 4 8 5 6 7 8 9 9 2 3 4 5 6 7 Husets dæksel Montagehuller Sirene Befæstigelse beskyttelsesafskærmning Befæstigelse husets dæksel Dækselkontakt Befæstigelse nedrivningskontakt Skrueklemmerække Beskyttelses-afskærmning 2 Stelforbindelse blitz (SG1660) 12V tilslutning blitz (SG1660) Stelforbindelse sirene 12V tilslutning sirene Ikke benyttet Dækselkontakt NC Dækselkontakt NC Nedrivningskontakt (intern) Nedrivningskontakt (intern) Nedrivningskontakt (intern) 23
Installation 1. Brug bagsiderne af alarmsirenens hus til at markere, hvor den skal 2. 3. 4. 5. befæstiges (2). Bor derefter montagehullerne. Før tilslutningskablet gennem den dertil beregnede åbning. Fastgør bagvæggen og nedrivningskontakten (7) på væggen. Opret forbindelserne på klemlisten (8) som beskrevet. Sæt beskyttelseshætten (9) og husets dæksel (1) på igen og stram holdeskruerne.