
Instructions / Assembly

1
2
4
2
CERTIFICATION: cETLus WET NO.
20280LEDDMG
3
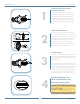
PREPARE FIXTURE AND ATTACH
MOUNTING BRACKET
If there is an existing fixture remove it. Expose the
supply wires from the J-box. Gently pull the supply
wires through the center of the mounting bracket.
Secure the mounting bracket to the J-box with the
supplied screws. Loosen the two side screws and
separate the fixture body and glass from the back
plate.
MAKE WIRE CONNECTION
Connect the black supply wire to the black fixture
wire. Secure with the supplied wire nuts. Connect the
white supply wire to the white fixture wire. Secure with
the supplied wire nuts. Attach the green J-Box wire
around green hexagonal head screw or connect it to
the green supply grounding wire of the fixture.
Secure all wires with electrical tape (not supplied).
Tuck all wires carefully into the J-Box.
MOUNT FIXTURE
Align the fixture back plate onto the mounting bracket
and secure with provided thumb screws. Align the glass
and fixture body onto the back plate and secure with
the supplied screws.
**This fixture is wet location rated. In order to ensure
that moisture does not enter the outlet box and cause
a short circuit, clear caulking should be used to seal the
space between the fixture mounting bracket and the
wall. Ensure that a space is left at the bottom to allow
for the escape of moisture. It is recommended that
Outdoor Silicon Sealant is used for that purpose**
RESTORE THE ELECTRICITY AND
CHECK THE OPERATION OF YOUR
NEW ACCESS LIGHTING FIXTURE
If the fixture is to be removed or replaced,
please ensure that the electricity is
switched off and that the fitting is cool
before touching it.
CAUTION
VER: 20.03.1