Cheetah WirelessTM 802.
Quick Installation Guide Cheetah WirelessTM 802.11a Access Point 802.
Copyright © 2003 by Accton Technology Corporation. All rights reserved. No part of this document may be copied or reproduced in any form or by any means without the prior written consent of Accton Technology Corporation. Accton makes no warranties with respect to this documentation and disclaims any implied warranties of merchantability, quality, or fitness for any particular purpose. The information in this document is subject to change without notice.
Accton Technology Corporation Limited Warranty: Accton warrants all is products to be free of manufacturing defects in workmanship and materials, under normal use and service, for the applicable warranty term. All Accton products carry a standard 90-day limited warranty from the date of purchase from Accton or its Authorized Reseller.
Limited Warranty WARRANTIES EXCLUSIVE: IF AN ACCTON PRODUCT DOES NOT OPERATE AS WARRANTED ABOVE, CUSTOMER'S SOLE REMEDY SHALL BE REPAIR OR REPLACEMENT OF THE PRODUCT IN QUESTION, AT ACCTON’S OPTION. THE FOREGOING WARRANTIES AND REMEDIES ARE EXCLUSIVE AND ARE IN LIEU OF ALL OTHER.WARRANTIES OR CONDITIONS, EXPRESS OR IMPLIED, EITHER IN FACT OR BY OPERATION OF LAW, STATUTORY OR OTHERWISE, INCLUDING WARRANTIES OR CONDITIONS OF MERCHANTABILITY AND FITNESS FOR A PARTICULAR PURPOSE.
Contents Introduction Package Checklist System Requirements Hardware Description Ethernet Compatibility Radio Characteristics LED Indicators 1 1 1 2 2 2 2 Applications 3 Hardware Installation 4 Software Installation and Configuration 6 Windows Installation (98/Me/NT/2000/XP) Setup Wizard Advanced Setup Identification Channel Performance Synchronization Transmit Threshold TCP / IP Settings Encryption Authentication Type Standard WEP Setup (WEP Default: Disable) Advanced WEP Setup SNMP System Admin
Contents Network Configuration and Planning Network Topologies Ad Hoc Wireless LAN (no AP or Bridge) Infrastructure Wireless LAN Infrastructure Wireless LAN for Roaming Wireless PCs Troubleshooting Accton Networks 24 24 24 25 26 27 27 Specifications 28 Terminology 31 iv
Introduction Accton’s Cheetah Wireless 802.11a Access Point (WA5001) provides transparent, wireless high speed data communications for portable or mobile devices equipped with an 802.11a wireless adapter (such as the WN5301). These communications can be between the access point and the wired LAN, between the access point and the wireless network, or within the wireless network.
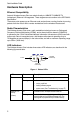
Quick Installation Guide Hardware Description Ethernet Compatibility Accton’s Wireless Access Point can attach directly to 10BASE-T/100BASE-TX (twisted-pair) Ethernet LAN segments. These segments must conform to the IEEE 802.3 specification. The access point appears as an Ethernet node and performs a routing function by moving packets from the wired LAN to remote workstations on the wireless infrastructure.
Applications LED Status Description Ethernet Link/ Activity On Indicates a valid 10 Mbps Ethernet cable link. Flashing Indicates that the access point is transmitting or receiving data on the 10 Mbps Ethernet LAN. The flashing rate is proportional to your network activity. On Indicates a valid wireless link.
Quick Installation Guide Hardware Installation Figure 2. Top Panel 1. Select the Site – Choose a proper place for your WA5001 Wireless Access Point. In general, the best location is at the center of your wireless coverage area, within line of sight of all wireless devices. 2. Placement of the Wireless Access Point – Proper placement will improve performance. Try to place the access point in a position that can best cover its BSS (page 25).
Hardware Installation 4. Connect the Power Cable – Connect the power adapter cable to the 3.3 V DC power socket on the rear panel. Warning: USE ONLY the power adapter supplied with the WA5001. Otherwise, the product may be damaged. The CD-ROM that comes with the package contains a utility program for the access point. Any updates can be downloaded from Accton’s Web site at: http://www.acctontech.com. The WA5001 can be configured over an Ethernet network using RJ-45 cable.
Quick Installation Guide Software Installation and Configuration Windows Installation (98/Me/NT/2000/XP) 1. Insert the CD-ROM that comes with the package into the CD-ROM drive on your PC, and then enter the following command: D:utility\setup. Follow the on-screen instructions to install the utility program. 2. After you finish the installed utility, choose Programs from the Start menu. Then select Cheetah Wireless 802.11a, and the configuration utility. 3.
Setup Wizard Setup Wizard 1. To view the access point’s management interface, enter the user name Admin, with a password 5up, and click LOGIN. 2. The home page displays the Main Menu on the screen. 3. Click on Setup Wizard to display basic configurations including SSID, Channel, Authentication Type and Standard WEP Setup.
Quick Installation Guide 4. Click on the Next button to start using the 1-2-3 Setup Wizard. SSID – The Service Set ID. This should be set to the same value as other wireless devices in your network. (Default: ANY) Note: The SSID is case sensitive and can consist of up to 32 alphanumeric characters.
Setup Wizard Channel – You can select Enable to set the access point to operate in turbo mode with a data rate of up to 72 Mbps. (Default: Disable) Authentication Type – Check the Shared Key radio button to start filtering frames with addresses defined in the Standard WEP Setup screen. (Default: Open System) Standard WEP Setup – For more secure data transmission, check the Enable radio button to ensure wireless network security. Then select one shared key (1 ~ 4) and the proper key size.
Quick Installation Guide Wired Equivalent Privacy (WEP) is implemented in this device to prevent unauthorized access to your wireless network. All wireless devices must have the same Key ID to communicate. Key Length (Manual Entry) Hex Digits per Key ID 64-bit: supports 4 shared keys 10 HEX digits 128-bit: supports 1 shared key 26 HEX digits 152-bit: supports 1 shared key 32 HEX digits 5. Click on the Finish button when completed.
Advanced Setup Advanced Setup Click the Advanced setup in the bottom right-hand corner to display additional information about the access point configuration as shown below: Note: The Advanced Setup screen allows you to view and change the current configuration of the access point. After modifying the configuration parameters, you must click on the Apply button to save the changes. The new settings will not take effect until you click Apply to refresh the access point.
Quick Installation Guide Identification The SSID (Service Set Identification) is the name of a basic service set provided by an access point. All clients that want to connect to the Internet via an access point must set their SSIDs to the same as that of the access point. SSID: This should be set to the same value as other wireless devices in your network. (Default: ANY). Channel Radio Channel: The radio channel through which the access point communicates to PCs in its BSS (page 25).
Advanced Setup Turbo Mode: You may either Enable or Disable the Turbo Mode. (Default: Disable) Turbo Mode is the enhanced wireless LAN operating mode (not regulated in the standard IEEE 802.11a) that can provide a higher data rate. The Normal Mode of the 802.11a access point provides connections up to 54 Mbps. Enabling Turbo Mode on the 802.11a access point allows the access point to provide connections with a data rate of up to 72 Mbps. Note: In Normal Mode, the channel bandwidth is 20 MHz.
Quick Installation Guide Synchronization In order to obtain transmission, the access point and connected clients need to be synchronized . Beacon Interval (20-1000 Kµs): Set the beacon interval between synchronization frames. These synchronization frames may also contain an indication of frames that are to be transmitted to stations in Power Save mode. (Default: 100) Note: 1Kµs = 1000 microsecs = 1 ms DTIM (1-16384): Set the Delivery Traffic Indication Message (DTIM) interval.
Advanced Setup Transmit Threshold Fragment Length (256-2346): The Fragment Length can be set between 256 and 2,346. If the packet size is smaller than the preset fragment size, the packet will not be segmented. Fragmentation of the packets can increase the reliability of transmission because it increases the probability of a successful transmission due to smaller frame size.
Quick Installation Guide TCP / IP Settings Set the TCP/IP configuration for accessing the Internet. DHCP Client: If Enable is selected, the IP address, subnet mask and default gateway can be dynamically assigned to the access point by the network DHCP server. (Default: Disable) Note: If there is no DHCP server on your network, then the access point will automatically start up with its default IP address, 192.168.1.20.
Advanced Setup Encryption For more secure data transmission, you may enable WEP (Wired Equivalent Privacy) to prevent unauthorized access to your wireless network. The WEP setting must be the same for each client in your wireless network.
Quick Installation Guide Authentication Type You may choose either the Open System or the Shared Key. (Default: Open System) If Shared Key is enabled, WEP should be enabled and at least one shared key should be defined. But you can enable WEP, and set the authentication type as Open System. Standard WEP Setup (WEP Default: Disable) Default Shared Key – Choose the Shared Key that has the encryption string you prefer (Key 1~4 for 64-bit).
Advanced Setup How to Set up the Access Control List: 1. Select ACL Enable 2. Enter an ACL ID (1 ~ 60) 3. Enter the MAC address of the station you want to set up. 4. Enter a Key Map, one of the shared keys (1 ~ 4) or one of the unique keys (5 ~ 64), and choose Allow or Deny. If the station’s WEP key is the same as the Key Map you assigned, the station will then allow or deny connections to the access point. 5.
Quick Installation Guide System Administration New Password Change the access point's password. Factory Default Use the Restore button to load the factory default configuration and reboot this device. Note that all user-configured information will be lost. You will also have to re-enter the password to regain management access to this device. Upgrade Firmware Click Browse to locate the downloaded firmware file and press Start Upgrade to start the upgrade process.
Status Status Checking the AP Status and Stations Status radio buttons on the home page displays additional information about the access point status and Stations Status as shown in the following section: Access Point Status 21
Quick Installation Guide In the AP Status page, click the appropriate hyperlink to view the access point configuration, access point SME statistics (station association information), or access point (transmit and receive) statistics.
Status Station Configuration Station SME Station Statistics 23
Quick Installation Guide Network Configuration and Planning Accton’s Cheetah wireless solution supports a stand-alone wireless network configuration, as well as an integrated configuration with 10/100 Mbps Ethernet LANs.
Network Topologies Infrastructure Wireless LAN The WA5001 can also provide access to a wired LAN for wireless workstations. An integrated wired/wireless LAN is called an infrastructure configuration. A Basic Service Set (BSS) consists of a group of wireless PC users, and an access point that is directly connected to the wired LAN.
Quick Installation Guide Infrastructure Wireless LAN for Roaming Wireless PCs The Basic Service Set (BSS) is the communications domain for each Wireless Access Point. For wireless PCs that do not need to support roaming, set the domain identifier (SSID) for the wireless card to the BSS ID of the access point to which you want to connect. Check with your administrator for the BSS ID of the access point or bridge to which he wants you to connect.
Troubleshooting Troubleshooting Check the following items before you contact Accton Technical Support. 1. If mobile users do not have roaming access to the WA5001 Wireless Access Point, check the following: • Make sure that all the WA5001s and wireless devices in the ESS in which the WLAN mobile users can roam are configured to the same WEP setting, SSID, and authentication algorithm. 2. If the WA5001 cannot be configured using the Web browser (page 7): • Remove power from the WA5001.
Quick Installation Guide Specifications Physical Characteristics Maximum Channels Maximum Clients Operating Range Data Rate Network Configuration Operating Frequency LED Indicators Power supply Output Power Physical Size Weight Temperature Humidity Compliances Emissions Safety Standards US & Canada: 8 (normal mode), 3 (turbo mode) Japan: 5 (normal mode), 1 (turbo mode) 64 Up to 1,650 feet Normal Mode: 6, 9, 12, 18, 24, 36, 48, 54 Mbps per channel Turbo Mode: 12, 18, 24, 36, 48, 72 Mbps per channel Infrast
Specifications Sensitivity Modulation/Rates Sensitivity (dBm) BPSK (6 Mbps) -85 BPSK (9 Mbps) -84 QPSK (12 Mbps) -83 QPSK (18 Mbps) -81 16 QAM (24 Mbps) -78 16 QAM (36 Mbps) -74 64 QAM (48 Mbps) -69 64QAM (54 Mbps) -65 BPSK Turbo (12 Mbps) -82 BPSK Turbo (18 Mbps) -81 QPSK Turbo (24 Mbps) -80 QPSK Turbo (36 Mbps) -78 16 QAM Turbo (48 Mbps) -75 16 QAM Turbo (72 Mbps) -71 29
Quick Installation Guide Modulation Modulation 30 5.15-5.25 GHZ (dBm) 5.25-5.
Terminology Terminology The following is a list of terminology that is used in this document. Access Point – An internetworking device that seamlessly connects wired and wireless networks. Ad Hoc – An ad hoc wireless LAN is a group of computers each with LAN adapters, connected as an independent wireless LAN. Backbone – The core infrastructure of a network. The portion of the network that transports information from one central location to another central location where it is unloaded onto a local system.
Quick Installation Guide 32
WA5001 E042003-R01 150000007000A