
Use and Care


11
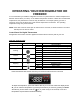
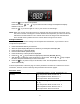
Defrosting
Freezers in this series defrost automatically in normal operating conditions. The evaporator behind
the rear wall of the unit defrosts automatically. The condensate collects in the drainage channel
behind the rear wall of the unit, and flows through the drainage hole into the drip tray by the
compressor where it evaporates.
However, frost may accumulate on the evaporator if the unit is repeatedly opened in a high heat or
high humidity location. If this frost pattern does not clear within 24 hours, your unit will require
manual defrosting.
Freezer models and the freezer compartment of refrigerator-freezers require manual
defrosting. For the most efficient operation and minimum energy consumption, defrost the freezer
when the frost on the freezer walls is excessive or ¼ to ½” thick.
CAUTION: Never use boiling water because it may damage the plastic parts. In addition, never use
a sharp or metallic instrument to remove frost, as it may damage the cooling coils and
will void your warranty. We recommend using a plastic scraper.
To defrost:
1. Remove the frozen items from the freezer and place it in another cooling device
2. Turn the thermostat off and unplug your freezer, leaving the door open to help speed up the
defrosting process
3. Use a sponge or toweling to remove water and melting ice from the freezer floor. Pouring warm (not
boiling) water on the ice/frost may also help speed the defrosting process.
4. Clean and thoroughly dry the freezer interior
5. Close the door and plug the freezer in, resetting the thermostat to the desired setting
6. Allow several hours for the cabinet to reach the proper storage temperature
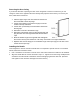
Shelves
To prevent damaging the door gasket, make sure to have the door all the way open when pulling the
shelves out of the rail compartment.
Any of the shelves can be removed to store larger items.
When removing the shelf from the rail compartment,
make sure to remove all items first. Then move the
shelf to the position where the notch of the shelf is
exactly under the plastic post and lift the shelf. In order
to replace the shelf, repeat steps described above in
reverse.