
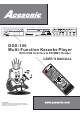
User Guide

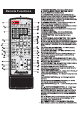


1. NUMERIC KEYS 0-9:
Note:
Used to input for track selections or programming
purposes. When Play Back Control (PBC) mode is on, songs will
stop playing at the end of every track. Playing will not resume until another
track entry has been submitted and set to play.
1. NUMERIC KEYS 0-9:
Note:
Used to input for track selections or programming
purposes. When
Play Back Control (PBC) mode is on, songs will
stop
playing at the end of every track. Playing will not resume until another
track
entry has been submitted and set to play.
2. DVD/USB- Switch between USB mode and Disc Mode.2. DVD/USB- Switch between USB mode and Disc Mode.
3.DISC TRAY - Press to open tray. Press or to close the
tray, it will play the disc automatically.
3.DISC TRAY - Press to open tray. Press or to close the
tray,
it will play the disc automatically.
4. EJECT - Opens and closes disc tray. While open, you may
press PLAY to close disc tray and begin playback or press once more
to close.
4. EJECT - Opens and closes disc tray. While open, you may
press
PLAY to close disc tray and begin playback or press once more
to
close.
5. PLAY - Begins the playback of media inside the disc tray or to
resume paused playback.
5. PLAY - Begins the playback of media inside the disc tray or to
resume
paused playback.
6. PAUSE- Pauses current playback. Press once more or PLAY
to resume playback.
6. PAUSE- Pauses current playback. Press once more or PLAY
to
resume playback.
7. STOP - Stops/ends playback.7. STOP - Stops/ends playback.
8. SKIP BACKWARD - Skips to the beginning of the current or
previous track if pressed twice.
8. SKIP BACKWARD - Skips to the beginning of the current or
previous
track if pressed twice.
9. SKIP FORWARD- Skips to the beginning of the next track.9. SKIP FORWARD- Skips to the beginning of the next track.
10. VOL- - Lowers Volume.10. VOL- - Lowers Volume.
2 . DISPLAY WINDOW -
NO DISC
0 Displays player status such as time, disc
format, and song number. If no disc is in the tray, the display window
will display . Detailed information will also be shown on the
TV screen.
2.DISPLAY WINDOW -
NO
DISC
0 Displays
player status such as time, disc
format,
and song number. If no disc is in the tray, the display window
will
display . Detailed information will also be shown on the
TV
screen.
22. POWER - Turns the power on and off(AC110V / AC240V), When
the power is on, indicatior lights and display on.
22. POWER - Turns the power on and off(AC110V / AC240V), When
the
power is on, indicatior lights and display on.
21. Remote Sensor - Receives incoming signals from the remote.21. Remote Sensor - Receives incoming signals from the remote.
12. AUDIO - Selects Left/Right, MONO, and Stereo audio output for
Cds and audio track for DVDs.
12. AUDIO - Selects Left/Right, MONO, and Stereo audio output for
Cds
and audio track for DVDs.
14. KEY CONTROL UP- Transposes the music key. Use to raise
key by a half tone.
14. KEY CONTROL UP- Transposes the music key. Use to raise
key
by a half tone.
13. KEY CONTROL DOWN- Transposes the music key. Use to
lower key by a half tone.
13. KEY CONTROL DOWN- Transposes the music key. Use to
lower
key by a half tone.
15. MIC TREBLE control - Used to make HIGH FREQUENCY
adjustments to MIC output.
15. MIC TREBLE control - Used to make HIGH FREQUENCY
adjustments
to MIC output.
16. MIC BASS control - Used to make LOW FREQUENCY
adjustments to MIC output.
16.
MIC BASS control - Used to make LOW FREQUENCY
adjustments
to MIC output.
17. ECHO control - Used to control the amount of ECHO applied to
MICCHANNELS1&2.
17. ECHO control - Used to control the amount of ECHO applied to
MIC
CHANNELS 1 & 2.
18.MIC1&2VOLcontrol-Used to control the volume output from
MIC CHANNEL 1& 2.
18. MIC 1 & 2 VOL control - Used to control the volume output from
MIC
CHANNEL 1& 2.
19.MIC1&2INPUTjacks - Connects microphones with 1/4 inch
plug.
19. MIC 1 & 2 INPUT jacks - Connects microphones with 1/4 inch
plug.
11. VOL+ - Raises Volume.11. VOL+ - Raises Volume.
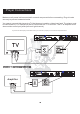
5. 5.1 CHANNEL AUDIO OUTPUT -
5.1CH
RCA outputs for analog 5.1Dolby
output. To use 5.1 channels, press on the remote or change
settings in the SETUP menu before using 5.1 channels.
SETUP> KARAOKE SETUP> KARAOKE MODE>OFF
SETUP> SPEAKER SETUP> DOWNMIX> OFF
CENTER> ON
REAR> ON
SUBWOOFER> ON
After that, you can test by selecting.
SETUP> SPEAKER SETUP> TEST TONE> ON
See below.
5. 5.1 CHANNEL AUDIO OUTPUT -
5.1CH
RCA outputs for analog 5.1Dolby
output. To
use 5.1 channels, press on the remote or change
settings
in the SETUP menu before using 5.1 channels.
SETUP>
KARAOKE SETUP> KARAOKE MODE>OFF
SETUP>
SPEAKER SETUP> DOWNMIX> OFF
CENTER> ON
REAR> ON
SUBWOOFER> ON
After
that, you can test by selecting.
SETUP>
SPEAKER SETUP> TEST TONE> ON
See
below.
2. SCART - Connection mainly used for Tv’s in Europe. TV
display(4:3) built-in video, RGB out and audio.
2. SCART - Connection mainly used for Tv’s in Europe. TV
display(4:3)
built-in video, RGB out and audio.
4. KARAOKE OUTPUT - Red and white RCA outputs for mixing
vocals and music. Used in karaoke mode.
4. KARAOKE OUTPUT - Red and white RCA outputs for mixing
vocals
and music. Used in karaoke mode.
1.ELECTRIC PLUG - Connection to auto-detect AC power supply
(100-240V,50-60 Hz).
1.ELECTRIC PLUG - Connection to auto-detect AC power supply
(100-240V,50-60
Hz).
3.VGA JACK -
VGA ENTER
Progressive scan output. Connect to a VGA monitor
and press button and on the remote control to change
the default setting and apply change in the SETUP menu before
using it.
3.VGA JACK -
VGA ENTER
Progressive scan output. Connect to a VGA monitor
and
press button and on the remote control to change
the
default setting and apply change in the SETUP menu before
using
it.
6. VIDEO OUTPUT
*Connect “Y” to “Y”, “PB” to “PB” (CB), “PR” to “PR” (CR)
COMPONENT - RCA outputs for use in Tvs with
component/progressive scan inputs.
6. VIDEO OUTPUT
*Connect “Y” to “Y”, “PB” to “PB” (CB), “PR” to “PR” (CR)
COMPONENT - RCA outputs for use in Tvs with
component/progressive
scan inputs.
7. RCA VIDEO OUTPUT - Yellow RCA outputs for use in T s with
composite inputs.
V7. RCA VIDEO OUTPUT - Yellow RCA outputs for use in T s with
composite
inputs.
V
9. S-VIDEO OUTPUT - Output for use in S-VIDEO input.9. S-VIDEO OUTPUT - Output for use in S-VIDEO input.
8.OPTICAL OUTPUT -
*Karaoke does not
work while using OPTICAL output.
Optical output for connection with a digital
amplifier or receiver for Dobly Digital or DTS sound. Please change
settings in the SETUP menu before using it.
SETUP> AUDIO SETUP> SPDIF OUTPUT>SPDIF/RAM OR
SPDIF/PCM
8.OPTICAL OUTPUT -
*Karaoke
does not
work
while using OPTICAL output.
Optical
output for connection with a digital
amplifier
or receiver for Dobly Digital or DTS sound. Please change
settings
in the SETUP menu before using it.
SETUP> AUDIO
SETUP> SPDIF OUTPUT>SPDIF/RAM OR
SPDIF/PCM
10.COAXIAL OUTPUT -
*Karaoke does not work
while using COAXIAL output.
Coaxial digital output to connect with a
digital amplifier or receiver for Dolby Digital or DTS sound. Please
change in the SETUP menu before using it.
SETUP> AUDIO SETUP> SPDIF OUTPUT> SPDIF/RAM OR
SPDIF/PCM
10.COAXIAL OUTPUT -
*Karaoke
does not work
while
using COAXIAL output.
Coaxial
digital output to connect with a
digital
amplifier or receiver for Dolby Digital or DTS sound. Please
change
in the SETUP menu before using it.
SETUP> AUDIO
SETUP> SPDIF OUTPUT> SPDIF/RAM OR
SPDIF/PCM
1 .MUSIC LEFT & RIGHT CHANNEL OUTPUT -
*Only music and no vocals.
1 Please connect with
a TV or Amplifier.
1 .MUSIC LEFT & RIGHT CHANNEL OUTPUT -
*Only
music and no vocals.
1 Please
connect with
aTV
or Amplifier.
3
BACK PANEL FUNCTIONS AND OPERATION:
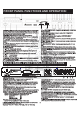
FRONT PANEL FUNCTIONS AND OPERATION:
DGX-106
SD/MMC
MINI SDMINI SD
USB
23
24
23. USB INTERFACE- Use this interface to connect USB devices
such as iPOD, Mp3 Players, external hard drives or flash drives.
23. USB INTERFACE- Use this interface to connect USB devices
such
as iPOD, Mp3 Players, external hard drives or flash drives.
24. CARD READER- Compatible formats: SD, Mini SD, and MMC
* Only supports FAT32 format
24. CARD READER- Compatible formats: SD, Mini SD, and MMC
*
Only supports FAT32 format
KARAOKE OUTPUTKARAOKE OUTPUT
DGX-106
1
2
3
5
4
6
7
89
10
11