
Full Product Manual


PREPARATION
Before beginning assembly of product, make sure all parts are present.. If any part is missing or
damaged, do not attempt to assemble the product. Contact customer service for replacement parts.
Estimated Installation Time (New installation): 30-60 minutes
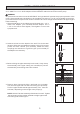
Tools Required for Assembly (not included): Wrench, Pliers, Phillips Screwdriver, Thread Tape, PVC
Purple Primer, and PVC Cement
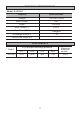
Accessories Required for Assembly (not included):
DETERMINING THE DEPTH OF WELL
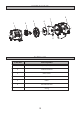
Using a weight tied to as string, determine the depth of the well by dropping the weight down the
well, and then:
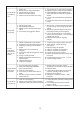
Pressure Tank
1-1/4 in. and 1 in. PVC Adaptors
1-1/4 in. and 1 in. PVC Pipes
1 in. Discharge Tee
Tank Tee
Drain Valve
1-1/4 in. Foot Valve
1 in. MNPT x 1-1/4 in. SLIP PVC Adaptor
1-1/4 in. Single Drop Well Seal
Pressure Gauge
Relief Valve
1/4 in. Plug
Measure the ground level mark to where the string is wet. This is your well's water level.
This number must be 10 ft under the pump's normal pumping level.
Subtract 5 ft from this measured water level number. This number must be less than 25 feet.
See Step 3 of Installation Instructions for a diagram.
LOCATION OF THE PUMP
Decide on the area for the pump installation. Select a pump location with adequate space for future
pump maintenance. It can be located in the basement or utility room of the house, at the well, or
between the house and the well. If installed outside of the house, it should be protected by a pump
house with auxiliary heat to prevent possible freezing. The well also should be protected for sanitary
reasons. Mount the pump as close to the well as possible.
TANKS - PRE-CHARGED STORAGE
For best performance of the pump, it is recommended that you use a diaphragm pressure tank (not
included). It is best to have this in place before installing the pump. A pre-charged storage tank has
a flexible bladder or diaphragm that acts as a barrier between the compressed air and water. This
barrier prevents the air from being absorbed into the water and allows the water to be acted on by
compressed air at initially higher than atmospheric pressures (pre-charged). More usable water is
provided than with a conventional type tank. Pre-charged tanks are specified in terms of a
conventional tank. For example, a 20-gallon pre-charged tank will have the same usable water or
draw-down capacity as a 40-gallon conventional tank, but the tank is smaller in size.
CAUTION: In order for the pump and tank to operate properly, the pressure tank needs to be drained
of all water BEFORE INSTALLING THE NEW PUMP. After draining, if you are using the supplied
30/50 PSI pressure switch at the pre-set settings, add or adjust the air pressure in the tank to 28 PSI
of pressure BEFORE startup.
4