Wireless-Ready DSL Gateway User Manual
Table of Contents 1 Introduction 1 Package Contents Minimum System Requirements Technical Support 2 Setting Up the Gateway Warning! Connecting a Computer to the Gateway Installing Filters Setting Up the DSL Connection 3 Using Qwest DSL 1 1 2 5 5 6 21 23 27 Connecting to the Internet Disconnecting from the Internet 4 Basic Setup 27 27 29 Basic Setup Gateway Features 29 32 5 Advanced Setup 33 Accessing Advanced Setup Using Advanced Setup WAN IP Address Wireless Settings LAN IP Address DHCP Ser
Actiontec Wireless-Ready DSL Gateway User Manual 6 Utilities 59 Web Activity Log DSL Settings Restore Default Settings Upgrade Firmware 7 Building a Network 59 60 60 61 63 Ethernet USB Wireless 63 66 69 8 Troubleshooting A Reference 71 75 Locating Computer Information Locating Windows Operating System Files Wiring Information B Setting Up Static IP Address Windows 98 and 98 SE Windows Me Windows 2000 Windows XP 75 76 78 81 81 84 87 91 C Computer Security 97 Securing the Gateway and Computer
1 Introduction Thank you for purchasing the Actiontec Wireless-Ready Gateway. The Gateway is the simplest way to connect a number of computers to a single high-speed broadband connection. This easy-to-use product is perfect for the office or small business. If you want to take your computing to the next level, the Actiontec WirelessReady DSL Gateway is sure to be one of the keys to your success.
Actiontec Wireless-Ready DSL Gateway User Manual Internet Explorer 4.0 or higher (5.x recommended) or Netscape Navigator 4.0 or higher (4.7 recommended) TCP/IP network protocol installed on each computer Technical Support Self Help To obtain answers to DSL configuration questions, visit the Qwest DSL Actiontec support page at this address: http://www.qwest.com/dsl/customerservice/Actiontec1520.html A help page is also available on the main page of the Actiontec DSL Gateway Web interface.
Chapter 1 Introduction Advanced Feature Support Qwest DSL technical support provides the following advanced feature support for the Actiontec DSL Gateway. Contact Qwest at 1-800-247-7285 for configuration assistance. Enabling Website Blocking Enabling VPN Pass-Through Enabling/Disabling NAT Firewall configuration Changing the LAN IP address of the DSL Gateway Enabling Services Blocking Enabling/Disabling DHCP VIP feature These features are supported in the DSL Gateway only.
Actiontec Wireless-Ready DSL Gateway User Manual Non-Actiontec-provided network card/Ethernet cable installation, configuration, or troubleshooting Commercial firewall software configuration contact the Actiontec Pay For Support Center at 1-888-825-9025. Actiontec networking support is provided for a fee of $29.95 per incident.
2 Setting Up the Gateway The instructions that follow parallel the steps contained in the Actiontec Installation Buddy™, which provides a visual guide to setting up the Gateway. It is recommended the user run the Installation Buddy first, before attempting any other procedures. To set up the Gateway, it must be connected to a computer, and then configured.
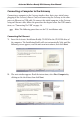
Actiontec Wireless-Ready DSL Gateway User Manual Connecting a Computer to the Gateway Connecting a computer to the Gateway involves three basic steps: initial setup, plugging in the Gateway’s Power Cord, and connecting the Gateway to the computer via Ethernet or USB cable. To connect this initial computer to the Gateway using an Ethernet cable, follow the procedure that begins below. For USB connections, see “Connecting Via USB” on page 14. ☞ Note: The following procedures are for U.S.
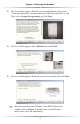
Chapter 2 Setting Up the Gateway 3. The next window appears. Read the onscreen information, then get the “Terms and Agreement” document from the White Bag and read it as well. Then, select I accept this agreement and click Next. 4. The next window appears. Select Ethernet, then click Next. 5. The next window appears. Read the onscreen instructions, then click Next. ☞ Note: You must have your Welcome Letter (ISP Worksheet) to complete this installation.
Actiontec Wireless-Ready DSL Gateway User Manual 6. When the next window appears, read the information concerning home alarm systems, then click Next. 7. Another window concerning home alarms appears. Read the onscreen information, then click Next. 8. When the next window appears, read the information concerning automatic water meters, then click Next.
Chapter 2 Setting Up the Gateway 9. In the next window, read the instructions regarding the items needed to set up the Gateway, then click Next. 10. As shown in the next window, get the Gateway from the DSL Quick Start Kit, then click Next. 11. The next window appears. Plug the smaller end of the Power Cord into the Black Port on the back of the Gateway, then click Next.
Actiontec Wireless-Ready DSL Gateway User Manual 12. When the next window appears, plug the larger end of the Power Cord into a Power Outlet, then click Next. 13. When the next window appears, confirm the Power Light on the Gateway glows steadily green. Click Next. 14. The following window appears. Get the Phone Line Splitter from the DSL Quick Start Kit and plug it into the Phone Jack closest to the computer, then click Next.
Chapter 2 Setting Up the Gateway 15. When the next window appears, get the Black DSL Cable and plug one end of it into the DSL Port on the back of the Gateway, then click Next. 16. Another window appears. Plug the other end of the Black DSL Cable into one of the two ports on the Splitter, then click Next.
Actiontec Wireless-Ready DSL Gateway User Manual 17. When the next window appears, confirm the Power and Internet Lights on the Gateway glow steadily green. Click Next. ☞ Note: If the Power and Internet Lights on the Gateway are not solid green, check all connections to the Gateway. If all connections are plugged in properly, call Qwest DSL Technical Support at 1-800-247-7285. 18.
Chapter 2 Setting Up the Gateway 19. When the next window appears, plug the other end of the Yellow Ethernet Cable into an Ethernet Port on the back of the computer. Click Next. ☞ Note: An Ethernet port looks similar to a phone jack, but is slightly larger. 20. When the next window appears, make sure one of the four Ethernet Network Lights glows solid green. The Gateway is connected to a computer via Ethernet. Click Next to install the filters as described in “Installing the Filters” on page 21.
Actiontec Wireless-Ready DSL Gateway User Manual Connecting Via USB 1. Insert Actiontec Installation Buddy CD-ROM in the CD-ROM drive of the computer. The Installation Buddy will start automatically. Wait until the following screen appears, read the onscreen instructions, then click Next. 2. The next window appears. Read the instructions, select First Computer by clicking on the check box, then click Next. 3. The next window appears.
Chapter 2 Setting Up the Gateway 4. The next window appears. Select USB, then click Next. 5. The next window appears. Read the onscreen instructions, then click Next. ☞ Note: You must have your Welcome Letter (ISP Worksheet) to complete this installation. If you have not received this document, contact your ISP immediately. 6. When the next window appears, read the information concerning home alarm systems, then click Next.
Actiontec Wireless-Ready DSL Gateway User Manual 7. Another window concerning home alarm systems appears. Read the onscreen information, then click Next. 8. When the next window appears, read the information concerning automatic water meters, then click Next. 9. In the next window, read the instructions regarding the items needed to set up the Gateway, then click Next.
Chapter 2 Setting Up the Gateway 10. As shown in the next window, get the Gateway from the DSL Quick Start Kit, then click Next. 11. The next window appears. Plug the smaller end of the Power Cord into the Black Port on the back of the Gateway, then click Next. 12. When the next window appears, plug the larger end of the Power Cord into a Power Outlet, then click Next.
Actiontec Wireless-Ready DSL Gateway User Manual 13. When the next window appears, confirm the Power Light on the Gateway glows steadily green. Click Next. 14. The following window appears. Get the Phone Line Splitter from the DSL Quick Start Kit and plug it into the Phone Jack closest to the computer, then click Next. 15. When the next window appears, get the Black DSL Cable and plug one end of it into the DSL Port on the back of the Gateway, then click Next.
Chapter 2 Setting Up the Gateway 16. Another window appears. Plug the other end of the Black DSL Cable into one of the two ports on the Splitter, then click Next. 17. When the next window appears, confirm the Power and Internet Lights on the Gateway glow steadily green. Click Next. ☞ Note: If the Power and Internet Lights on the Gateway are not solid green, check all connections to the Gateway. If all connections are plugged in properly, call Qwest DSL Technical Support at 1-800-247-7285.
Actiontec Wireless-Ready DSL Gateway User Manual 18. In the next window, get the Purple USB Cable from the Quick Start Kit and plug the square end of it in the Purple Port on the back of the Gateway. Click Next. 18. When the next window appears, plug the rectangular end of the Purple USB Cable into a USB Port on the front or back of the computer. Click Next. ☞ Note: A USB port is shaped like a thin rectangle about 1/4 inch by 1/2 inch, and may be vertically or horizontally oriented.
Chapter 2 Setting Up the Gateway Installing Filters Filters allow the user to talk on the phone while online. All phones and other devices (answering machines, fax machines, etc.) using the same line (i.e., using the same phone number) as the DSL line must have a filter installed. To install a filter, follow these instructions: 1. When the following window appears, read the onscreen instructions, then click Next to continue. 2.
Actiontec Wireless-Ready DSL Gateway User Manual 3. When the following window appears, get the Clear Bag, take out the phone filters, then click Next. Caution: Do not install a filter in the phone jack used by the black DSL cable. 4. In the next window, read the onscreen instructions concerning wall-mount phones. Click Next. 5. After the next window appears, plug a Phone Filter into ever Phone Jack that has a device (phone, fax machine, answering machine, etc.), then click Next.
Chapter 2 Setting Up the Gateway 6. When the next window appears, read the onscreen instructions on how to connect the phone filters, then click Next. The phone filters are installed. Click Next. to go to “Setting Up the DSL Connection,” as described below. Setting Up the DSL Connection After connecting the Gateway and installing phone filters, the DSL connection must be configured. Use the following procedure: 1.
Actiontec Wireless-Ready DSL Gateway User Manual 2. If PPPoE or PPPoA was selected, the following window appears. Enter the User Name and Password in the proper text boxes, or, if the ISP does not require them, click the box next to “My ISP does not require a User Name or Password.” Click Next. If RFC 1483 was selected, go directly to step 3. 3. The next window appears. Select the IP type used by the ISP. Click Next. If DHCP was selected, go directly to step 6 4. The next window appears.
Chapter 2 Setting Up the Gateway 5. When the next window appears, enter the IP Address, Subnet, Gateway, DNS 1, and DNS 2 information in the proper text boxes. This information should be provided by the ISP. When finished, click Next. 6. In the next window, the Installation Buddy checks the configuration of the Gateway. 7. A “Congratulations!” window appears. Read the onscreen instructions, then click Next.
Actiontec Wireless-Ready DSL Gateway User Manual 8. In the next window, read the onscreen information about computer security, then click Next. 9. In the last window, read the onscreen information regarding additional reference material on the CD-ROM, then click Finish. The Gateway has been successfully configured.
Using Qwest DSL 3 Qwest DSL operates over home or business phone lines equipped with Qwest DSL service. For this reason, the Qwest DSL connection is not portable; it can’t be accessed while away from home or business. To connect while traveling, ask the ISP about a dial-up account. Most Qwest DSL ISPs provide a dial-up account for free, while others charge a minimal fee.
Actiontec Wireless-Ready DSL Gateway User Manual 28
4 Basic Setup This chapter is a guide through a basic configuration of the Gateway, including how to connect the Gateway to the ISP, as well as an overview of the Gateway’s LEDs and switches. To complete the basic setup, the user will need the Welcome Letter (ISP Worksheet). If the document is not available, contact the ISP immediately. Basic Setup To configure the gateway for basic operation: 1. Open the Web browser. In the address bar, enter http://192.168.0.1 then press Enter on the keyboard. 2.
Actiontec Wireless-Ready DSL Gateway User Manual 3. Follow the instructions in the “Set Up/Configuration” screen, then click Begin Basic Setup. 4. In the next window, follow the onscreen instructions, then click Next. 5. In the next window, select the type of connection by clicking on the circle next to PPPoA or PPPoE. If unsure about the selection, contact the ISP.
Chapter 4 Basic Setup 6. Enter the User Name, Password, and Static IP provided by the ISP in the “DSL Broadband Connection - PPP” screen. Click Next. ☞ Note: If the ISP uses a connection method other than PPPoE (DHCP or Static IP, for example) see “Advanced Setup” to connect the Gateway. 7. Click Save and Restart in the “Save and Restart” screen. 8. The “Congratulations” screen appears. The Gateway is successfully configured.
Actiontec Wireless-Ready DSL Gateway User Manual Gateway Features This section contains a quick description of the Gateway’s lights and switches. Power Light - The Power Light displays the Gateway’s current status. If the Power Light glows steadily green, the Gateway is receiving power and fully operational. When the Power Light is rapidly flashing, the Gateway is initializing.
Advanced Setup 5 This section contains information concerning advanced configuration, such as wireless settings, remote management, and Web site blocking. Accessing Advanced Setup To access the Advanced Setup configuration screens, follow these instructions: 1. Open the Web browser. In the address bar enter: http://192.168.0.1 then press Enter on the keyboard. 2. The “Main Menu” screen appears. Select Setup/Configuration. 3.
Actiontec Wireless-Ready DSL Gateway User Manual 4. In the next screen, read the recommendations. To perform an advanced setup on the Gateway, click Begin Advanced Setup. 5. The “Configuring the Advanced Settings” screen appears. To check all the settings, or if unsure of which settings to modify, select Next. To modify a specific configuration, click on its name in the menu bar on the left.
Chapter 5 Advanced Setup If changes have been made to one or more Advanced ☞ Note: Setup settings and Save and Restart has not been clicked before leaving the Advanced Setup screens (i.e., switching to Utilities or Basic Setup), all Advanced Setup settings changes will be lost. WAN IP Address Selecting WAN IP Address in the “Advanced Configuration” screen generates the “WAN IP Address” screen. WAN IP Address allows manual set up of the IP address of the Gateway.
Actiontec Wireless-Ready DSL Gateway User Manual Transparent Bridging Select this option to use the Gateway as a transparent bridge only if directed to do so by your ISP. This option should only be used if the Gateway is being used as a Modem to connect one computer to the Internet via a DSL connection. When the Gateway is being used as a transparent bridge, it does not provide any firewall security.
Chapter 5 Advanced Setup Host and domain name information may also be accessed ☞ Note: from the computer originally connected to the DSL modem. Specify a Static IP Address Select this option if assigned a static (specific) IP Address by the Internet Service Provider (ISP). Enter the IP Address, along with the Subnet Mask and Default Gateway Address (also provided by the ISP), in the “Broadband Connection via Static IP Address” screen.
Actiontec Wireless-Ready DSL Gateway User Manual Unnumbered/VIP Mode If the user has purchased a block of static IP addresses, select Unnumbered Mode by clicking on the box. Then, enter the IP address and Subnet Mask assigned to the Gateway in the “Gateway Address” and “Unnumbered Subnet Mask” text boxes below “Unnumbered IP Address.” This information should be sent to the user when purchasing a block of static IP addresses.
Chapter 5 Advanced Setup Channel Channel assigns the frequency band at which the Gateway communicates. In the United States, use channels 1-11. (The factory default value is set to 1.) Wireless Equivalent Privacy Wireless Equivalent Privacy (WEP) is an encryption method used with the 802.11b standard to provide limited data security over wireless networks. The Gateway offers three levels of WEP: Off, 64-bit, and 128-bit. Qwest recommends setting up WEP to offer some security to your wireless connection.
Actiontec Wireless-Ready DSL Gateway User Manual 128-bit WEP 128-bit WEP requires one key of 13 hexadecimal pairs. A hexadecimal digit consists of alphanumeric characters ranging from 0-9 or A-F. An example of a 128-bit WEP key is: 3D-44-FE-6C-A1-EF-2E-D3-C4-21-74-5D-B1. To create a 128-bit WEP key, enter 13 hexadecimal digit pairs in the Key text box.
Chapter 5 Advanced Setup LAN IP Address Selecting LAN IP Address in the “Advanced Configuration” screen generates the “LAN IP Address” screen. The value in the LAN IP Address text box is the IP address of the Gateway as seen on the network. The LAN IP address of the Gateway can be modified, but Actiontec recommends keeping the default factory setting (192.168.0.1). the Gateway’s Address is modified, verify the ☞ Note: IfServer range is within the same subnet.
Actiontec Wireless-Ready DSL Gateway User Manual Actiontec strongly recommends leaving the DHCP Server option On. If the DHCP Server option is Off, ensure the IP addresses of the networked computers are on the same subnet as the IP address of the Gateway. For more information, see “DHCP Server Configuration” on page 42. DHCP Server Configuration Clicking Next in the “DHCP Server” screen generates the “DHCP Server Configuration” screen. Change IP address range and DNS server information here.
Chapter 5 Advanced Setup DNS Server 2 - the secondary DNS provided by the Internet Service Provider (ISP). If the ISP provided secondary DNS server infor- mation, enter it here. If not, leave the text box intact. After changing settings, click Next or Back to continue, or Save and Restart to make all changes permanent. Services Blocking Selecting Services Blocking in the “Advanced Configuration” screen generates the “Services Blocking” screen. To modify Internet privileges (Web, FTP, Newsgroups, etc.
Actiontec Wireless-Ready DSL Gateway User Manual Netmeeting To allow the computers on the Gateway’s network to access Netmeeting, enter the Netmeeting IP address (LAN IP address using Netmeeting) in the IP text box, then select On. If Netmeeting is not needed, select Off. After changing settings, click Next or Back to continue, or Save and Restart to make all changes permanent. Website Blocking Selecting Website Blocking in the “Advanced Configuration” screen generates the “Website Blocking” screen.
Chapter 5 Advanced Setup After changing settings, click Next or Back to continue, or Save and Restart to make all changes permanent. Remote Management Selecting Remote Management in the “Advanced Configuration” screen generates the “Remote Management” screen. Remote Management allows access to the Gateway through the Internet via another computer. Actiontec recommends leaving the Remote Management Off (the factory default setting).
Actiontec Wireless-Ready DSL Gateway User Manual Port Forwarding Selecting Port Forwarding in the “Advanced Configuration” screen generates the “Port Forwarding” screen. Port forwarding allows certain programs to bypass the Gateway’s built-in firewall, allowing access to parts of the network (for hosting a Web or ftp server, for example). To use port forwarding, enter the IP port range in the “IP Port Range” text boxes. (If more than 10 ports are needed, Actiontec recommends using DMZ Hosting.
Chapter 5 Advanced Setup In this screen, the user can allow only certain IP addresses to access forwarded ports. Enter the port range of the forwarded ports in the “Remote IP Port Range” text boxes, enter the IP address to be allowed access in the “Remote IP Address” text box, then click “Add.” The active forwarded ports will appear in the “List of Forwarded Ports” text box. To deactivate a forwarded port, select it from the “List of Forwarded Ports” text box, then click “Remove.
Actiontec Wireless-Ready DSL Gateway User Manual DMZ hosting is used to support online gaming and Internet conferencing services. These programs usually require multiple open ports, making the network accessible from the Internet. DMZ hosting symbolically places the DMZ host computer outside of the Gateway’s network. Access to the network resources while DMZ hosting is active is blocked. Actiontec recommends activating DMZ hosting only as long as necessary.
Chapter 5 Advanced Setup Dynamic Routing Selecting Dynamic Routing in the “Advanced Configuration” screen generates the “Dynamic Routing” screen. Dynamic routing allows the exchange of routing tables between routers. This relieves the user of having to set up static routes for each router. If a router is set up behind the Gateway in the network configuration, consult the documentation that came with the router to see what kind of Dynamic Routing is required, then select the needed option.
Actiontec Wireless-Ready DSL Gateway User Manual After changing settings, click Next or Back to continue, or Save and Restart to make all changes permanent. Static Routing Selecting Static Routing in the “Configuring the Advanced Settings” screen generates the “Static Routing” screen. Static Routing allows the user to manually create routes to other networks connected to the Gateway.
Chapter 5 Advanced Setup MAC Address Cloning Selecting MAC Address Cloning in the “Advanced Configuration” screen generates the “MAC Address Cloning” screen. A MAC (media access control) address is an identifier unique to every networkable device. Some Internet Service Providers (ISP) require a MAC address to validate a computer’s permission to be on their network.
Actiontec Wireless-Ready DSL Gateway User Manual Status After configuring the Gateway, settings can be viewed by selecting Status in the Main Menu. The “Current Status” screen appears, displaying many of the Gateway’s settings. No settings (other than connecting or disconnecting from the Internet) can be changed from the Current Status screen. In the left hand column, there are other Status options available: Routing Table, WAN Status, LAN Status, and Active User List.
Chapter 5 Advanced Setup Routing Table Selecting Routing Table generates the “Routing Table” screen. This screen displays an overview of the Gateway’s routes. These routes are the pathways used to transfer information to and from the Internet. When disconnected from the Internet, only one route is displayed; when connected, at least two routes (for incoming and outgoing information) are displayed.
Actiontec Wireless-Ready DSL Gateway User Manual WAN Status Selecting WAN Status generates a “Current Status” screen. This screen displays on overview of the Gateway’s WAN (Wide Area Network) connection. PPP Status There are five PPP Status categories: Status, User Name, Session Time, Packets Sent, and Packets Received. Status - Displays the PPP connection status. When “connected” is displayed, the Gateway can access to the Internet.
Chapter 5 Advanced Setup Packets Sent - Displays the number of PPP packets sent throught the WAN port of the Gateway. Packets Received - Displays the number of PPP packets received through the WAN port of the Gateway. DSL Status There are eight DSL Status categories: VPI, VCI, DSL Mode, Connection Status, Speed, ATM QoS class, Near End CRC Errors (I/F), and Far End CRC Errors (I/F). VPI - Displays current Virtual Path Identifier (VPI) setting of the Gateway.
Actiontec Wireless-Ready DSL Gateway User Manual LAN Status Selecting LAN Status generates the “Lan Port Status” screen. This screen displays on overview of the Gateway’s LAN (Local Area Network) port connections. Ethernet There are three Ethernet categories: Link Speed, Packets Sent, Packets Received Link Speed - Displays the link speed of the Ethernet connection. Packets Sent - Displays the number of packets (amount of data) sent over the Ethernet connection.
Chapter 5 Advanced Setup Wireless There are two Wireless categories: Packets Sent and Packets Received Packets Sent - Displays the number of packets (amount of data) sent over the Wireless connection. Packets Received - Displays the number packets (amount of data) received over the Wireless connection. Active User List Selecting Active User List generates the “Active User List” screen.
Actiontec Wireless-Ready DSL Gateway User Manual 58
6 Utilities To access the Gateway’s utilities select Utilities from the “Main Menu” screen. The “Utilities” screen appears. From here, the Web activity log can be viewed, the DSL settings changed, the Gateway’s factory default settings restored, and the Gateway’s firmware upgraded. Web Activity Log The Web Activity Log provides information about the Web sites each computer on the Gateway’s network has visited. To access the Web Activity Log, select Web Activity Log from the “Utilities” screen.
Actiontec Wireless-Ready DSL Gateway User Manual DSL Settings To access DSL Settings, select DSL Settings from the “Utilities” screen. The Gateway’s VPI, VCI, and Mode settings can be changed from here. Actiontec recommends not changing these values without consulting the Internet Service Provider (ISP). Restore Default Settings To restore the Gateway to its factory default settings, select Restore Default Settings from the “Utilities” screen.
Chapter 6 Utilities Upgrade Firmware Selecting Upgrade Firmware in the “Utilities” screen generates the “Upgrade Firmware” screen. Actiontec periodically posts firmware upgrades to enhance the Gateway’s capabilities. To upgrade the Gateway’s firmware: 1. Click Upgrade Here in the “Upgrade Firmware” window. 2. The QWEST upgrade Web page will appear. Follow the onscreen instructions to download and install the Actiontec 1520 Gateway firmware.
Actiontec Wireless-Ready DSL Gateway User Manual 62
Building a Network 7 Other computers can be connected to the Gateway to form a network. The network computers can be connected to the Gateway in three ways: Ethernet, USB, or wirelessly. Ethernet 1. Insert the Actiontec Installation Buddy CD-ROM in the CD-ROM drive of the computer. The Installaton Buddy will start automatically. Wait until the following screen appears, read the onscreen instructions, then click Next. 2. The next window appears.
Actiontec Wireless-Ready DSL Gateway User Manual 3. The next window appears. Select Wired, then click Next. 4. The next window appears. Select Ethernet, then click Next. 5. When the next window appears, get the Yellow Ethernet Cable from the Quick Start Kit, then click Next.
Chapter 7 Building a Network 6. When the next window appears, plug one end of the Yellow Ethernet Cable into one of the Yellow Ports on the back of the Gateway, then click Next. 7. Another window appears. Plug the other end of the Yellow Ethernet Cable into an Ethernet port on the back of the computer, then click Next. ☞ Note: An Ethernet port looks similar to a phone port, but is slightly bigger. 8.
Actiontec Wireless-Ready DSL Gateway User Manual 9. In the next window, the Installation Buddy checks the configuration of the Gateway. A congratulations window appears. The Gateway is connected to a computer via Ethernet. USB 1. Insert Disk 1 (Installation Buddy CD) in the CD-ROM drive of the computer. The Installaton Buddy will start automatically. Wait until the following screen appears, read the onscreen instructions, then click Next.
Chapter 7 Building a Network 2. The next window appears. Read the instructions, select Additional Computer by clicking on the check box, then click Next. 3. The next window appears. Select Wired, then click Next. 4. The next window appears. Select USB, then click Next.
Actiontec Wireless-Ready DSL Gateway User Manual 5. When the next window appears, get the Purple USB Cable from the Quick Start Kit, then click Next. 6. When the next window appears, plug the square end of the Purple Cable into the Purple USB Port on the back of the Gateway, then click Next. 7. Another window appears. Plug the rectangular end of the Purple USB Cable into a USB port on the front or back of the computer, then click Next.
Chapter 7 Building a Network ☞ Note: An Ethernet port looks similar to a phone port, but is slightly bigger. 8. In the next window, the Installation Buddy checks the configuration of the Gateway. A congratulations window appears. The Gateway is connected to a computer via USB. Wireless Computers to be added to the network wirelessly must ☞ Note: have wireless capabilities ( wireless adapter, wireless PCI USB adapter, etc.). 1. Insert Disk 1 (Installation Buddy CD) in the CD-ROM drive of the computer.
Actiontec Wireless-Ready DSL Gateway User Manual 2. The next window appears. Read the instructions, select Additional Computer by clicking on the check box, then click Next. 3. The next window appears. Select Wireless, then click Next. 4. The next window appears. Follow the instructions and insert the Connection 12-3 CD into the computer’s CD-ROM drive to set up the wireless connection. The computer is now connected to the network wirelessly.
Troubleshooting 8 This chapter contains a list of problems that may be encountered while using the Gateway, and techniques to try and overcome the problem. Note that these techniques may not solve the problem. If you need additional help, contact the ISP or Qwest DSL Technical Support at 1-800-247-7285. LAN Connection Failure Ensure the Gateway is properly installed, the LAN connections are correct, and the power is on. Confirm the computer and Gateway are on the same network segment.
Actiontec Wireless-Ready DSL Gateway User Manual Additionally, the “IP Address” entry should be on the 192.168.0.X network (with “x” defining a range from 2 though 255). If the Ethernet adapter is showing an incorrect IP address, click Release, which sets all values back to 0 (zero). Then, click Renew (this process may take a few seconds). The renewed IP address should be on the 192.168.0.X network. If an error occurs, or the IP address renews with an address outside the 192.168.0.
Chapter 8 Troubleshooting Time out error occurs when entering a URL or IP Address Verify all the computers are working properly. Ensure the IP settings are correct. Ensure the Gateway is on and connected properly. Verify the Gateway’s settings are the same as the computer by clicking Status in the “Main Menu” screen. Check the cable/DSL modem by attempting to connect to the Internet.
Actiontec Wireless-Ready DSL Gateway User Manual 74
A Reference This appendix contains information about various topics, including accessing information about your Windows computer and wiring under special circumstances. Locating Computer Information The following procedure is valid for Windows 98, 98 SE, Me, NT 4.0, 2000 and XP. 1. From the desktop, right-click on My Computer. 2. Select Properties from the menu that appears. 3. When the “System Properties” window appears, select General.
Actiontec Wireless-Ready DSL Gateway User Manual Locating Windows Operating System Files If the operating system files reside on the hard drive of the computer, follow the instructions below to locate them. If the files are not on the hard drive, they must be loaded from the installation disks. Windows 98, 98 SE 1. From the desktop, click Start. 2. When the menu appears, select Find, then Files or Folders. 3. When the “Find: All Files” window appears, select Name & Location. 4.
Appendix A Reference 4. Click the down arrow next to the “Look in” text box and select My Computer from the list that appears. 5. Click Search Now. 6a. Windows Me: When the search is complete, note the directory path that appears most often in the “In Folder” column. For example: C:\WINDOWS \OPTIONS\INSTALL. 6b. Windows 2000: When the search is complete, note the directory path that appears most often in the “In Folder” column. For example: C:\WINNT \Driver Cache. 7.
Actiontec Wireless-Ready DSL Gateway User Manual Windows Me, 2000 1. From the desktop, click Start. 2. Select Search, then For Files and Folders. 3. The “Search Results” window appears. In the panel at left titled “What do you want to search for?”, click All files and folders. 4. Another panel, titled “Search by any or all of the criteria below” appears. In the “Look in” text box, click the down arrow and select My Computer from the menu that appears. 5.
Appendix A Reference easiest way to do this is to purchase a pair of two-line modular adapters, a linecord coupler, and some short lengths of phone cable, available at any telephone supply retailer. Do not purchase a 1-line modular adapter or line splitter. ☞ Note: Installing either of these items results in two phone jacks on Line 1, and no access to Line 2. 1. Disconnect the telephone from the two-line phone jack. 2. Install one of the two-line modular adapters (modular adapter #1) in the phone jack 3.
Actiontec Wireless-Ready DSL Gateway User Manual Automatic Water Meter If your home or office has an automatic water meter that uses the same phone line as the Qwest DSL Gateway, you must put a DSL Phone Filter on the water meter. Call your water company for help when installing the DSL Phone Filter on your water meter. PBX or Key System To share Qwest DSL with telephone line in an office PBX or key system: 1.
B Setting Up Static IP Address To communicate with the Gateway from a computer on the network (to use the Web Configuration Utility, for example), the user may have to switch the IP address settings from DHCP-enabled to static IP, so that the computer and the Gateway are on the same subnet. To set up static IP on a computer, select the operating system and follow the instructions. The following procedures are based on the Gateway’s fac☞ Note: tory default address.
Actiontec Wireless-Ready DSL Gateway User Manual 3. Another menu appears. Select Control Panel. 4. When the “Control Panel” window appears, double-click Network.
Appendix C Setting Up Static IP Address 5. The “Network” window appears. In the "The following network components are installed" list box, locate and double-click TCP/IP. 6. The “TCP/IP Properties” window appears. Select IP Address. 7. In the IP Address tab, make sure the the circle next to “Specify an IP Address” is selected. When active, a black dot appears in the circle. If the circle already contains a black dot, leave it alone. 8. Enter the following numbers in the “IP Address” text box: 192.168.0.
Actiontec Wireless-Ready DSL Gateway User Manual 9. Enter the following numbers in the “Subnet mask” text box: 255.255.255.0 Do not include the periods; they are automatically entered. 10. Click OK. The TCP/IP Properties window disappears. 11. In the Network window, click OK. The Network window disappears. 12. The “System Settings Change” window appears, asking whether the computer should be restarted. Click Yes. The computer restarts.
Appendix C Setting Up Static IP Address 3. Another menu appears. Select Control Panel. 4. When the “Control Panel” window appears, double-click Network.
Actiontec Wireless-Ready DSL Gateway User Manual 5. The “Network” window appears. In the “The following network components are installed” list box, locate and double-click TCP/IP. 6. The “TCP/IP Properties” window appears. Click IP Address. 7. In the IP Address tab, make sure the the circle next to “Specify an IP Address” is selected. When active, a black dot appears in the circle. If the circle already contains a black dot, leave it alone. 8.
Appendix C Setting Up Static IP Address 9. Enter the following numbers in the “Subnet mask” text box: 255.255.255.0 Do not include the periods; they are automatically entered. 10. Click OK. The TCP/IP Properties window disappears. 11. If there is a check in the box next to “Detect connection to network media,” click on it to uncheck the box. 12. In the Network window, click OK. The Network window disappears. 13. The “System Settings Change” window appears, asking whether the computer should be restarted.
Actiontec Wireless-Ready DSL Gateway User Manual 3. Another menu appears. Select Control Panel. 4. When the “Control Panel” window appears, double-click Network and Dialup Connections.
Appendix C Setting Up Static IP Address 5. In the “Network and Dial-up Connections” window, double-click Local Area Connection. A number may be displayed after the Local Area Connection. If there is more than one Local Area Connection listed, locate the one that corresponds to the network card installed in the computer by finding the name of the network card in the Device Name column. 6. The “Local Area Connection Status” window appears. Select General, then click Properties.
Actiontec Wireless-Ready DSL Gateway User Manual 7. The “Local Area Connection Properties” window appears. Click General. 8. In the “Components checked are used by this connection” list box, doubleclick Internet Protocol (TCP/IP). 9. The “Internet Protocol (TCP/IP) Properties” window appears. 10. In the General tab, make sure the the circle next to “Obtain an IP Address automatically” is selected. When active, a black dot appears in the circle. If the circle already contains a black dot, leave it alone.
Appendix C Setting Up Static IP Address 12. Enter the following numbers in the “Subnet mask” text box: 255.255.255.0 Do not include the periods; they are automatically entered. 13. Click OK. The “Internet Protocol (TCP/IP) Properties” window disappears. 14 In the “Local Area Connection Properties” window, click OK. The Local Area Connection Properties window disappears. 15. Click Close in the Local Area Connection Status window. The window disappears. 16.
Actiontec Wireless-Ready DSL Gateway User Manual 3. Another menu appears. Select Control Panel. 4. When the “Control Panel” window appears, double-click Network Connections.
Appendix C Setting Up Static IP Address 5. In the “Network Connections” window, double-click Local Area Connection. A number may be displayed after the Local Area Connection. If there is more than one Local Area Connection listed, locate the one that corresponds to the network card installed in your computer by finding the name of the network card in the Device Name column. 6. The “Local Area Connection Status” window appears. Select General, then click Properties.
Actiontec Wireless-Ready DSL Gateway User Manual 7. The “Local Area Connection Properties” window appears. Select General. 8. In the “Components checked are used by this connection” list box, doubleclick Internet Protocol (TCP/IP). 9. The “Internet Protocol (TCP/IP) Properties” window appears. 10. In the General tab, make sure the the circle next to “Obtain an IP Address automatically” is selected. When active, a black dot appears in the circle. If the circle already contains a black dot, leave it alone.
Appendix C Setting Up Static IP Address 11. Enter the following numbers in the “IP Address” text box: 198.162.0.2 Do not include the periods; they are automatically entered. 12. Enter the following numbers in the “Subnet mask” text box: 255.255.255.0 Do not include the periods; they are automatically entered. 13. Click OK. The Internet Protocol (TCP/IP) Properties window disappears. 14 In the Local Area Connection Properties window, click OK. The Local Area Connection Properties window disappears. 15.
Actiontec Wireless-Ready DSL Gateway User Manual 96
Computer Security C The Internet is a giant network of computers all over the world. When a computer is connected to the Internet, it can exchange information with any other computer on the Internet. This lets the user send e-mail, surf the World Wide Web, download files, and buy products and services online, but it also makes the computer vulnerable to attack from persons intent on doing malicious mischief.
Actiontec Wireless-Ready DSL Gateway User Manual With both types of Internet connections, access to the computer must be controlled to make sure someone on the Internet doesn’t access the information on the computer. The longer the computer is connected to the Internet, the easier it is for someone on the Internet to find the computer and attempt to access it without permission. DSL service also provides fast Internet connections.
Appendix B Computer Security Internet Browsers Always exit the Internet browser (for example, Internet Explorer or Netscape Navigator). Never “minimize” the browser or leave it open in the background. Breaking into a computer is easier when an Internet browser is running. Network Applications Network applications (such as software programs) that allow remote access to the computer also make the computer vulnerable to access from other people on the Internet.
Actiontec Wireless-Ready DSL Gateway User Manual For more information about firewalls, including vendors who sell firewall products, go to the Qwest DSL web site and click the Security topic. Firewall products are available from computer and networking equipment retailers.
Specifications General D Model Number GS204AD9-01 (Four-Port Wireless-Ready DSL Gateway) Standards IEEE 802.3 (10BaseT) IEEE 802.3u (100BaseTX) IEEE 802.11b (Wireless) G.dmt G.lite t1.413 RFC 1483, 2364, 2516 Protocol LAN - CSMA/CD WAN - PPP, DHCP, Static IP WAN Full-rate ADSL Interface LAN GS204AD9-01 10/100 RJ-45 switched ports (4) USB port (1) Expansion PCMCIA expansion slot (2) Speed LAN Ethernet: 10/100Mbps Wireless: 802.
Actiontec Wireless-Ready DSL Gateway User Manual Wireless Operating Range Indoors Up to 30M (100 ft.) @ 11 Mbps Up to 50M (165 ft.) @ 5.5 Mbps Up to 70M (230 ft.) @ 2 Mbps Up to 91M (300 ft.) @ 1 Mbps Outdoors Up to 152M (500 ft.) @ 11 Mbps Up to 270M (885 ft.) @ 5.5 Mbps Up to 396 (1300 ft.) @ 2 Mbps Up to 457M (1500 ft.) @ 1 Mbps Topology Star (Ethernet) LED Indicators Power, Internet, Wireless, Ethernet Network (4) Environmental Power Input External, 12V DC, 1.
E Glossary Access Point A device that allows wireless clients to connect to one another. An access point can also act as a bridge between wireless clients and a “wired” network, such as an Ethernet network. Wireless clients can be moved anywhere within the coverage area of the access point and remain connected to the network.
Actiontec Wireless-Ready DSL Gateway User Manual Firewall Prevents users outside the network from accessing and/or damaging files or computers on the network. Gateway A device that manages the data traffic of a network, as well as data traffic to and from the Internet. IP (Internet Protocol) Address A series of four numbers separated by periods identifying a unique Internet computer host. ISP Gateway Address An IP address for the Internet gateway.
Appendix E Glossary Subnet Mask A set of four numbers configured like an IP address used to create IP address numbers used within a particular network only. TCP/IP (Transmission Control Protocol/Internet Protocol) The standard protocol for data transmission over the Internet. WAN (Wide Area Network) A network connecting computers located in separate areas, (i.e., different buildings, cities, countries). The Internet is a WAN.
Actiontec Wireless-Ready DSL Gateway User Manual 106
F Security Level Services Table The following information is related to the Firewall options (High, Medium, and Low) in the “Advanced Services” chapter of this manual (page 35). The types of services and their respective ports are listed in the two right-hand columns; the “In” column details if a particular service can be accessed by a user outside of the network; and the “Out” column informs whether a computer on the Gateway’s network can access a particular incoming service.
Actiontec Wireless-Ready DSL Gateway User Manual Medium Security Level Service http dns ftp telnet smtp pop3 nntp real audio/video icmp H.323 T.120 SSH Port 80 53 21 23 25 110 119 7070 n/a 1720 1503 22 In no no no no no no no yes no no no no Out yes yes yes yes yes yes yes no yes yes yes yes In no yes no no no no no yes yes yes yes yes Out yes yes yes yes yes yes yes no yes yes yes yes Low Security Level Service http dns ftp telnet smtp pop3 nntp real audio/video icmp H.323 T.
Appendix F Security Level Services Table Acronym Definitions http HyperText Transfer Protocol This protocol delivers information over the Internet, and is used when a home computer connects to a Web site via an Internet browser dns Domain Name System. A date query system used to translate host names into Internet addresses (i.e., www.somewebsite.com translates to 888.999.000.111) ftp File Transfer Protocol. A protocol used to transfer files over the Internet.
Actiontec Wireless-Ready DSL Gateway User Manual icmp Internet Control Message Protocol. Allows error messages, text packages, and informational messages to be transferred over the Internet. H.323 A standard protocol for sending audio and video over the Internet. T.120 A standard protocol for multimedia teleconferencing over the Internet. SSH Secure Shell. A method for the secure transfer of files from another computer. Also enables remote capabilities (terminal, log in).
Non-Windows System Setup G The Gateway supports both the Classic Macintosh operating systems (9.2.1 and below), as well as OS X. When installing any software, consult the user manual and ☞ Note: help files supplied with the software for detailed information. Actiontec provides the following information as a guideline only. Classic To configure the Router, Open Transport 2.5.2 or above must be loaded on the computer. 1. Click Apple, Control Panels, then TCP/IP.
Actiontec Wireless-Ready DSL Gateway User Manual 2. When the “TCP/IP” window appears, select Edit from menu bar, then select User Mode. 3. When the “User Mode” window appears, select Advanced, then click OK. 4. In the “TCP/IP” window, select Ethernet from the “Connect via” drop-down list. 5. Select Using DHCP Server from the “Configure” drop-down list. 6. Ensure the “Use 802.3” option is not checked. 7. Disregard any addresses in the IP Address text boxes.
Appendix G Non-Windows System Setup OS X 1. Open the “System Preferences” application via the Dock or Apple Menu. The “Network” window appears. 2. Select Built-In Ethernet from the “Show” drop-down list. 3. Select TCP/IP and, from the “Configure” drop-down list, select Using DHCP. 4. Click Apply Now and close the “System Preferences” application. The TCP/IP settings are configured. Next, go to “Connecting to the ISP” on page 86.
Actiontec Wireless-Ready DSL Gateway User Manual Connecting to the ISP 1. Open the Web browser. In the address bar, enter http://192.168.0.1 then press Enter on the keyboard. 2. The “Main Menu” screen appears. Select Setup/Configuration. 3. In the “Set Up/Configuration” screen, select Non-Windows Setup from the menu on the left side.
Appendix G Non-Windows System Setup 4. The “Actiontec DSL Modem Setup Page” screen appears. In this screen, the user can configure the the ISP Protocol (Bridged, PPPoA, or PPPoE) and the IP configuration (Dynamic or Static). Using the Internet Service Provider (ISP) Worksheet provided by the ISP, enter the information in the appropriate text boxes. If no worksheet has been provided, contact the ISP. 5. Click Save and Restart at the bottom of the Actiontec DSL Modem Setup Page screen.
Actiontec Wireless-Ready DSL Gateway User Manual 116
Notices Regulatory Compliance Notices Class B Equipment This equipment has been tested and found to comply with the limits for a Class B digital device, pursuant to Part 15 of the FCC Rules. These limits are designed to provide reasonable protection against harmful interference in a residential installation. This equipment generates, uses, and can radiate radio frequency energy and, if not installed and used in accordance with the instructions, may cause harmful interference to radio communications.
Actiontec Wireless-Ready DSL Gateway User Manual 2. This device must accept any interference received, including interference that may cause unwanted operation. To comply with FCC RF exposure compliance require☞ Note: ments, the antenna used for this transmitter must be installed to provide a separation distance of at least 20 cm from all persons and must not be co-located or operating in conjunction with any other antenna or transmitter.
Limited Warranty Hardware: Actiontec Electronics, Inc., warrants to the end user (“Customer”) that this hardware product will be free from defects in workmanship and materials, under normal use and service, for twelve (12) months from the date of purchase from Actiontec Electronics or its authorized reseller.
Actiontec Wireless-Ready DSL Gateway User Manual THIS ACTIONTEC ELECTRONICS PRODUCT MAY INCLUDE OR BE BUNDLED WITH THIRD-PARTY SOFTWARE, THE USE OF WHICH IS GOVERNED BY A SEPARATE END-USER LICENSE AGREEMENT. THIS ACTIONTEC ELECTRONICS WARRANTY DOES NOT APPLY TO SUCH THIRDPARTY SOFTWARE. FOR THE APPLICABLE WARRANTY, PLEASE REFER TO THE END-USER LICENSE AGREEMENT GOVERNING THE USE OF SUCH SOFTWARE.
Limited Warranty NEITHER ASSUMES NOR AUTHORIZES ANY OTHER PERSON TO ASSUME FOR IT ANY OTHER LIABILITY IN CONNECTION WITH THE SALE, INSTALLATION, MAINTENANCE OR USE OF ITS PRODUCTS.
Actiontec Wireless-Ready DSL Gateway User Manual Governing Law: This Limited Warranty shall be governed by the laws of the State of California, U.S.A., excluding its conflicts of laws and principles, and excluding the United Nations Convention on Contracts for the International Sale of Goods.