Network Attached Storage Device Model #s: NS100, NS100-160, NS100-200, NS100-250, NS100-300, NS100-400 User Manual Ver 1.
Table of Contents 1 Introduction 1 Features Package Contents System Requirements Technical Support 1 2 2 2 2 Configuring the NAS Device Client PC Setup Accessing the NAS Device from the Web Changing the Password USB Devices Adding a Print Server Other Configurations 3 Using the Administrative Utility Accessing the Administrative Utility Users System Status Network Settings System Settings Advanced Setup 3 3 6 8 9 10 14 15 15 16 20 21 23 28 4 Accessing the NAS Device on the Internet 43 Connecting Via
ActiontecNetwork Attached Storage Device User Manual This page left intentionally blank.
1 Introduction Congratulations for purchasing the Actiontec Network Attached Storage (NAS) Device. The NAS Device adds gigabytes of storage space to your network without the cost, space, and maintenance hassles of a full-fledged file server. The NAS Device provides solid data transfer performance for multiple client connections, and you can add as many NAS Devices to the network as you like.
Actiontec Network Attached Storage Device User Manual Package Contents If any of these items are damaged or missing, please contact the dealer for replacements. • NAS Device • Quick Installation Guide • Setup CD • Ethernet Cable • Power Adapter System Requirements • Windows 98SE, Me, 2000 and XP • Ethernet network employing 10BaseT or 100BaseTX • TCP/IP protocol Technical Support Actiontec Electronics prides itself on making durable, high-quality, high-performance products.
Configuring the NAS Device 2 After connecting and setting up the NAS Device (see the included Quick Start Guide for instructions), the user can perform custom configurations. This chapter explains how to configure the NAS Device on the network for various tasks, including file sharing, setting up a print server, and changing the password.
Actiontec Network Attached Storage Device User Manual 2. Log on when Windows prompts for a network logon. If ESC (on the keyboard) or Cancel is clicked, no network resources will be available. When logging on, a valid user name and password must be entered. If the administrator has defined users on the NAS Device, use the user name and password supplied by him/her.
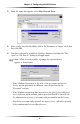
Chapter 2 Configuring the NAS Device 2. From the menu that appears, select Map Network Drive…. AEEE AEEE 3. Select a drive letter for this folder, click in the “Reconnect at Logon” check box, then click OK. 4. This drive will now be available in Windows Explorer, and from the “FileOpen” or “File-Save As” dialogs in all applications. When accessing a folder, a prompt for a password may ☞ Note: appear, as shown below.
Actiontec Network Attached Storage Device User Manual Tips for Storing Data on the NAS Device • Change the Windows user name and password to match the user name and password assigned by the NAS Device. This allows just one log in sequence. • Map multiple NAS folders on the computer, as described above. • Backup data by copying files from the computer to the NAS Device. • If Windows Me, 2000, or XP is running on the computer, a backup program is available.
Chapter 2 Configuring the NAS Device 3. The “Actiontec Network Attached Storage” home screen appears in the Web browser window. 4. To browse the files and folders on the NAS Device, click Shared_Data or FLASH/USB HDD. • Shares (Folders) to which everyone has access are listed. Access these folders and files by clicking on the folder name or file name. • To download a file displayed in the browser, right-click on the file and select Save Target as…. 5.
Actiontec Network Attached Storage Device User Manual Changing the Password Although the administrator must create the user name and initial password, they can be changed by the user. To do this: 1. Open a Web browser. 2. In the Address or Location text box, enter “http://” and the NAS Device’s IP address. If using the default IP address, enter: http://192.168.0.
Chapter 2 Configuring the NAS Device 5. Enter the required data: • User name - the login name of the NAS Device, created by the administrator • Existing password - the current password • New password - the new password • Confirm new password - reenter the new password 6. Click Save to save the changes. 7. Click Home to return to the main screen. USB Devices A USB hard drive or USB Memory Disk (flash memory disk) can be inserted in the NAS Device’s USB port at any time.
Actiontec Network Attached Storage Device User Manual If the device is not removed, it will not be re-con☞ Note: nected. The USB device must be removed and re-inserted to reUSB connect. Adding a Print Server If a USB printer is connected to the NAS Device, the Device can be used as a print server. To do this, follow these instructions (this installation is for Windows XP only; other operating systems may have a slightly different procedure): 1.
Chapter 2 Configuring the NAS Device 3. When the “Printers” (or “Printers and Faxes”) window appears, click Add Printers. 4. Read the on-screen information, then click Next. 5. In the next window, select the “A network printer…” option. Click Next.
Actiontec Network Attached Storage Device User Manual 6. In the next window, select the “Browse for a printer” option. Click Next. 7. In the “Add Printer Wizard” window, select the workgroup to which the NAS Device belongs. Click Next. 8. From the list that appears, select the NAS Device. Click Next.
Chapter 2 Configuring the NAS Device 9. From the list that appears, select the printer. Click Next. 10. Select the printer manufacturer and model. Click Next. 11. Select whether or not the printer will function as the default printer. Click Next.
Actiontec Network Attached Storage Device User Manual 12. Click Finish to exit. Other Configurations After configuring the NAS Device, all users can access the Device with “guest” access rights. This allows access to the public shares (by default, “Disk” and “Flash or USB HDD”). However, Actiontec recommends creating a NAS User for each person on the network. This will provide each network user with his/her own name and password, as well as a personal folder on the NAS Device.
Using the Administrative Utility 3 This chapter describes using the NAS Device’s Administration Utility. With the Utility, the administrator can check the NAS Device’s status, add or delete users, or create user groups. Accessing the Administrative Utility To establish a connection from a computer to the NAS Device: 1. Open a Web browser. 2. In the Address text box, enter “http://” and the NAS Device's IP address. If using the default IP address, enter: http://192.168.0.
Actiontec Network Attached Storage Device User Manual 4. To access the Administration interface, click Administration on the right. A password prompt appears, as shown below. 5. Enter “admin” for the name, and leave the password blank. • To gain access, enter the user name and password of a user in the “Administrators” User Group. • By default, the only user in the “Administrators” User Group is “admin.” (Other users can be added later.) • The default password for the “admin” user is blank (no password).
Chapter 3 Using the Administrative Utility • When a user is created, a Share (folder) is created for them, with the same name. Only the user and the Administrator group can access this new Share. Name Enter the user name here. Note that punctuation and other special characters (e.g. * / | \ ) cannot be used in the name. Comment Enter a comment here. Password/Verify Password Enter the user’s password in these text boxes. These text boxes are also used to change an existing user’s password, as follows: 1.
Actiontec Network Attached Storage Device User Manual Create Private Folder If creating a new user: • Checking this option creates a Group and a Private Folder (Share) with the same name as the user. • The “Private Folder (Share) Location” text box allows the user to select which disk is used for the Private Folder. • Read/Write access will be granted to the Share. If changing an existing user: • The check box has no effect - it will neither create nor delete.
Chapter 3 Using the Administrative Utility Groups Click this to view and/or modify the Groups which the selected user is in. Delete Click this button to delete the selected user. When a user is deleted, his/her private folder, and any MWarning: data it contains, is deleted. If this data is important, the administrator should copy it to another folder before deleting the user. Save Use this button to save any changes made to the “User Properties” for an existing user. Modifying Existing User Properties 1.
Actiontec Network Attached Storage Device User Manual System Status This screen displays many of the NAS Device’s current settings Server Name The current name of the NAS Device. This name will be shown in “Network Neighborhood” or “My Network Places.” IP Address IP address currently used by the NAS Device. Current Status Indicates the current status of the Device. This will usually display “Available” or “Ready” If the Device is not available, the message will say why the Device is not available (e.g.
Chapter 3 Using the Administrative Utility Delete Current Job Clicking this button deletes the current print job and, if applicable, starts the next print job in the print server queue. Delete All Jobs Clicking this button deletes all current print jobs. Refresh Click this button to update the data shown on the Status screen.
Actiontec Network Attached Storage Device User Manual Obtain IP Address Automatically (DHCP Client) Do not select this option unless a DHCP server is connected to the network. A DHCP server provides an IP address to computers and other devices. Fixed IP Address Select this if the Network does not have a DHCP server, and enter the following data. IP Address: (Default:192.168.0.100) The IP address must be unused, and compatible with the computers on the network.
Chapter 3 Using the Administrative Utility Primary The IP address of the first DNS Server. Backup The IP address of the backup DNS server (accessed if the first server is busy). System Settings This screen provides an overview of the NAS Device’s settings.
Actiontec Network Attached Storage Device User Manual Server Name If needed, change the name of the NAS Device here. Note that punctuation and other special characters (e.g. * / | \ ) cannot be used in the name. Comment Enter a comment here (the location of the NAS Device, for instance). Workgroup This should match the Workgroup name of the computers on the network.
Chapter 3 Using the Administrative Utility Shutdown/Restart Use these two sets of text boxes to force the NAS Device to turn off and on at the same time every day, or on the weekends. Shutdown Now Clicking this button causes the NAS Device to shut down immediately, breaking all existing network connections. No data will be saved. Restart Now Clicking this button restarts the NAS Device, breaking all network connections. No data will be saved.
Actiontec Network Attached Storage Device User Manual Sync Now Click this button to synchronize with the NAS Device immediately. Send E-Mail Alerts… Click here to enable the sending of e-mail alerts by the NAS Device. Alerts will be sent when there is some problem requiring the administrator’s attention. E-Mail Address (1)/(2) Enter the e-mail addresses to which the alerts will be sent. Subject Enter the text that will appear in the “Subject” text box of an e-mail alert.
Chapter 3 Using the Administrative Utility Enable FTP Server If this option is enabled, users can upload and download files via FTP (file transfer protocol). Allow anonymous FTP login (“guest” right) The FTP server prompts for a user name and password when clients attempt to connect. If this option is enabled, users will be able to enter “anonymous” as the user name, and anything as the password. If this option is disabled, users must provide their correct user name and password.
Actiontec Network Attached Storage Device User Manual Advanced Setup This screen includes many of the NAS Device’s advanced settings, including Groups, Folders, Backup, Hard Drive, and Upgrade. Groups In this screen, manage the user groups on the NAS Device. New Group Use this text box to create a new group. Existing Groups This list box shows the list of all groups. Two groups - “everyone” and “administrators” - always exist. These groups cannot be deleted. Create Click this button to create a new group.
Chapter 3 Using the Administrative Utility Members Click this button to display the users who are members of the selected group. Members can then be added or deleted. The “everyone” group always contains all users. Members ☞ Note: cannot be added or deleted. Delete Click this button to delete the selected Group. The “administrators” and “everyone” groups cannot be ☞ Note: deleted. Access Rights Screen In this screen, view and modify the groups which can access this share.
Actiontec Network Attached Storage Device User Manual Other Shares The “Other Shares” column on the right shows all other shares. The current group has no access to these shares. To Add Access Rights Select the share or share in the right-hand column, then click << Read Access to provide read-only access, or click << R/W Access to provide read-write access. Multiple shares can be selected by holding down CTRL on the keyboard while selecting.
Chapter 3 Using the Administrative Utility Members (Users) The “Members” column on the left shows the users who are currently members of this group. Other Users The “Other Users” column on the right shows users who are not currently members of this group. To Add a Member to the Group Select the user or users in the right-hand column, then click <<. Multiple users can be selected by holding down CTRL on the keyboard while selecting.
Actiontec Network Attached Storage Device User Manual • Only the NAS Device administrators can create Shares. However, within a Share, users who have access to that Share can create other folders (directories) as well as files. • A Share can be accessed by many User Groups, and a User Group can access many Shares. • If a Share within a Share exists, all users with access to the outer share will always have the same access rights to the inner share. Shared Folders All existing shares are listed.
Chapter 3 Using the Administrative Utility Location The Location associated with the Share. Note that once a Share is created, its location can not be changed. There are two options: • Default folder- if selected, creates the Share in the default folder. • Specify - if selected, enter the folder (directory) to be converted to a Share. If the folder does not exist, it will be created.
Actiontec Network Attached Storage Device User Manual Share Access The screen is displayed when Access Rights is clicked on the Shares screen. Determine which users can access the selected share in this screen. Share Name The name of the Group being modified is shown above the two lists of shares. Groups with Access This list shows which Group can currently access this Share. The type of access is shown in brackets. (R = Read Only, R/W = Read-Write).
Chapter 3 Using the Administrative Utility To Remove Access Rights Select the Group in the left-hand column, then click No Access >>. Multiple Groups can be selected by holding down the CTRL on the keyboard while selecting. When finished, click Close Backup Config Backup This facility allows the user to Backup (Download) and Restore (Upload) the NAS Device's configuration file. The configuration file contains all network information, as well as the User, Group, and Share information.
Actiontec Network Attached Storage Device User Manual Data Backup Data files can be backed up from the NAS Device to another network device, or from another network device to the Device. The Backup Jobs text box displays any defined backup jobs. If no jobs have been defined, the text box will be empty.
Chapter 3 Using the Administrative Utility Add New Job Clicking this button opens the “Define Backup Job” screen, where a new backup job can be defined. Define Backup Job From this screen new backup jobs can be created, which will be displayed on the “Backup” screen. Name Enter the job’s name here. The backup job’s name must be composed of alphanumeric symbols not exceeding 15 characters in length. Backup Type Select the desired backup type: • Full - backup all files.
Actiontec Network Attached Storage Device User Manual Direction Select the desired direction where backing up will occur here: • From this NAS to another device - data on the NAS Device is backed up to remote device. • From another device to NAS - data on remote device is backed up to the NAS Device. Share Select the applicable share here. If backing up from the NAS Device, select the share to back up. If backing up to the NAS Device, select the share where the backup-up data will be stored.
Chapter 3 Using the Administrative Utility • Every Monday, Every Tuesday… - select this option to have the backup performed once per week, on the specified day and time. • The time text box (hour, minute, AM/PM) - specify at what time the backup job should be performed. Hard Drive This screen allows the user to perform various disk operations on the USB hard disk drive. No operations can be performed on a USB flash drive. This screen has four sections: Prepare Disk, Self-Test (S.M.A.R.T.
Actiontec Network Attached Storage Device User Manual • Preparing - only displayed after the “Prepare Disk” button is pressed. (See below for details). • Prepared - disk is ready for use. Prepare Disk Click here after installing a new disk. The disk will be partitioned and quick-formatted. Any data on the disk will be lost. Performing a “Prepare Disk” operation will destroy M Warning: any data on the disk. Once started, this process cannot be halted or reversed. Self-test (S.M.A.R.T.) S.M.A.R.T.
Chapter 3 Using the Administrative Utility drive. • Scandisk in progress - Scandisk operation is in progress. The disk cannot be used while a Scandisk is in progress. If required, use the “Start/Stop” button to terminate the Scandisk operation and gain access to data on the disks. (To see the results of the Scandisk operation, use the “View Disk Log” button.) • Scandisk completed - The last Scandisk operation has been completed. Use the “View Disk Log” button to view the results.
Actiontec Network Attached Storage Device User Manual Disk Log Use this to view the results of the last Scandisk operation. Help Click here for more information about this screen. Upgrade The “Upgrade” process updates the NAS Device's firmware to the latest version. The upgrade file is obtained from the dealer or supplier. Note that the NAS Device is unavailable during the upgrade process, and all connections will be lost, including the one used to start the upgrade.
Accessing the NAS Device on the Internet 4 If the network is connected to the Internet, typically by a broadband router/ gateway and modem, the NAS Device can be made available via the Internet. Features available to Internet users include: • Using a Web browser to view and download files • Remote management Connecting Via the Internet If the network is connected to the Internet via a router or gateway, the NAS Device can be made available from the Internet.
Actiontec Network Attached Storage Device User Manual Using the Web Browser from the Internet This is identical to using the Web browser from the network. But remember: • The Internet IP address must be used to connect to the NAS Device, not the LAN IP address. • If the port number used by the NAS Device has been changed from the default (80), specify the correct port number when connecting. For example, if the port is 8080, and the Internet IP address is 203.70.212.
Troubleshooting This chapter lists some common problems, and their solutions. Problem 1: The NAS Utility doesn’t list any NAS Devices. Solution 1: Check the following: 5 • The NAS Device is installed, LAN connections are OK, and it is powered on and startup is complete. • Ensure the computer and the NAS Device are on the same network segment. (If you don't have a router, this must be the case.) • Ensure the computer has the TCP/IP network protocol loaded.
Actiontec Network Attached Storage Device User Manual Problem 2: The NAS Device is configured, but I can’t find it in Network Neighborhood. Solution 2 Try using Start - Find - Computer, and enter the NAS Device's name. If this does not work, use Control Panel - Network to check the following: • TCP/IP protocol is installed. If not, use Add - Protocol - Microsoft - TCP/IP to install it. • Check the network Bindings: • Ensure the TCP/IP protocol is bound to the Network card (NIC).
Chapter 5 Troubleshooting Problem 3 When I click on an NAS folder icon in Network Neighborhood, I get prompted for a password. Solution 3 This can happen in the following situations: • The Logon name you used on the computer is recognized by the NAS Device, but the password is not. Simply enter the NAS password, or make the Windows password the same as the NAS password. • The logon name you used on the computer is not recognized by the NAS Device, and was converted to guest, with guest access rights.
Actiontec Network Attached Storage Device User Manual This page left intentionally blank.
A Specifications Model Number(s) NS100, NS100-160, NS100-200, NS100-250, NS100-300, NS100-400 (Actiontec Network Attached Storage Device) Capacity 160, 200, 250, 300, or 400 Gigabytes (depending on model) Ports 10/100 Ethernet, USB 2.0, Power Network Interface 10/100 (Auto MDIX) Standards IEEE 802.3; 802.
Actiontec Network Attached Storage Device User Manual LED Indicators Ready, Status, Disk, Disk Full, USB, Ethernet Operating temperature 0° - 55° C (32° - 131° F) Relative Humidity > 80 % (non-condensing) Limited Warranty 1 year ☞ Note: Specifications are subject to change without notice.
Notices Regulatory Compliance Notices Class B Equipment This equipment has been tested and found to comply with the limits for a Class B digital device, pursuant to Part 15 of the FCC Rules. These limits are designed to provide reasonable protection against harmful interference in a residential installation. This equipment generates, uses, and can radiate radio frequency energy and, if not installed and used in accordance with the instructions, may cause harmful interference to radio communications.
Actiontec Network Attached Storage Device User Manual This device complies with Part 15 of the FCC Rules. Operation is subject to the following two conditions: 1. This device may not cause harmful interference 2.
Limited Warranty Hardware: Actiontec Electronics, Inc., warrants to the end user (“Customer”) that this hardware product will be free from defects in workmanship and materials, under normal use and service, for twelve (12) months from the date of purchase from Actiontec Electronics or its authorized reseller.
Actiontec Network Attached Storage Device User Manual THIS ACTIONTEC ELECTRONICS PRODUCT MAY INCLUDE OR BE BUNDLED WITH THIRD-PARTY SOFTWARE, THE USE OF WHICH IS GOVERNED BY A SEPARATE END-USER LICENSE AGREEMENT. THIS ACTIONTEC ELECTRONICS WARRANTY DOES NOT APPLY TO SUCH THIRDPARTY SOFTWARE. FOR THE APPLICABLE WARRANTY, PLEASE REFER TO THE END-USER LICENSE AGREEMENT GOVERNING THE USE OF SUCH SOFTWARE.
Limited Warranty NEITHER ASSUMES NOR AUTHORIZES ANY OTHER PERSON TO ASSUME FOR IT ANY OTHER LIABILITY IN CONNECTION WITH THE SALE, INSTALLATION, MAINTENANCE OR USE OF ITS PRODUCTS.
Actiontec Network Attached Storage Device User Manual Governing Law: This Limited Warranty shall be governed by the laws of the State of California, U.S.A., excluding its conflicts of laws and principles, and excluding the United Nations Convention on Contracts for the International Sale of Goods.