
User guide


Acu-Rite Companies Inc.
ENC 250
™
MULTI-SECTION
9
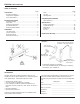
The reading head must be mounted in the same location as
it is held by the alignment brackets. To attach the reading
head to the mounting surface, follow these steps:
• Custom designed brackets by the installer should be solid,
and rigidly assembled. Attach brackets to the machine
with [1/4-20] M6 fasteners minimum. Allow clearance for
removing alignment brackets once the reading head has
been installed. Also, allow a small amount of clearance
between the reading head and its mounting surface for
setting the leveling screws. For custom brackets, transfer
punch the two head mounting holes on the bracket and tap
these holes for [8-32 x 1/2”] M4 x 12mm deep minimum.
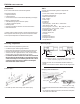
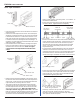
To mount the reading head proceed as follows:
• Insert, but do not tighten the [8-32] M4 reading head
screws.
• Place a [.001 - .003”] .025 - .076mm shim between the
leveling set screws and mounting bracket.
• Adjust each screw until a slight drag is felt on the shim.
• Evenly tighten the [8-32] M4 reading head mounting
screws so that the head does not shift or twist. Remove
the alignment brackets as done previously.
• Verify the reading head is able to move through the entire
length of machine travel without interference.
Installing the reading head
Completing the
installation
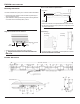
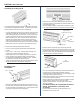
• Remove the Reading Head shipping tool from the end of
the scale case. Attach the left end cap with M3 x 12 CHM
screws provided in the hardware kit. Tighten these screws
securely to compress the end cap gasket.
M3 x 12 CHMS
• Move the axis so that the reading head is at the tape
tensioning position indicated by the tension label on the
right side of the scale.
• Set the readout’s display and encoder resolution to .005
mm. See readout reference manual for setting resolution.
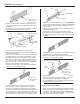
• Remove tensioning hole plug from the right end cap.
• Insert the M4 thumbscrew from the hardware kit through
the washer and polyurethane compression spring into the
tensioning hole. Turn the thumbscrew until it engages the
scale tensioner inside the scale case.
• Turn the thumbscrew clockwise to tension the tape until
the display has changed approximately .050mm.
Carefully back off the thumbscrew until the display stops
changing. Reset the display to zero.
• Repeat this procedure two to three times to put the tape
in a relaxed, slack-free position.
• Slowly tighten the thumbscrew until the display reaches
the tensioning value shown on the scale label.
• Tighten the M5 SHSS on the right side of the case to
30 in-lb. [3.4Nm]
• THE M5 SHSS MUST BE TIGHTENED SECURELY
AFTER TENSIONING TO PREVENT TAPE
SLIPPAGE.
• Unscrew and remove the knurled tensioning screw
assembly from the scale case.
Polyurethane
compression spring
Flat washer
M4
Thumbscrew
Tensioning hole
M4
Thumbscrew
M5 SHSS