ADATASync User Manual User Manual Version 1.0 © 2010 A-DATA Technology Co., Ltd.
1. Installation 1. Run ADATASync.exe 2.
. Specify the Destination Folder and Click “Next” 4.
5. Confirm Installation Options and Click “Install” 6. Please wait for the Installer to finish. This should only take a few seconds.
7. Installation Complete! Click “Finish” to exit.
2. Dashboard Overview After Installation, you can start “Launch Bar” from the Start Menu. Once opened, the Launch Bar will appear on the Desktop. 1. Right Click on the Icon to show two options “Hide to Systray”, “Exit” on the screen. Click “Hide to Systray”, Launch Bar will be hidden to the lower right system tray. You need to right click on the Icon in the tray to open the Launch Bar. Click “Exit”, Launch Bar will be closed and it will exit the program.
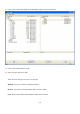
2. Left Click on the Icon to start the ADATASync Main Menu. Source Pane: Located on the Upper Left area. Local and external drives are displayed here. You can select a source folder in the Source Pane. Destination Pane: Located on the Upper Right area. The disk supported ADATASync Program is displayed here. You can select a destination Folder in the Destination Pane. Task Pane: Located on the lower area. Currently pending actions or previously executed tasks are shown here.
3. Add a Task 1. Select a source folder in the Source Pane, such as File2 folder.
2. Next, select a destination folder in the Destination Pane, such as File4 folder. 3. Next, select function button “Add” 4. Select Job type and Click “OK”. There are three Job types for user to set the task. Backup: Copy source folder to destination folder. Restore: Copy file(s) from destination folder to source folder. Sync: Make source folder and destination folder data consistent.
5. The task is added and shown in the Task Pane including its Job type.
4. Execute a Task 1. Select task(s) in the Task Pane and Click “Execute”. For example, select the task of backup from File2 folder to File4 folder. 2. Wait for the Execute to finish.
3.
The file2 folder is all backup to the File4 folder in the Destination Pane.
5. Remove a Task 1. Select task(s) in the Task Pane and Click “Remove”. For example, select the task of backup from File2 folder to File4 folder.
2. The task selected is deleted.
6. Scheduling When users turn on “Scheduling” function and also set the corresponding schedule(s) for executing the function, all the task(s) shown in the Task Pane (including currently pending actions or previously executed tasks) will be executed at the time. 1. Left Click on the “Setting” and Click “Scheduling” 2. Scheduling Dialog is shown below. Users are able to enable/disable ”Scheduling” function, and also to select the corresponding schedule(s) for executing the function. Then, click “OK”.
3. In this case, there are three tasks in the Task Pane, including the backup from File2 folder to File4 folder, the restore from File6 folder to File5 folder, and the sync between File7 folder and File8 folder. Wherein the File4 folder and File5 folder are empty folders. The files in File7 folder and File8 folder respectively are totally different.
4. When the time is due, the three tasks are executed according to their Job type.
5. All three tasks are executed at the set schedule. You can see that the file2 folder is backup to File4 folder.
You can see that the files in File6 folder are restored to File5 folder. Also the files in the File7 and File8 are synced.