
Installation manual


11
B. UNPACKING/SETTING UP
Remove protective shipping material (i.e., plastic wrap and optional shipping box) from dryer.
IMPORTANT: Dryer must be transported and handled in an upright position at ALL times.
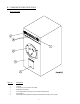
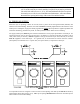
The dryer can be moved to its final location with or without the skid attached. To unskid the dryer, locate and
remove the four (4) bolts securing the base of the dryer to the wooden skid. Two (2) are located at the rear base
(remove the back panel for access), and two (2) are located in the bottom of the lint chamber. To remove the two
(2) bolts located in the lint chamber area, remove lint drawer completely. (Refer to
page 40 for lint drawer
removal instructions.) Once the bolts are removed and the lint drawer is reinserted, slide the dryer off of the skid.
With the skid removed, to make it easier to slide the dryer into its final position, slightly lower
ALL four leveling
legs, so that the dryer will slide on the legs instead of the base frame.
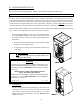
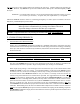
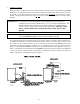
1. Inside the basket (tumbler) of this dryer is an exhaust transition
piece that must be installed on the outlet of the exhaust before
any further venting is connected. To do this, follow the procedures
listed below:
a. Remove the exhaust transition piece from the basket (tumbler)
and place it on the exhaust outlet.
b. Using the screws provided, secure the exhaust transition piece
to the dryer.
NOTE: It is recommended that this joint be taped as well as
ALL other duct joints to prevent moisture and lint from
escaping into the building.
WARNING
An exhaust duct transition piece is shipped inside of the dryers
tumbler and must be installed on the dryers exhaust duct, with
the hardware provided, BEFORE location venting is connected
to the dryer.
THIS EXHAUST DUCT TRANSITION PIECE
MUST BE INSTALLED FIRST!
Failure to observe this installation requirement may result in damage
to the dryer, create a FIRE HAZARD and will VOID the
manufacturers warranty.
012999JEV-GS/cj P/N: 114092
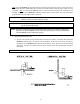
2. Leveling Dryer
The dryer is equipped with four (4) leveling legs, one at each corner
of the dryer base. Two (2) are located at the rear of the dryer
base, and two (2) are located in the lint chamber. To increase
bearing life and improve efficiency, the dryer should be tilted
slightly to the rear.