
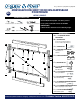
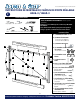
Installation Guide


©2013-2016 Jewett-Cameron Company • www.jewettcameron.com • Customer Service: 800-955-2879
03-AG1-CONTRACTOR 2016-10-21
3
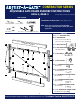
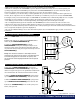
STEP 2C: LATCH SIDE OF FRAME (A) INSTALLATION
Carefully add the LATCH SIDE OF THE FRAME (A)
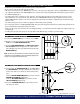
Now, carefully (at this point the frame is still loose) extend
the gate frame to within 1 inch of the post where the latch
will be attached.
Now measure the distance between the plates where the
2x4’s will attach (top and bottom of frame), cut 2x4’s and
attach using 1 INCH ROUNDHEAD WOOD SCREWS (G) for the
plates, and 2 INCH FLATHEAD WOOD SCREWS (H) for the
spreader bars.
NOTE: Depending on the width of your gate, you may not
need all of the 2 inch wood screws, it is not necessary to have
a screw in every hole. Because it is an adjustable frame, not
all the pre-drilled holes on the spreader bars and vertical
frame sides will line up.
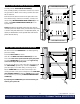
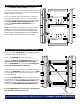
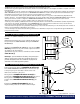
STEP 3: TRUSS CABLE and GATE LATCH INSTALLATION
Be sure to loosen the TURNBUCKLE to its widest opening
prior to assembly.
Assemble TRUSS CABLE as shown.
Slide the “S” HOOK of the TRUSS CABLE KIT (C) into the
hole at the lower corner of the latch side of the gate frame.
Hook the TURNBUCKLE into the hole at the opposite top
corner on the hinge side of the frame.
Form a loop on the loose end of the cable, thread through
the CABLE CLAMP, slip that loop onto the “S” HOOK and
pull cable tight, secure with clamp, cut off any excess.
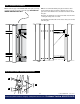
Attach STRIKER BAR from the Gate Latch Kit (F) to the
inside gate frame at the desired height use the 4 HEX HEAD
SELF-TAPPING SCREWS (I) . Align the LATCH with the Striker
Bar and attach to post using 1.5 INCH ROUNDHEAD WOOD
SCREWS (K).
By adjusting the TURNBUCKLE you can fine tune the gate
latch to give a perfect fit.
1”
2x4’s Not Included
2x4’s Not Included
2x4’s Not Included
F
C
I K
G H AG
G H G