
Installation Guide


Adorn Pillar Stone Installation
Natural Concrete Products – www.naturalconcreteproducts.com
Tools needed to install:
Safety glasses, gloves, measuring tape, caulking gun, level, exterior construction screws and construction
adhesive. Safety first is the number one priority with any construction project. Always wear safety
glasses and gloves when handling Adorn Pillar Stone.
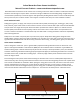
Construct the pillar base using
2” X 2”’s and OSB or plywood
to the desired height. Each
Pillar Stone is 6” high so
designing the height in 6”
increments will eliminate
cutting of the Pillar Stones.
The outside dimensions need
to be 14” X 14”. Cover the
frame with an ice and water
resistant type of wrap. It is
recommended to use treated
lumber (2”X4”) on the base.
Anchor the pillar as needed.
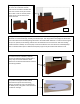
Attach the base course:
Place 4 Pillar Stones
around the base as shown.
Level the base course and
attach with 2 screws per
Pillar Stone through the
attaching flange
approximately 1” above
the stone veneer. Continue
installing the Pillar Stones
one course at a time.
Square up the corners,
check for level and attach
with screws.
When you get to the top
course, bend the flashing over
the frame and screw in place.
Place a bead of construction
adhesive around the top of the
Pillar Stones. Set the Pillar Cap
in place.
The finished pillar will be
approximately 18” square.