
Owner's manual


ADS Eureka Digital System User Manual
13
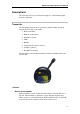
Pushbutton switch
The pushbutton switch turns on and off the transmitter unit. Refer to
Transmitter Control and Indicators below for more information.
LEDs
The LEDs display information about the transmitter. Refer to Transmitter
Control and Indicators below for more information.
Handle
The handle exists for carrying and positioning the transmitter.
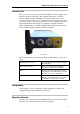
Charger/Accelerometer Connector
This connector, located on the side of the transmitter, is used for charging
the transmitter, connecting the external accelerometer, or connecting the
programming cable. The connector is angled slightly downward to divert
rain away from the connector.
Antenna Connector
The antenna connector is for connecting the standard antenna or an
external antenna, if required.
Headphone Connector
The headphone connector is for connecting the headphones to monitor
signals directly from the transducer.
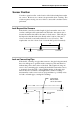
Recharging the Transmitters and Battery Life
To recharge the transmitters, simply place the transmitter in the case,
connect the charging lead in the case to the transmitter, and connect the
charge lead from the car or mains to the case. A single transmitter also can
be charged directly from an appropriate charger. The charger
automatically uses boost charge and trickle charge rates to obtain optimum
use and battery life. In temperatures ranging from 32 º to 122 º Fahrenheit
(0 º to 50 º Celsius), the batteries can be fully charged (from a totally
discharged status) in approximately 2.5 hours.
The transmitter can operate for approximately 6 to 7 hours (in high-power
mode) on a full charge. In low-power mode, battery life is much longer.
Transmitter Control and Indicators
The top of each transmitter has a pushbutton switch and 7 LEDs.
One High-power radio LED
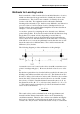
One Low-power radio LED (This is the proper setting when the
transmitter is within 66 feet (20 m) of the Receiver Unit.)
Five sound/battery LED indicators