
Owner manual

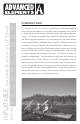
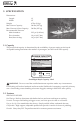

TM
10
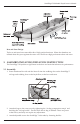
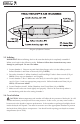
Diagram of Ination Chambers
3.3 Inating
IMPORTANT: Before inating, check to be sure that the kayak is completely assembled.
Inate your kayak in the following order. Failure to follow these instructions may cause
damage to your kayak. Do not over inate.
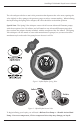
1. Locate chamber 1. Unscrew cap and check that plunger valve is in the inate position.
Inate Chamber 1 until rm to the touch (2.25 psi ONLY).
2. Proceed to chamber 2. Inate chamber 2 until StraitEdge™ tube is rm to touch (2.25 psi
ONLY). Close caps on chambers 1 and 2 tightly.
3. Locate chamber 3 “oor.” Make sure valve body is screwed in tightly. Remove small
cap (See Figure 2) and use appropriate pump nozzle. Inate chambers until rm (1.0 psi
ONLY). Do not over inate!
4. Locate Chambers 4 and 5. Inate Chambers 4 and 5 until rm (1.0 psi ONLY).
5. Make sure all valves are closed tightly and properly. Check to be sure the cap tether is
not interfering with the valve seating chamber 3.
3.4 Over Ination
CAUTION: Water temperature and weather will aect the air pressure of the kayak. In cold
weather and water your kayak will lose some pressure. If this occurs, you may want to add a
bit more air to the kayak to improve performance. In hot weather or prolonged sunlight, the air
inside the kayak will expand. You must let some air out of the appropriate chambers to prevent
the kayak from failing due to overpressure. You should avoid exposing your kayak to extreme
temperatures (hot or cold).