
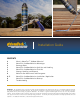
Installation Guide
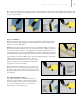


Open control knob (left/counter-clockwise) and test a bead of adhesive. Bead width can be adjusted by opening/closing
the control knob or adjusting the trigger pull back. Adjust these two factors to your desired application approach, until
you get a ½" foam bead.
Step 4 // Installation
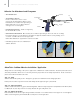
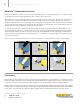
Check the tip of the applicator gun prior to dispensing adhesive and remove any dried
adhesive from the tip with AdvanTech
™
subfloor adhesive or by safely scraping with a
utility knife or other sharp object.
TIP: Wipe gun tip with a rag at the end of each use to avoid adhesive drying on the gun tip.
Dispense foam adhesive with the can in the upside-down position. Apply a continuous
½-inch foam bead to floor joists. A ½" diameter foam bead will collapse down into
approximately a 3/8" inch wide gel. CAUTION: Do not press tip of gun directly to floor
joists and maintain a distance slightly above the work surface to avoid adhesive splatter.
Install subfloor panels within 20 minutes of dispensing subfloor adhesive. Install ALL
subfloor fasteners, edge and field fasteners, at initial
installation before the adhesive cures. If the glue cures
before the subfloor has been laid and fastened, remove
all glue with a scraper and reapply.
When finished for the day or the project, if there is still
adhesive in the can, completely shut off applicator gun
by rotating control knob clockwise until stopped. Store
the applicator gun attached to the adhesive container for
up to 30 days.
Step 5 // Restarting with a new can
To restart a partially used can with applicator gun
attached, hold the adhesive can and shake vigorously
for minimum 30 seconds. Rotate the control knob
in a counter-clockwise direction to open the valve.
Applicator gun is now ready for use.
AdvanTech
™
Subfloor Adhesive // Installation Guide
5