A61900GSW0 AGS1921 DE FR IT EN GEFRIERGERÄT CONGÉLATEUR CONGELATORE FREEZER BENUTZERINFORMATION NOTICE D'UTILISATION ISTRUZIONI PER L’USO USER MANUAL 2 23 44 65
FÜR PERFEKTE ERGEBNISSE Danke, dass Sie sich für dieses AEG Produkt entschieden haben. Wir haben es geschaffen, damit Sie viele Jahre von seiner ausgezeichneten Leistung und den innovativen Technologien, die Ihnen das Leben erleichtern, profitieren können. Es ist mit Funktionen ausgestattet, die in gewöhnlichen Geräten nicht vorhanden sind. Nehmen Sie sich ein paar Minuten Zeit zum Lesen, um seine Vorzüge kennen zu lernen.
Inhalt INHALT 4 7 10 10 11 12 14 16 16 20 22 Sicherheitshinweise Bedienfeld Erste Inbetriebnahme Täglicher Gebrauch Hilfreiche Hinweise und Tipps Reinigung und Pflege Was tun, wenn … Technische Daten Montage Geräusche Hinweise zum Umweltschutz In dieser Benutzerinformation werden folgende Symbole verwendet: Wichtige Hinweise zur Sicherheit von Personen und Informationen zur Vermeidung von Geräteschäden Allgemeine Hinweise und Ratschläge Hinweise zum Umweltschutz Änderungen vorbehalten 3
Sicherheitshinweise SICHERHEITSHINWEISE Lesen Sie zu Ihrer Sicherheit und für die optimale Geräteanwendung vor der Installation und dem Gebrauch des Gerätes die vorliegende Benutzerinformation aufmerksam durch, einschließlich der Ratschläge und Warnungen. Es ist wichtig, dass zur Vermeidung von Fehlern und Unfällen alle Personen, die das Gerät benutzen, mit der Bedienung und den Sicherheitsvorschriften vertraut sind.
Sicherheitshinweise 5 Achten Sie beim Transport und bei der Aufstellung des Gerätes darauf, nicht die Komponenten des Kältekreislaufs zu beschädigen. Bei einer eventuellen Beschädigung des Kältekreislaufs: – Offene Flammen und Zündfunken vermeiden – Den Raum, in dem das Gerät installiert ist, gut lüften • Technische und anderweitige Änderungen am Gerät sind gefährlich. Ein defektes Netzkabel kann Kurzschlüsse und einen Brand verursachen und/oder zu Stromschlägen führen.
Sicherheitshinweise Reinigung und Pflege • Schalten Sie vor Wartungsarbeiten immer das Gerät ab und ziehen Sie den Netzstecker aus der Steckdose. • Reinigen Sie das Gerät nicht mit Metallgegenständen. • Verwenden Sie keine scharfen Gegenstände zum Entfernen von Reif und Eis im Gerät. Benutzen Sie einen Kunststoffschaber. Montage Halten Sie sich für den elektrischen Anschluss strikt an die Anweisungen der betreffenden Abschnitte.
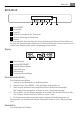
Bedienfeld 7 BEDIENFELD 1 2 3 4 5 6 1 Taste ON/OFF 2 Taste Mode 3 Taste OK 4 Taste zur Verringerung der Temperatur 5 Taste zur Erhöhung der Temperatur 6 Display Der voreingestellte Tastenton lässt sich durch gleichzeitiges Drücken der Taste Mode und der Taste zur Verringerung der Temperatur für mehrere Sekunden auf einen lauten Ton einstellen. Diese Änderung kann wieder rückgängig gemacht werden.
Bedienfeld 1. 2. 3. Drücken Sie 5 Sekunden lang die Taste ON/OFF. Das Display wird ausgeschaltet. Ziehen Sie den Gerätestecker aus der Steckdose, um das Gerät vom Netz zu trennen. Temperaturregelung Die Temperatur des Gefriergeräts wird mit der Temperaturtaste eingestellt. Stellen Sie die Standardtemperatur ein: • -18 °C für den Gefrierschrank Die Temperaturanzeige zeigt die eingestellte Temperatur. Die eingestellte Temperatur wird innerhalb von 24 Stunden erreicht.
Bedienfeld 9 1. Entnehmen Sie die Getränke aus dem Gefrierraum. 2. Schalten Sie den Alarmton und die Funktion mit der Taste OK aus. Die Funktion kann jederzeit während des Countdowns deaktiviert werden: 1. Drücken Sie die Taste Mode, bis die Anzeige Minute Minder blinkt. 2. Drücken Sie zur Bestätigung die Taste OK. 3. Die Anzeige Minute Minder erlischt. Die Zeit kann während des Countdowns geändert werden, indem Sie die Tasten zur Erhöhung und Verringerung der Temperatur drücken.
Erste Inbetriebnahme ERSTE INBETRIEBNAHME Reinigen des Innenraums Bevor Sie das Gerät in Betrieb nehmen, beseitigen Sie den typischen „Neugeruch“ am besten durch Reinigen der Innenteile mit lauwarmem Wasser und einer neutralen Seife. Sorgfältig nachtrocknen. Verwenden Sie keine Reinigungsmittel oder Scheuerpulver, da hierdurch die Oberfläche beschädigt wird. Wenn “dEMo” auf dem Display angezeigt wird, befindet sich das Gerät im Demo-Modus. Schlagen Sie dazu bitte unter „Was tun, wenn...“ nach.
Hilfreiche Hinweise und Tipps 11 Kam es zum Beispiel durch einen Stromausfall, der länger dauerte als der in der Tabelle mit den technischen Daten angegebene Wert (siehe "Ausfalldauer") zu einem ungewollten Abtauen, dann müssen die aufgetauten Lebensmittel sehr rasch verbraucht oder sofort gekocht und (nach dem Abkühlen) erneut eingefroren werden. Gefrierkalender Die Symbole zeigen verschiedene Arten gefrorener Lebensmittel. Die Zahlen geben die Lagerdauer in Monaten für das Gefriergut an.
Reinigung und Pflege • weniger fetthaltige Lebensmittel lassen sich besser lagern als fetthaltigere; Salz verkürzt die Lagerzeit von Lebensmitteln im Gefrierfach; • werden Gefrierwürfel direkt nach der Entnahme aus dem Gefrierfach verwendet, können Sie zu Frostbrand auf der Haut führen; • es empfiehlt sich, das Einfrierdatum auf jeder einzelnen Packung zu notieren, um einen genauen Überblick über die Lagerzeit zu haben.
Reinigung und Pflege 13 Bitte achten Sie darauf, das Kühlsystem nicht zu beschädigen. Viele Haushaltsreiniger für Küchen enthalten Chemikalien, die den im Gerät verwendeten Kunststoff angreifen können. Aus diesem Grund ist es empfehlenswert, das Gerät außen nur mit warmem Wasser und etwas flüssigem Tellerspülmittel zu reinigen. Schließen Sie das Gerät nach der Reinigung wieder an die Netzversorgung an.
Was tun, wenn … Verwenden Sie bitte niemals scharfe Gegenstände zum Entfernen von Reif und Eis vom Verdampfer, da dieser dadurch beschädigt werden könnte. Benutzen Sie keine mechanischen oder sonstigen Hilfsmittel, um den Abtauprozess zu beschleunigen; halten Sie sich dazu ausschließlich an die Angaben des Geräteherstellers. Ein Temperaturanstieg des Gefrierguts während des Abtauens des Gerätes kann die Lagerzeit dieser Lebensmittel verkürzen.
Was tun, wenn … Problem 15 Mögliche Ursache Abhilfe Die Temperatur der Lebensmittel ist zu hoch. Lassen Sie die Lebensmittel auf Raumtemperatur abkühlen, bevor Sie sie in das Gerät legen. Die Raumtemperatur ist zu hoch. Senken Sie die Raumtemperatur. Die FROSTMATIC SchnellgefrierFunktion ist eingeschaltet. Siehe hierzu „FROSTMATIC-Funktion“. Der Temperaturregler ist nicht richtig eingestellt. Stellen Sie eine höhere Temperatur ein. Die FROSTMATIC SchnellgefrierFunktion ist eingeschaltet.
Technische Daten Schließen der Tür 1. 2. 3. Reinigen Sie die Türdichtungen. Stellen Sie die Tür nach Bedarf ein. Siehe hierzu "Montage". Ersetzen Sie die defekten Türdichtungen, falls erforderlich. Kontaktieren Sie den Kundendienst. TECHNISCHE DATEN Abmessung der Aussparung Höhe 1600 mm Breite 600 mm Tiefe 630 mm Ausfalldauer 35 h Spannung 230-240 V Frequenz 50 Hz Die technischen Informationen befinden sich auf dem Typenschild innen links im Gerät sowie auf der Energieplakette.
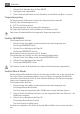
10mm 10mm 100mm Montage Aufstellung WARNUNG! Wenn Sie ein altes Gerät entsorgen möchten, das ein Schloss oder einen Riegel an der Tür besitzt, müssen Sie das Schloss bzw. den Riegel zunächst unbrauchbar machen, um zu verhindern, dass sich spielende Kinder darin einschließen können. Die Steckdose für den Anschluss des Geräts muss nach der Installation zugänglich sein.
Montage Distanzstücke hinten Im Gerät befinden sich zwei Distanzstücke, die, wie in der Abbildung gezeigt, angebracht werden müssen. Lockern Sie dazu die Schrauben etwas und passen Sie die Distanzstücke unter den Schraubenköpfen ein. Anschließend ziehen Sie die Schrauben wieder fest. Wechseln des Türanschlags WARNUNG! Vor der Durchführung von Arbeiten am Gerät ist stets der Netzstecker aus der Steckdose zu ziehen. Beim Wechseln des Türanschlags muss wie folgt vorgegangen werden: 1.
Montage 2. 19 Schieben Sie die Tür vom Bolzen (G) herunter. Schrauben Sie den Bolzen (G) los und montieren Sie ihn auf der gegenüberliegenden Seite. 3. Schrauben Sie den Gelenkbolzen (Z) des Scharniers (E) und die hintere Schraube (Y) mit einem 10 mm Schlüssel los und G nehmen Sie den Schließmechanismus (M) ab.
Geräusche Bei niedrigen Umgebungstemperaturen (z. B. im Winter) kann es vorkommen, dass die Türdichtung nicht richtig am Gerät anliegt. Warten Sie in diesem Fall ab, bis sich die Dichtung allmählich anpasst. GERÄUSCHE Während das Gerät in Betrieb ist, entstehen bestimmte Geräusche (Kompressor und Kühlkreislauf).
Geräusche BLUBB! HISSS! SSSRRR! CRACK! 21 BLUBB! HISSS! SSSRRR! CRACK!
Hinweise zum Umweltschutz HINWEISE ZUM UMWELTSCHUTZ Das Symbol auf dem Produkt oder seiner Verpackung weist darauf hin, dass dieses Produkt nicht als normaler Haushaltsabfall zu behandeln ist, sondern an einem Sammelpunkt für das Recycling von elektrischen und elektronischen Geräten abgegeben werden muss. Durch Ihren Beitrag zum korrekten Entsorgen dieses Produkts schützen Sie die Umwelt und die Gesundheit Ihrer Mitmenschen. Umwelt und Gesundheit werden durch falsches Entsorgen gefährdet.
POUR DES RÉSULTATS PARFAITS Merci d'avoir choisi ce produit AEG. Nous l'avons créé pour vous offrir la meilleure performance pour une longue durée, avec des technologies innovantes qui vous simplifient la vie - autant de caractéristiques que vous ne trouverez pas sûrement pas sur d'autres appareils. Veuillez prendre quelques instants pour lire cette notice afin d'utiliser au mieux votre appareil.
Sommaire SOMMAIRE 25 28 31 31 33 33 35 37 37 41 43 Consignes de sécurité Bandeau de commande Première utilisation Utilisation quotidienne Conseils Entretien et nettoyage En cas d'anomalie de fonctionnement Caractéristiques techniques Installation Bruits En matière de sauvegarde de l'environnement Les symboles suivants sont utilisés dans ce manuel: Informations importantes pour votre sécurité et pour éviter d’abîmer l’appareil.
Consignes de sécurité 25 CONSIGNES DE SÉCURITÉ Pour votre sécurité et garantir une utilisation correcte de l'appareil, lisez attentivement cette notice, y compris les conseils et avertissements, avant d'installer et d'utiliser l'appareil pour la première fois. Pour éviter toute erreur ou accident, veillez à ce que toute personne qui utilise l'appareil connaisse bien son fonctionnement et ses fonctions de sécurité. Conservez cette notice avec l'appareil.
Consignes de sécurité • Le circuit frigorifique de l’appareil contient de l’isobutane (R600a), un gaz naturel offrant un haut niveau de compatibilité avec l’environnement mais qui est néanmoins inflammable. Pendant le transport et l'installation de votre appareil, assurez-vous qu'aucune partie du circuit frigorifique n'est endommagée.
Consignes de sécurité 27 • Respectez scrupuleusement les conseils de conservation donnés par le fabricant de l'appareil. Consultez les instructions respectives. • Ne mettez pas de bouteilles ni de boîtes de boissons gazeuses dans le compartiment congélateur, car la pression se formant à l'intérieur du contenant pourrait le faire éclater et endommager ainsi l'appareil. • Ne consommez pas certains produits tels que les bâtonnets glacés dès leur sortie de l'appareil, car ils peuvent provoquer des brûlures.
Bandeau de commande Protection de l'environnement Le système frigorifique et l'isolation de votre appareil ne contiennent pas de C.F.C. contribuant ainsi à préserver l'environnement. L'appareil ne doit pas être mis au rebut avec les ordures ménagères et les déchets urbains. La mousse d'isolation contient des gaz inflammables : l'appareil sera mis au rebut conformément aux règlements applicables disponibles auprès des autorités locales.
Bandeau de commande 29 3. L'alarme sonore peut se déclencher au bout de quelques secondes. Pour réinitialiser l'alarme, reportez-vous au paragraphe « Alarme de température ». 4. Si "dEMo" s'affiche, l'appareil est en mode démonstration. Reportez-vous au chapitre « En cas d'anomalie de fonctionnement ». 5. Les voyants du thermostat indiquent la température programmée par défaut. Pour sélectionner une température programmée différente, reportez-vous au paragraphe « Réglage de la température ».
Bandeau de commande 1. Appuyez sur le bouton Mode jusqu'à ce que le voyant correspondant apparaisse. L'indicateur Minute Minder clignote. La minuterie affiche pendant quelques secondes la valeur de consigne (30 minutes). 2. Appuyez sur le bouton de réglage de la minuterie pour modifier la valeur de consigne (1 à 90 minutes). 3. Appuyez sur le bouton OK pour confirmer. L'indicateur Minute Minder s'affiche. La minuterie se met à clignoter (min).
Première utilisation 31 4. Le voyant alarme continue de clignoter jusqu'à ce que les conditions normales de fonctionnement soient rétablies. Une fois l'alarme rétablie, le voyant alarme s'éteint. Alarme porte ouverte Une alarme sonore se déclenche si la porte est restée ouverte pendant 80 secondes environ. Au rétablissement des conditions normales (porte fermée), l'alarme sonore s'arrête.
Utilisation quotidienne Pour garantir un bon fonctionnement et une performance optimale de l'appareil, les aliments ne doivent pas entrer en contact avec la paroi arrière du compartiment congélateur, comme indiqué sur la figure. Conservation des aliments congelés À la mise en service ou après un arrêt prolongé, placez le thermostat sur la position Max pendant 2 heures environ, avant d'introduire les produits dans le compartiment.
Conseils 33 CONSEILS Conseils pour la congélation Pour obtenir les meilleurs résultats, voici quelques conseils importants : • la quantité maximale de denrées que vous pouvez congeler par 24 heures est indiquée sur la plaque signalétique. • le temps de congélation est de 24 heures. Aucune autre denrée à congeler ne doit être ajoutée pendant cette période. • congelez seulement les denrées alimentaires fraîches, de qualité supérieure (une fois nettoyées).
Entretien et nettoyage Nettoyage périodique Cet appareil doit être nettoyé régulièrement : • Nettoyez l'intérieur et tous les accessoires avec de l'eau tiède savonneuse. • Vérifiez régulièrement les joints de porte et nettoyez-les en les essuyant pour éviter toute accumulation de déchets. • Rincez et séchez soigneusement. Ne pas tirer, déplacer ou endommager les tuyaux et/ou câbles qui se trouvent à l'intérieur de l'appareil.
En cas d'anomalie de fonctionnement 3. 35 Laissez la porte entrouverte et glissez la spatule en plastique dans le logement prévu, en bas de l'appareil ; placez dessous un récipient pour recevoir l'eau de dégivrage. Pour accélérer le dégivrage, placez un récipient d'eau chaude dans le compartiment congélateur. De plus, retirez les morceaux de givre qui se détachent en se cassant avant la fin du dégivrage. 4.
En cas d'anomalie de fonctionnement Anomalie L'appareil ne fonctionne pas. Cause possible Solution L'appareil est à l'arrêt. Remettez en fonctionnement l'appareil. La fiche du cordon d’alimentation n'est pas correctement branchée à la prise de courant. Branchez correctement la fiche du cordon d’alimentation dans la prise de courant. Le courant n'arrive pas à l'appa- Branchez un autre appareil élecreil. La prise de courant n'est pas trique à la prise de courant. alimentée.
Caractéristiques techniques Anomalie 37 Cause possible Solution La porte n'est pas correctement fermée. Reportez-vous au chapitre « Fermeture de la porte ». Le thermostat n'est pas correctement réglé. Augmentez la température. Un carré supérieur ou inférieur apparaît sur l'afficheur de température.
Installation Emplacement L'appareil doit être installé à bonne distance de toute source de chaleur telle que les radiateurs, chauffe-eau, lumière directe du soleil etc. Assurez-vous que l'air circule librement à l'arrière de l'appareil. Pour garantir un rendement optimum si l'appareil est installé sous un élément suspendu, la distance entre le haut de l'armoire et l'élément suspendu doit être de 100 mm minimum. Si possible, évitez de placer l'appareil sous des éléments suspendus.
Installation 39 Branchement électrique Contrôlez, avant de brancher l'appareil, si la tension et la fréquence indiquées sur la plaque signalétique correspondent à celles de votre réseau. L'appareil doit être relié à la terre. La fiche du câble d'alimentation comporte un logement pour mise à la terre. Si la prise de courant murale n'est pas mise à la terre, branchez l'appareil sur une prise de terre conformément aux normes en vigueur, en demandant conseil à un électricien qualifié.
Installation 1. Enlevez la grille de ventilation encliquetable (D). Démontez la charnière inférieure (E) en dévissant les trois vis et gardez le joint de la charnière (X). F X N M Z 2. 3. 4. 5. 6. 7. 8. Y E F D Glissez la porte pour la faire sortir de la goupille (G). Dévissez la goupille (G) et montez-la sur le côté opposé. Dévissez l'axe d'articulation (Z) de la charnière (E) et la vis arrière (Y) avec une clé de 10 mm et enlevez le dispositif de fermeture (M).
Bruits 41 9. Dévissez la poignée. Retirez le cache avec une pointe. Installez la poignée et 180° le cache sur le côté opposé. Prenez les deux caches fournis du sac d'accessoires et couvrez les orifices restés libres après avoir enlevé la poignée. 10. Assurez-vous que le panneau avant de la porte est parallèle au panneau avant de l'élément supérieur. 11. Remettez l'appareil en place, mettez-le d'aplomb, attendez quatre heures au moins puis branchez-le à la prise de courant.
Bruits BRRR! BLUBB! HISSS! SSSRRR! BRRR! BLUBB! HISSS! SSSRRR!
En matière de sauvegarde de l'environnement CRACK! 43 CRACK! EN MATIÈRE DE SAUVEGARDE DE L'ENVIRONNEMENT Le symbole sur le produit ou son emballage indique que ce produit ne peut être traité comme déchet ménager. Il doit plutôt être remis au point de ramassage concerné, se chargeant du recyclage du matériel électrique et électronique.
PER RISULTATI PERFETTI Grazie per aver scelto di acquistare questo prodotto AEG. Lo abbiamo creato per fornirvi prestazioni impeccabili per molti anni, grazie a tecnologie innovative che vi semplificheranno la vita - funzioni che non troverete sui normali elettrodomestici. Vi invitiamo di dedicare qualche minuto alla lettura per sapere come trarre il massimo dal vostro elettrodomestico.
Indice 45 INDICE 46 49 52 52 53 54 56 58 58 61 63 Informazioni per la sicurezza Pannello dei comandi Primo utilizzo Utilizzo quotidiano Suggerimenti e consigli utili Pulizia e cura Cosa fare se… Dati tecnici Installazione Rumori Considerazioni ambientali In questo manuale sono riportati i seguenti simboli: Informazioni importanti relative alla prevenzione dei rischi per la salute personale e dei danni alle apparecchiature.
Informazioni per la sicurezza INFORMAZIONI PER LA SICUREZZA Per garantire un impiego corretto e sicuro dell'apparecchio, prima dell'installazione e del primo utilizzo leggere con attenzione il libretto istruzioni, inclusi i suggerimenti e le avvertenze. Per evitare errori e incidenti, è importante garantire che tutte le persone che utilizzano l'apparecchio ne conoscano il funzionamento e le caratteristiche di sicurezza.
Informazioni per la sicurezza 47 In caso di danneggiamento del circuito refrigerante: – Evitare fiamme libere e scintille – Aerare bene il locale in cui si trova l'apparecchiatura • È pericoloso cambiare le specifiche o modificare il prodotto in qualunque modo. Un danneggiamento del cavo potrebbe provocare cortocircuiti, incendi e/o scosse elettriche.
Informazioni per la sicurezza Pulizia e cura • Prima di eseguire qualunque intervento di manutenzione, spegnere l'apparecchiatura ed estrarre la spina dalla presa. • Non pulire l'apparecchiatura con oggetti metallici. • Non usare oggetti appuntiti per sbrinare l'apparecchiatura. Usare un raschietto di plastica. Installazione Per il collegamento elettrico, seguire attentamente le istruzioni dei paragrafi corrispondenti. • Disimballare l'apparecchio e assicurarsi che non presenti danni.
Pannello dei comandi 49 PANNELLO DEI COMANDI 1 2 3 4 5 6 1 ON/OFF tasto 2 Mode tasto 3 OK tasto 4 Tasto Temperatura più fresca 5 Tasto Temperatura più calda 6 Display E' possibile modificare le impostazioni audio predefinite dei tasti e impostarle con un volume più alto premendo contemporaneamente il tasto Mode ed il tasto temperatura più fresca per alcuni secondi. La modifica è reversibile.
Pannello dei comandi 1. 2. 3. Premere il tasto ON/OFF per 5 secondi. Il display si spegne. Per scollegare l’apparecchiatura dalla corrente elettrica, staccare la spina dalla presa di alimentazione. Regolazione della temperatura È possibile regolare la temperatura impostata del congelatore premendo il tasto temperatura. Impostare la temperatura predefinita: • -18°C per il congelatore Gli indicatori della temperatura visualizzano la temperatura impostata.
Pannello dei comandi 51 Al termine del conto alla rovescia la spia Minute Minder lampeggia e viene emesso un segnale acustico: 1. Estrarre le bevande dal vano congelatore. 2. Premere il tasto OK per spegnere il segnale acustico e porre fine alla funzione. È possibile disattivare la funzione in qualsiasi momento durante il conto alla rovescia: 1. Premere il tasto Mode fino a quando la spia Minute Minder lampeggia. 2. Premere il tasto OK per confermare. 3. La spia Minute Minder si spegne.
Primo utilizzo PRIMO UTILIZZO Pulizia dell'interno Prima di utilizzare l'apparecchiatura per la prima volta, lavare l'interno e gli accessori con acqua tiepida e sapone neutro per eliminare il tipico odore dei prodotti nuovi, quindi asciugare accuratamente. Non usare detergenti corrosivi o polveri abrasive che possano danneggiare la finitura. Se “dEMo” appare sul display, l'apparecchiatura si trova in modalità dimostrazione: fare riferimento al paragrafo “COSA FARE SE…”.
Suggerimenti e consigli utili 53 Se si verifica un'interruzione della corrente elettrica di durata superiore al "tempo di salita" indicato nella tabella dei dati tecnici, il cibo scongelato deve essere consumato rapidamente o cucinato immediatamente e quindi ricongelato (dopo il raffreddamento). Elenco alimenti congelati I simboli mostrano i diversi tipi di alimenti congelati. I numeri indicano i mesi di conservazione dei tipi di surgelati corrispondenti.
Pulizia e cura Consigli per la conservazione dei surgelati Per ottenere i migliori risultati con questo apparecchio: • accertare che i cibi congelati commercialmente siano adeguatamente conservati dal rivenditore; • fare in modo che i cibi congelati siano trasferiti dal negozio al congelatore nel più breve tempo possibile; • non aprire la porta frequentemente o lasciarla aperta più del tempo strettamente necessario. • Una volta scongelato, il cibo si deteriora rapidamente e non può essere ricongelato.
Pulizia e cura 55 Quando tale strato raggiunge uno spessore di ca. 3-5 mm, il vano congelatore deve essere sbrinato. Circa 12 ore prima dello sbrinamento, impostare il termostato su una regolazione più alta per accumulare una riserva di freddo sufficiente per l'interruzione del funzionamento. Per rimuovere la brina, procedere come segue: 1. Spegnere l'apparecchio. 2. Rimuovere i surgelati, avvolgerli in vari strati di carta di giornale e riporli in un luogo fresco.
Cosa fare se… COSA FARE SE… AVVERTENZA! Prima di eseguire la ricerca guasti, estrarre la spina dalla presa di alimentazione. Le operazioni di ricerca guasti, non descritte nel presente manuale, devono essere eseguite esclusivamente da elettricisti qualificati o da personale competente. Problema L'apparecchiatura non funziona. Possibile causa Soluzione L'apparecchiatura è spenta. Accendere l’apparecchiatura. La spina non è inserita correttamente nella presa di alimentazione.
Cosa fare se… Problema Possibile causa 57 Soluzione Sono stati introdotti molti alimenti contemporaneamente. Introdurre gli alimenti un poco alla volta. I prodotti sono troppo vicini tra loro. Disporre i prodotti in modo da consentire una corretta circolazione dell'aria fredda. Gli alimenti non sono avvolti correttamente. Avvolgere correttamente gli alimenti. La porta non è chiusa correttamente. Consultare la sezione "Chiusura della porta".
Dati tecnici DATI TECNICI Nicchia di incasso Altezza 1600 mm Larghezza 600 mm Profondità 630 mm Tempo di salita 35 h Tensione 230-240 V Frequenza 50 Hz I dati tecnici sono riportati sulla targhetta del modello, applicata sul lato sinistro interno dell'apparecchiatura, e sull'etichetta dei valori energetici.
10mm 10mm 100mm Installazione Luogo d'installazione AVVERTENZA! Qualora occorra ritirare dall'uso un apparecchio con serratura, si raccomanda di rendere quest'ultima inservibile per evitare che i bambini possano chiudersi all'interno. La spina dell'apparecchio deve essere accessibile dopo l'installazione.
Installazione Distanziatori posteriori All'interno dell'apparecchio sono presenti due distanziatori che devono essere montati come illustrato nella figura. Allentare le viti e inserire il distanziatore sotto la testa della vite, infine riserrare le viti. Possibilità di invertire la porta AVVERTENZA! Prima di eseguire le operazioni descritte, estrarre la spina dalla presa di corrente. Per modificare il senso di apertura della porta, procedere come segue: 1.
Rumori 61 2. Fare uscire la porta dal perno (G). Svitare il perno (G) e installarlo sul lato opposto. 3. Svitare il perno di rotazione (Z) della cerniera (E) e la vite posteriore (Y) con una chiave da 10 mm e togliere il dispositivo di chiusura (M). Prendere nel sacchetto degli accessori il tappino inferioG re rimasto e inserirlo nel lato opposto della stessa cerniera avvitando nuovamente la vite posteriore. 4. Svitare il tappino superiore (N) dalla parte inferiore della porta.
Rumori SSS RRR ! HISSS! OK B! B LU B CLICK! BRRR! BLUBB! K! IC CL BRRR! CR AC K! CLICK! BRRR! BLUBB!
Considerazioni ambientali HISSS! SSSRRR! CRACK! 63 HISSS! SSSRRR! CRACK! CONSIDERAZIONI AMBIENTALI Il simbolo sul prodotto o sulla confezione indica che il prodotto non deve essere considerato come un normale rifiuto domestico, ma deve essere portato nel punto di raccolta appropriato per il riciclaggio di apparecchiature elettriche ed elettroniche.
Considerazioni ambientali Dove portare gli apparecchi fuori uso? In qualsiasi negozio che vende apparecchi nuovi oppure si restituiscono ai centri di raccolta ufficiali della SENS oppure ai riciclatori ufficiali della SENS. La lista dei centri di raccolta ufficiali della SENS è visibile nel sito www.sens.ch.
FOR PERFECT RESULTS Thank you for choosing this AEG product. We have created it to give you impeccable performance for many years, with innovative technologies that help make life simpler – features you might not find on ordinary appliances. Please spend a few minutes reading to get the very best from it. ACCESSORIES AND CONSUMABLES In the AEG webshop, you’ll find everything you need to keep all your AEG appliances looking spotless and working perfectly.
Contents CONTENTS 67 69 72 72 74 74 76 78 78 81 83 Safety information Control panel First use Daily use Helpful Hints and Tips Care and cleaning What to do if… Technical data Installation Noises Environmental concerns The following symbols are used in this user manual: Important information concerning your personal safety and information on how to avoid damaging the appliance.
Safety information 67 SAFETY INFORMATION In the interest of your safety and to ensure the correct use, before installing and first using the appliance, read this user manual carefully, including its hints and warnings. To avoid unnecessary mistakes and accidents, it is important to ensure that all people using the appliance are thoroughly familiar with its operation and safety features.
Safety information – thoroughly ventilate the room in which the appliance is situated • It is dangerous to alter the specifications or modify this product in any way. Any damage to the cord may cause a short-circuit, fire and/or electric shock. WARNING! Any electrical component (power cord, plug, compressor) must be replaced by a certified service agent or qualified service personnel to avoid hazard. 1. 2. • • • • Power cord must not be lengthened.
Control panel 69 Installation For electrical connection carefully follow the instructions given in specific paragraphs. • Unpack the appliance and check if there are damages on it. Do not connect the appliance if it is damaged. Report possible damages immediately to the place you bought it. In that case retain packing. • It is advisable to wait at least four hours before connecting the appliance to allow the oil to flow back in the compressor.
Control panel 5 Temperature warmer button 6 Display It is possible to change predefined sound of buttons to a loudly one by pressing together Mode button and Temperature colder button for some seconds. Change is reversible. Display 1 1 2 3 4 5 6 2 3 4 5 6 Timer function FROSTMATIC function Minute Minder function Child Lock function Alarm indicator Temperature indicator Switching on To switch on the appliance do these steps: 1. Connect the mains plug to the power socket. 2.
Control panel 71 FROSTMATIC function To switch on the function: 1. Press the Mode button until the corresponding icon appears. The FROSTMATIC indicator flashes. 2. Press the OK button to confirm. The FROSTMATIC indicator is shown. This function stops automatically after 52 hours. To switch off the function before its automatic end: 1. Press the Mode button until the FROSTMATIC indicator flashes. 2. Press the OK button to confirm. 3. The FROSTMATIC indicator goes off.
First use 2. 3. The Child Lock indicator flashes. Press the OK button to confirm. The Child Lock indicator is shown. To switch off the function: 1. Press the Mode button until the Child Lock indicator flashes. 2. Press the OK button to confirm. 3. The Child Lock indicator goes off. High temperature alarm An increase in the temperature in the freezer compartment (for example due to an earlier power failure) is indicated by: • flashing the alarm and freezer temperature indicators • sounding of buzzer.
Daily use 73 To freeze fresh food activate the FROSTMATIC function at least 24 hours before placing the food to be frozen in the freezer compartment. Place the fresh food to be frozen in the two top compartments. The maximum amount of food that can be frozen in 24 hours is specified on the rating plate, a label located on the inside of the appliance. The freezing process lasts 24 hours: during this period do not add other food to be frozen.
Helpful Hints and Tips Cold accumulators One or more cold accumulators are supplied in the freezer; these increase the length of time for which food will keep in the event of a power failure or breakdown. HELPFUL HINTS AND TIPS Hints for freezing To help you make the most of the freezing process, here are some important hints: • the maximum quantity of food which can be frozen in 24 hrs. is shown on the rating plate; • the freezing process takes 24 hours.
Care and cleaning 75 Periodic cleaning The equipment has to be cleaned regularly: • clean the inside and accessories with lukewarm water and some neutral soap. • regularly check the door seals and wipe clean to ensure they are clean and free from debris. • rinse and dry thoroughly. Do not pull, move or damage any pipes and/or cables inside the cabinet.
What to do if… 3. Leave the door open and insert the plastic scraper in the appropriate seating at the bottom centre, placing a basin underneath to collect the defrost water In order to speed up the defrosting process, place a pot of warm water in the freezer compartment. In addition, remove pieces of ice that break away before defrosting is complete. 4. When defrosting is completed, dry the interior thoroughly and keep the scraper for future use. 5. Switch on the appliance. 6.
What to do if… Problem 77 Possible cause Solution The appliance has no power. There is no voltage in the mains socket. Connect a different electrical appliance to the mains socket. Contact a qualified electrician. The Alarm light flashes. The temperature in the freezer is Refer to "High temperature too high. alarm" The compressor operates continually. The temperature is not set correctly. Set a higher temperature. The door is not closed correctly. Refer to "Closing the door".
Technical data Problem dEMo appears on the Display. Possible cause The appliance is in demonstration mode (dEMo). Solution Keep pressed approximately 10 sec. the OKbutton since a long sound of buzzer is heard and the Display shut off for a short while: appliance start works regularly. Closing the door 1. 2. 3. Clean the door gaskets. If necessary, adjust the door. Refer to "Installation". If necessary, replace the defective door gaskets. Contact the Service Center.
Installation 79 10mm 10mm 100mm WARNING! It must be possible to disconnect the appliance from the mains power supply; the plug must therefore be easily accessible after installation. Positioning WARNING! If you are discarding an old appliance that has a lock or catch on the door, you must ensure that it is made unusable to prevent young children being trapped inside. The appliance shall have the plug accessible after installation.
Installation Rear spacers Inside the appliance you find two spacers which must be fitted as shown in the figure. Slacken the screws and insert the spacer under the screw head, then retighten the screws. Door reversibility WARNING! Before carrying out any operations, remove the plug from the power socket. To change the opening direction of the door, do these steps: 1. Remove the clip-in ventilation grille (D).
Noises 2. 81 Slide the door off the pin (G). Unscrew the pin (G) and install it on the opposite side. 3. Unscrew the pivot pin (Z) of the hinge (E) and the rear screw (Y) with a spanner of 10 mm and remove the closing device (M). Take from the accessory bag the G lower closing device left and install it on the opposite side of the same hinge by screwing again the rear screw. 4. Unscrew the upper closing device (N) from the bottom of the door.
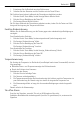
Noises SSS RRR ! HISSS! OK B! B LU B CLICK! BRRR! BLUBB! K! IC CL BRRR! CR AC K! CLICK! BRRR! BLUBB!
Environmental concerns HISSS! SSSRRR! CRACK! 83 HISSS! SSSRRR! CRACK! ENVIRONMENTAL CONCERNS The symbol on the product or on its packaging indicates that this product may not be treated as household waste. Instead it should be taken to the appropriate collection point for the recycling of electrical and electronic equipment.
www.aeg.