A52200GSW0 A42200GSW0 NL Gebruiksaanwijzing EN User manual FR Notice d'utilisation DE Benutzerinformation 2 19 36 54
www.aeg.com INHOUD 1. 2. 3. 4. 5. 6. 7. 8. 9. 10. VEILIGHEIDSVOORSCHRIFTEN . . . . . . . . . . . . . . . . . . . . . . . . . . . . . . . . . . . . . . . . . . . . . . . . 3 BESCHRIJVING VAN HET PRODUCT . . . . . . . . . . . . . . . . . . . . . . . . . . . . . . . . . . . . . . . . . . . 6 BEDIENINGSPANEEL . . . . . . . . . . . . . . . . . . . . . . . . . . . . . . . . . . . . . . . . . . . . . . . . . . . . . . . . 6 DAGELIJKS GEBRUIK . . . . . . . . . . . . . . . . . . . . . . . . . . . . . . . . . .
NEDERLANDS 1. 3 VEILIGHEIDSVOORSCHRIFTEN In het belang van uw veiligheid en om een correct gebruik te kunnen waarborgen is het van belang dat u, alvorens het apparaat te installeren en in gebruik te nemen, deze gebruiksaanwijzing, inclusief de tips en waarschuwingen, grondig doorleest. Om onnodige vergissingen en ongevallen te voorkomen is het belangrijk ervoor te zorgen dat alle mensen die het apparaat gebruiken, volledig bekend zijn met de werking ervan en de veiligheidsvoorzieningen.
www.aeg.com – de ruimte waar het apparaat zich bevindt grondig ventileren • Het is gevaarlijk om wijzigingen aan te brengen in de specificaties of dit product op enigerlei wijze te modificeren. Een beschadigd netsnoer kan kortsluiting, brand en/of een elektrische schok veroorzaken. WAARSCHUWING! Alle elektrische onderdelen (netsnoer, stekker, compressor) mogen om gevaar te voorkomen uitsluitend worden vervangen door een erkende onderhoudsdienst of gekwalificeerd onderhoudspersoneel.
NEDERLANDS • • • • • • Meld mogelijke beschadigingen onmiddellijk bij de winkel waar u het apparaat gekocht heeft. Gooi in dat geval de verpakking niet weg. Wij adviseren u om 4 uur te wachten voordat u het apparaat aansluit, dan kan de olie terugvloeien in de compressor. Rond het apparaat dient adequate luchtcirculatie te zijn, anders kan dit tot oververhitting leiden. Om voldoende ventilatie te verkrijgen de instructies met betrekking tot de installatie opvolgen.
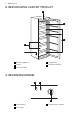
www.aeg.com 2. BESCHRIJVING VAN HET PRODUCT 1 2 3 5 4 1 Bedieningspaneel 4 Typeplaatje 2 Klepje 5 Maxibox-mandjes 3 Vriezermanden 3.
NEDERLANDS 3.1 Inschakelen Steek dan de stekker in het stopcontact. Draai de thermostaatknop naar rechts op een gemiddelde stand. Het controlelampje en het alarmlampje gaan branden. 3.2 Uitschakelen Draai om het apparaat uit te zetten de thermostaatknop naar de stand " ". 3.3 Temperatuurregeling De temperatuur wordt automatisch geregeld. Ga als volgt te werk om het apparaat in werking te stellen: • draai de thermostaatknop op een lagere stand om de minimale koude te verkrijgen.
www.aeg.com 4.3 Ontdooien Diepgevroren of ingevroren voedsel, kan voordat het wordt gebruikt, ontdooid worden op kamertemperatuur. Kleine stukken kunnen zelfs rechtstreeks vanuit de vriezer gekookt worden als ze nog bevroren zijn: in dat geval zal de bereiding iets langer duren. 5. NUTTIGE AANWIJZINGEN EN TIPS 5.1 Normale bedrijfsgeluiden 5.3 Tips voor het invriezen • U kunt een zwak gorgelend en borrelend geluid horen wanneer het koelmiddel door leidingen wordt gepompt. Dat is normaal.
NEDERLANDS schikte wijze door de detailhandelaar werden opgeslagen; • zorg ervoor dat de ingevroren levensmiddelen zo snel mogelijk van de winkel naar uw vriezer gebracht worden; • de deur niet vaker te openen of open te laten staan dan strikt noodzakelijk 9 • als voedsel eenmaal ontdooid is, bederft het snel en kan het niet opnieuw worden ingevroren; • bewaar het voedsel niet langer dan de door de fabrikant aangegeven bewaarperiode. 6. ONDERHOUD EN REINIGING 6.
www.aeg.com Zet, ongeveer 12 uur voordat u gaat ontdooien, de temperatuurregelaar op een hogere stand, om voldoende koudereserve op te bouwen voor de onderbreking tijdens de werking. Volg onderstaande aanwijzingen om de rijp te verwijderen: 1. Het apparaat uitschakelen 2. Verwijder al het ingevroren voedsel, wikkel het in een paar lagen krantenpapier en leg het op een koele plaats. LET OP! Raak ingevroren voedsel niet met natte handen aan. Uw handen kunnen dan aan de producten vastvriezen. 3.
NEDERLANDS 11 7. PROBLEEMOPLOSSING WAARSCHUWING! Haal de stekker uit het stopcontact voordat u problemen gaat oplossen. Alleen een gekwalificeerde elektricien of een bevoegd persoon mag problemen oplossen die niet in deze handleiding beschreven zijn. Probleem Mogelijke oorzaak Het apparaat werkt Het apparaat is uitgeniet. Het controleschakeld. lampje knippert niet. Oplossing Zet het apparaat aan. De stekker zit niet goed in het stopcontact. Steek de stekker goed in het stopcontact.
www.aeg.com Probleem Mogelijke oorzaak Oplossing Producten zijn te dicht op Bewaar de producten op elkaar geplaatst. een manier die een koude luchtcirculatie mogelijk maakt. Er is te veel rijpvorming. Het product is niet goed verpakt. Verpak het op de juiste manier. De temperatuurknop is niet goed ingesteld. Stel een hogere temperatuur in. 7.1 De deur sluiten 3. 1. Maak de afdichtingen van de deur schoon. 2. Stel de deur, indien nodig, af. Raadpleeg "Montage".
NEDERLANDS 13 8.2 Locatie 100 mm min Het apparaat moet ver van hittebronnen, zoals radiatoren, boilers, direct zonlicht enz., vandaan worden geïnstalleerd. Zorg er voor dat de lucht vrij kan circuleren aan de achterkant van de kast. Als het apparaat onder een wandkast wordt geplaatst, moet de minimale afstand tussen de bovenkant van de kast en de wandkast ten minste 100 mm bedragen om optimale prestaties te garanderen.
www.aeg.com 8.5 horizontale afstelling Zorgvuldige horizontale afstelling voorkomt trillingen en lawaai van de machine tijdens de werking. Om de hoogte van het apparaat aan te passen, spant u de twee voorvoetjes meer of minder aan. 8.6 Omkeerbaarheid van de deur Om de volgende handelingen uit te voeren, raden we aan dit te doen met de hulp van een tweede persoon die de deuren van het apparaat tijdens de werkzaamheden stevig vasthoudt.
NEDERLANDS A B 15 • Schroef de pen (A) los en monteer deze weer aan de tegenoverliggende kant. • Verwijder het kapje (B) en plaats het aan de tegenoverliggende kant. • Schroef de onderste scharnieren vast. • Plaats de plint terug. • Zet het apparaat rechtop. • Bevestig de handgreep aan de tegenoverliggende kant en plaats de kunststof plugs (in het zakje van de gebruiksaanwijzing) in de open gaatjes. • Voer een eindcontrole uit en verzeker u ervan dat: – Alle schroeven zijn aangedraaid.
www.aeg.
NEDERLANDS SSSRRR! SSSRRR! CRACK! CRACK! 10. TECHNISCHE GEGEVENS A42200GSW0 A52200GSW0 Hoogte 1540 mm 1540 mm Breedte 595 mm 595 mm Diepte Afmetingen 658 mm 658 mm Tijdsduur 30 h 20 h Voltage 230 - 240 V 230-240 V Frequentie 50 Hz 50 Hz De technische gegevens staan op het typeplaatje aan de linker binnenkant in het apparaat en op het energielabel. 11. MILIEUBESCHERMING Recycle de materialen met het symbool . Gooi de verpakking in een geschikte verzamelcontainer om het te recyclen.
www.aeg.com apparaten gemarkeerd met het symbool niet weg met het huishoudelijk afval. Breng het product naar het milieustation bij u in de buurt of neem contact op met de gemeente.
ENGLISH 19 CONTENTS 1. 2. 3. 4. 5. 6. 7. 8. 9. 10. SAFETY INSTRUCTIONS . . . . . . . . . . . . . . . . . . . . . . . . . . . . . . . . . . . . . . . . . . . . . . . . . . . . . PRODUCT DESCRIPTION . . . . . . . . . . . . . . . . . . . . . . . . . . . . . . . . . . . . . . . . . . . . . . . . . . . . CONTROL PANEL . . . . . . . . . . . . . . . . . . . . . . . . . . . . . . . . . . . . . . . . . . . . . . . . . . . . . . . . . . DAILY USE . . . . . . . . . . . . . . . . . . . . . . . . . . . . . . . . . .
www.aeg.com 1. SAFETY INSTRUCTIONS In the interest of your safety and to ensure the correct use, before installing and first using the appliance, read this user manual carefully, including its hints and warnings. To avoid unnecessary mistakes and accidents, it is important to ensure that all people using the appliance are thoroughly familiar with its operation and safety features.
ENGLISH WARNING! Any electrical component (power cord, plug, compressor) must be replaced by a certified service agent or qualified service personnel to avoid hazard. 1. • • • • Power cord must not be lengthened. 2. Make sure that the power plug is not squashed or damaged by the back of the appliance. A squashed or damaged power plug may overheat and cause a fire. 3. Make sure that you can come to the mains plug of the appliance. 4. Do not pull the mains cable. 5.
www.aeg.com • The appliance must not be located close to radiators or cookers. • Make sure that the mains plug is accessible after the installation of the appliance. • Connect to potable water supply only (If a water connection is foreseen). 1.6 Service • Any electrical work required to do the servicing of the appliance should be carried out by a qualified electrician or competent person. • This product must be serviced by an authorized Service Centre, and only genuine spare parts must be used.
ENGLISH 1 Control panel 4 Rating plate 2 Flap 3 Freezer baskets 5 Maxibox baskets 23 3. CONTROL PANEL 1 2 3 1 Alarm Light 2 Pilot Light 3 Temperature Regulator 3.1 Switching on Insert the plug into the wall socket. Turn the Temperature regulator clockwise to a medium setting. The Pilot light and the Alarm light will light up. 3.2 Switching off To turn off the appliance, turn the Temperature regulator to the " " position. 3.3 Temperature regulation The temperature is automatically regulated.
www.aeg.com 4. DAILY USE 4.1 Storage of frozen food 4.2 Freezing fresh food When first starting-up or after a period out of use, before putting the products in the compartment let the appliance run at least 2 hours. The freezer baskets ensure that it is quick and easy to find the food package you want. If large quantities of food are to be stored, remove all drawers except for the bottom basket which needs to be in place to provide good air circulation.
ENGLISH 5.3 Hints for freezing To help you make the most of the freezing process, here are some important hints: • the maximum quantity of food which can be frozen in 24 hrs. is shown on the rating plate; • the freezing process takes 24 hours.
www.aeg.com Clean the condenser (black grill) and the compressor at the back of the appliance with a brush. This operation will improve the performance of the appliance and save electricity consumption. Take care of not to damage the cooling system. Many proprietary kitchen surface cleaners contain chemicals that can attack/ damage the plastics used in this appliance.
ENGLISH 27 To remove the frost, follow the instructions below: 1. Switch off the appliance. 2. Remove any stored food, wrap it in several layers of newspaper and put it in a cool place. CAUTION! Do not touch frozen goods with wet hands. Hands can freeze to the goods. 3. Leave the door open and insert the plastic scraper in the appropriate seating at the bottom centre, placing a basin underneath to collect the defrost water.
www.aeg.com 7. TROUBLESHOOTING WARNING! Before troubleshooting, disconnect the mains plug from the mains socket. Only a qualified electrician or competent person must do the troubleshooting that is not in this manual. Problem Possible cause Solution The appliance does not operate. The Pilot light does not flash. The appliance is switched Switch on the appliance. off. The mains plug is not connected to the mains socket correctly. Connect the mains plug to the mains socket correctly.
ENGLISH Problem Possible cause 29 Solution Many products are stored Store less products at the at the same time. same time. There is too much frost. Products are too near to each other. Store products so that there is cold air circulation. Food is not wrapped correctly. Wrap the food correctly. The temperature regulator is not set correctly. Set a higher temperature. 7.1 Closing the door 1. 2. 3. Clean the door gaskets. If necessary, adjust the door. Refer to "Installation".
www.aeg.com 8.2 Location 100 mm min The appliance should be installed well away from sources of heat such as radiators, boilers, direct sunlight etc. Ensure that air can circulate freely around the back of the cabinet. To ensure best performance, if the appliance is positioned below an overhanging wall unit, the minimum distance between the top of the cabinet and the wall unit must be at least 100 mm . Ideally, however, the appliance should not be positioned below overhanging wall units.
ENGLISH 31 8.5 Levelling Accurate levelling prevents the vibration and noise of the appliance during operation. To adjust the height of the appliance loosen or tighten the two adjustable front feet. 8.6 Door reversibility To carry out the following operations, we suggest that this be made with another person that will keep a firm hold on the doors of the appliance during the operations.
www.aeg.com A B • Unscrew the pin (A) and screw it on the opposite side. • Remove the cap (B) and position it on the opposite side. • Screw the lower hinges. • Refit the plinth. • Stand the appliance upright. • Fit the handle on the opposite side and put the plastic caps (contained in the instructions bag) in the free holes. • Do a final check to make sure that: – All screws are tightened. – The door opens and closes correctly. If the ambient temperature is cold (i.e.
ENGLISH CLICK! BRRR! BLUBB! HISSS! CLICK! BRRR! BLUBB! HISSS! 33
www.aeg.com SSSRRR! SSSRRR! CRACK! CRACK! 10. TECHNICAL DATA A42200GSW0 A52200GSW0 Height 1540 mm 1540 mm Width 595 mm 595 mm Depth Dimension 658 mm 658 mm Rising Time 30 h 20 h Voltage 230 - 240 V 230-240 V Frequency 50 Hz 50 Hz The technical information are situated in the rating plate on the internal left side of the appliance and in the energy label. 11. ENVIRONMENT CONCERNS Recycle the materials with the symbol . Put the packaging in applicable containers to recycle it.
ENGLISH appliances marked with the symbol with the household waste. Return the product to your local recycling facility or contact your municipal office.
www.aeg.com SOMMAIRE 1. 2. 3. 4. 5. 6. 7. 8. 9. 10. INSTRUCTIONS DE SÉCURITÉ . . . . . . . . . . . . . . . . . . . . . . . . . . . . . . . . . . . . . . . . . . . . . . . . DESCRIPTION DE L'APPAREIL . . . . . . . . . . . . . . . . . . . . . . . . . . . . . . . . . . . . . . . . . . . . . . . . BANDEAU DE COMMANDE . . . . . . . . . . . . . . . . . . . . . . . . . . . . . . . . . . . . . . . . . . . . . . . . . UTILISATION QUOTIDIENNE . . . . . . . . . . . . . . . . . . . . . . . . . . . . . . . . . . .
FRANÇAIS 1. 37 INSTRUCTIONS DE SÉCURITÉ Pour votre sécurité et garantir une utilisation correcte de l'appareil, lisez attentivement cette notice, y compris les conseils et avertissements, avant d'installer et d'utiliser l'appareil pour la première fois. Pour éviter toute erreur ou accident, veillez à ce que toute personne qui utilise l'appareil connaisse bien son fonctionnement et ses fonctions de sécurité. Conservez cette notice avec l'appareil.
www.aeg.com Si le circuit frigorifique est endommagé : – évitez les flammes vives et toute autre source d'allumage – aérez soigneusement la pièce où se trouve l'appareil • Ne modifiez pas les spécifications de l'appareil. Si le câble d'alimentation est endommagé, il peut causer un court circuit, un incendie et/ou une électrocution.
FRANÇAIS • Déballez l'appareil et vérifiez qu'il n'est pas endommagé. Ne branchez pas l'appareil s'il est endommagé. Signalez immédiatement au revendeur de l'appareil les dommages constatés. Dans ce cas, gardez l'emballage. • Il est conseillé d'attendre au moins quatre heures avant de brancher l'appareil pour que le circuit frigorifique soit stabilisé. • Veillez à ce que l'air circule librement autour de l'appareil pour éviter qu'il ne surchauffe.
www.aeg.com 2. DESCRIPTION DE L'APPAREIL 1 2 3 5 4 1 Bandeau de commande 4 Plaque signalétique 2 Volet 5 Bacs Maxibox 3 Paniers de congélation 3.
FRANÇAIS 3.1 Mise en marche Branchez l'appareil à une prise murale. Tournez le thermostat dans le sens des aiguilles d'une montre sur une position médiane. Le voyant lumineux et le voyant Alarme s'allument. 3.2 Désactivation Pour mettre à l'arrêt l'appareil, tournez le thermostat sur la position « ». 3.3 Réglage de la température La température est réglée automatiquement. Pour faire fonctionner l'appareil, procédez comme suit : • tournez le thermostat sur la position minimum pour obtenir moins de froid.
www.aeg.com Placez les denrées fraîches à congeler dans le compartiment supérieur. Les petites pièces peuvent même être cuites sans décongélation préalable : dans ce cas, la cuisson est plus longue. 4.3 La décongélation Les aliments surgelés ou congelés peuvent être décongelés à température ambiante. 5. CONSEILS UTILES 5.1 Bruits de fonctionnement normaux • n'enlevez pas les accumulateurs de froid du panier de congélation.
FRANÇAIS • L'identification des emballages est importante : indiquez la date de congélation du produit, et respectez la durée de conservation indiquée par le fabricant. 5.
www.aeg.com 6.3 Dégivrage du congélateur Une certaine quantité de givre se forme toujours sur les clayettes du congélateur et autour du compartiment supérieur. Dégivrez le congélateur lorsque l'épaisseur de la couche de givre est d'environ 3-5 mm. Environ 12 heures avant d'effectuer le dégivrage, réglez le bouton du thermostat vers le haut, de manière à assurer une réserve de froid pendant l'interruption du fonctionnement.
FRANÇAIS 45 Pour enlever le givre, suivez les instructions ci-dessous : 1. Éteignez l'appareil. 2. Sortez les denrées congelées, enveloppez-les dans plusieurs feuilles de papier journal et conservez-les dans un endroit frais. ATTENTION Ne touchez pas les produits congelés et les surfaces givrées avec les mains humides. Risque de brûlures ou d'arrachement de la peau. 3. Laissez la porte ouverte et utilisez la spatule en plastique comme gouttière en l'insérant dans l'emplacement prévu à cet effet.
www.aeg.com 7. EN CAS D'ANOMALIE DE FONCTIONNEMENT AVERTISSEMENT Avant d'intervenir sur l'appareil, débranchez la fiche de la prise secteur. La résolution des problèmes non mentionnés dans la présente notice doit être exclusivement confiée à un électricien qualifié ou à une personne compétente. Problème Cause probable Solution L'appareil ne fonctionne pas. Le voyant ne clignote pas. L'appareil est éteint. Mettez l'appareil en marche.
FRANÇAIS Problème Il y a trop de givre. Cause probable Solution Trop de produits ont été introduits simultanément. Introduisez moins de produits en même temps. Les produits sont trop près les uns des autres. Stockez les produits de façon à permettre la circulation de l'air froid. Les aliments ne sont pas correctement emballés. Emballez les aliments correctement. Le thermostat n'est pas réglé correctement. Sélectionnez une température plus élevée. 7.1 Fermeture de la porte 1. 2. 47 3.
www.aeg.com 8.2 Emplacement 100 mm min L'appareil ne doit pas être installé près d'une source de chaleur telle qu'un radiateur, une chaudière, la lumière directe du soleil, etc. Assurez-vous que l'air circule librement à l'arrière de l'appareil. Pour garantir un rendement optimal si l'appareil est installé sous un élément suspendu, la distance entre le haut de l'appareil et l'élément suspendu doit être de 100 mm minimum. Si possible, évitez de placer l'appareil sous des éléments suspendus.
FRANÇAIS 49 8.5 Mise de niveau Une mise à niveau correcte évite les vibrations et le bruit de l'appareil au cours de son fonctionnement. Pour ajuster la hauteur de l'appareil, desserrez ou serrez les deux pieds réglables avant. 8.6 Réversibilité de la porte Pour effectuer les opérations suivantes, il est conseillé de se faire aider par une autre personne pour maintenir fermement les portes lors de toute manipulation de l'appareil.
www.aeg.com A B • Dévissez le pivot (A) et placez-le sur le côté opposé. • Démontez le cache (B) et placez-le sur le côté opposé. • Vissez les charnières inférieures. • Remettez en place le socle. • Remettez l'appareil en position verticale. • Installez la poignée sur le côté opposé et placez les caches en plastique (fournis dans la pochette contenant la notice d'utilisation) dans les orifices vides. • Faites une dernière vérification pour vous assurer que : – Toutes les vis sont bien serrées.
FRANÇAIS CLICK! BRRR! BLUBB! HISSS! CLICK! BRRR! BLUBB! HISSS! 51
www.aeg.com SSSRRR! SSSRRR! CRACK! CRACK! 10. CARACTÉRISTIQUES TECHNIQUES A42200GSW0 A52200GSW0 Hauteur 1540 mm 1540 mm Largeur 595 mm 595 mm Profondeur Dimensions 658 mm 658 mm Autonomie de fonctionnement 30 h 20 h Tension 230 - 240 V 230-240 V Fréquence 50 Hz 50 Hz Les caractéristiques techniques figurent sur la plaque signalétique située sur le côté gauche à l'intérieur de l'appareil et sur l'étiquette énergétique. 11.
FRANÇAIS appareils portant le symbole avec les ordures ménagères. Emmenez un tel produit dans votre centre local de recyclage ou contactez vos services municipaux.
www.aeg.com INHALT 1. 2. 3. 4. 5. 6. 7. 8. 9. 10. SICHERHEITSHINWEISE . . . . . . . . . . . . . . . . . . . . . . . . . . . . . . . . . . . . . . . . . . . . . . . . . . . . . GERÄTEBESCHREIBUNG . . . . . . . . . . . . . . . . . . . . . . . . . . . . . . . . . . . . . . . . . . . . . . . . . . . . BEDIENFELD . . . . . . . . . . . . . . . . . . . . . . . . . . . . . . . . . . . . . . . . . . . . . . . . . . . . . . . . . . . . . . TÄGLICHER GEBRAUCH . . . . . . . . . . . . . . . . . . . . . . . . . . .
DEUTSCH 1. 55 SICHERHEITSHINWEISE Lesen Sie zu Ihrer Sicherheit und für eine optimale Nutzung des Geräts vor der Montage und dem ersten Gebrauch das vorliegende Benutzerhandbuch einschließlich der Ratschläge und Warnungen aufmerksam durch. Es ist wichtig, dass zur Vermeidung von Fehlern und Unfällen alle Personen, die das Gerät benutzen, mit der Bedienung und den Sicherheitsvorschriften vertraut sind.
www.aeg.com Bei einer eventuellen Beschädigung des Kältekreislaufs: – Offene Flammen und Zündfunken vermeiden – Den Raum, in dem das Gerät installiert ist, gut lüften • Technische und anderweitige Änderungen am Gerät sind gefährlich. Ein defektes Netzkabel kann Kurzschlüsse und einen Brand verursachen und/ oder zu Stromschlägen führen. WARNUNG! Elektrische Bauteile (Netzkabel, Stecker, Kompressor) dürfen zur Vermeidung von Gefahren nur vom Kundendienst oder einer Fachkraft ausgewechselt werden.
DEUTSCH • Kontrollieren Sie nach dem Auspacken das Gerät auf eventuelle Beschädigungen. Nehmen Sie das Gerät nicht in Betrieb, wenn es beschädigt ist. Melden Sie die Schäden umgehend dem Händler, bei dem Sie es erworben haben. Bewahren Sie in diesem Fall die Verpackung auf. • Lassen Sie das Gerät mindestens vier Stunden stehen, bevor Sie es elektrisch anschließen, damit das Öl in den Kompressor zurückfließen kann.
www.aeg.com 2. GERÄTEBESCHREIBUNG 1 2 3 5 4 1 Bedienfeld 4 Typenschild 2 Klappe 5 Maxibox Körbe 3 Gefrierkörbe 3.
DEUTSCH 59 Drehen Sie den Temperaturregler zum Ausschalten des Geräts in die Position „ “. • Drehen Sie den Temperaturregler auf eine höhere Einstellung, um die maximal mögliche Kühlung zu erreichen. Eine mittlere Stellung ist im Allgemeinen am besten geeignet.
www.aeg.com die maximal mögliche Kühlung zu erreichen. Legen Sie die einzufrierenden frischen Lebensmittel in die oberen Fächer. Kleinere Gefriergutteile können sogar direkt aus dem Gefriergerät entnommen und anschließend sofort gekocht werden: in diesem Fall dauert der Garvorgang allerdings etwas länger. 4.3 Auftauen Tiefgefrorene oder gefrorene Lebensmittel können vor der Verwendung bei Raumtemperatur aufgetaut werden. 5. PRAKTISCHE TIPPS UND HINWEISE 5.
DEUTSCH Salz verkürzt die Lagerzeit von Lebensmitteln im Gefrierfach; • werden Gefrierwürfel direkt nach der Entnahme aus dem Gefrierfach verwendet, können Sie zu Frostbrand auf der Haut führen; • es empfiehlt sich, das Einfrierdatum auf jeder einzelnen Packung zu notieren, um einen genauen Überblick über die Lagerzeit zu haben. 5.
www.aeg.com Bitte achten Sie darauf, das Kühlsystem nicht zu beschädigen. Viele Haushaltsreiniger für Küchen enthalten Chemikalien, die den im Gerät verwendeten Kunststoff angreifen können. Aus diesem Grund ist es empfehlenswert, das Gerät außen nur mit warmem Wasser und etwas flüssigem Tellerspülmittel zu reinigen. Schließen Sie das Gerät nach der Reinigung wieder an die Netzversorgung an. 6.
DEUTSCH 63 Entfernen Sie den Reif wie nachstehend erläutert: 1. Schalten Sie das Gerät aus. 2. Nehmen Sie das gesamte Gefriergut heraus, verpacken Sie es in mehrere Schichten Zeitungspapier und lagern Sie es an einem kühlen Ort. VORSICHT! Fassen Sie gefrorene Lebensmittel nicht mit nassen Händen an. Ihre Hände könnten an den Lebensmitteln festfrieren. 3.
www.aeg.com 7. FEHLERSUCHE WARNUNG! Ziehen Sie vor der Fehlersuche immer den Netzstecker aus der Steckdose. Eine Fehlersuche, die von der in der vorliegenden Gebrauchsanleitung beschriebenen Fehlersuche abweicht, darf nur von einem qualifizierten Elektriker oder einer Fachkraft durchgeführt werden. Problem Mögliche Ursache Abhilfe Das Gerät funktioniert nicht. Die Kontrolllampe blinkt nicht. Das Gerät ist ausgeschaltet. Schalten Sie das Gerät ein.
DEUTSCH 65 Problem Mögliche Ursache Abhilfe Die Temperatur im Gefrierraum ist zu hoch. Der Temperaturregler ist nicht richtig eingestellt. Stellen Sie eine niedrigere Temperatur ein. Es wurden zu viele Produkte auf einmal eingelegt. Legen Sie weniger Produkte auf einmal ein. Die Lebensmittel liegen zu dicht aneinander. Lagern Sie die Lebensmittel so, dass die Kaltluft im Gerät zirkulieren kann. Die Lebensmittel sind nicht richtig verpackt. Verpacken Sie die Lebensmittel richtig.
www.aeg.com 8.2 Ort 100 mm min Das Gerät sollte in ausreichendem Abstand von Wärmequellen wie Heizungen, Boilern, direkter Sonneneinstrahlung etc. aufgestellt werden. Vergewissern Sie sich, dass Luft an der Rückseite des Gehäuses frei zirkulieren kann. Um einwandfreien Betrieb sicherzustellen, sollte der Abstand zwischen der Oberseite des Gehäuses und dem Hängeschrank mindestens 100 mm betragen, wenn das Gerät unter einem Hängeschrank aufgestellt wird.
DEUTSCH 67 8.5 Ausrichten Durch eine genaue waagrechte Ausrichtung lassen sich Vibrationen und Geräusche während des Betriebs minimieren. Lösen oder ziehen Sie zum Ausrichten des Geräts die beiden vorderen Schraubfüße an. 8.6 Wechseln des Türanschlags Die nachfolgend beschriebenen Schritte sollten von mindestens zwei Personen durchgeführt werden, um ein Herunterfallen der Türen zu vermeiden.
www.aeg.com A B • Schrauben Sie den Bolzen (A) ab und an der gegenüberliegenden Seite wieder an. • Nehmen Sie die Kappe (B) ab und bringen Sie sie auf der gegenüberliegenden Seite an. • Schrauben Sie die unteren Scharniere an. • Bringen Sie die Sockelblende wieder an. • Stellen Sie das Gerät wieder in aufrechte Position. • Bringen Sie den Griff auf der gegenüberliegenden Seite an und setzen Sie die Kunststoffkappen (im Beutel mit der Anleitung) auf die freien Öffnungen.
DEUTSCH CLICK! BRRR! BLUBB! HISSS! CLICK! BRRR! BLUBB! HISSS! 69
www.aeg.com SSSRRR! SSSRRR! CRACK! CRACK! 10. TECHNISCHE DATEN A42200GSW0 A52200GSW0 Höhe 1540 mm 1540 mm Breite 595 mm 595 mm Tiefe Abmessungen 658 mm 658 mm Lagerzeit bei Störung 30 Std. 20 Std. Spannung 230 - 240 V 230-240 V Frequenz 50 Hz 50 Hz Die technischen Daten befinden sich auf dem Typenschild innen links im Gerät sowie auf der Energieplakette. 11. UMWELTTIPPS Recyceln Sie Materialien mit dem Symbol .
DEUTSCH Recyceln Sie zum Umwelt- und Gesundheitsschutz elektrische und elektronische Geräte. Entsorgen Sie Geräte mit diesem Symbol nicht mit dem Hausmüll. Bringen Sie das Gerät zu Ihrer örtlichen Sammelstelle oder wenden Sie sich an Ihr Gemeindeamt.
280151304-A-102013 www.aeg.