BP7304001 BP7304021 BP7304151 EN User Manual
www.aeg.com CONTENTS 1. SAFETY INFORMATION.................................................................................................3 2. SAFETY INSTRUCTIONS................................................................................................ 4 3. PRODUCT DESCRIPTION.............................................................................................. 7 4. CONTROL PANEL...........................................................................................................8 5.
ENGLISH 1. 3 SAFETY INFORMATION Before the installation and use of the appliance, carefully read the supplied instructions. The manufacturer is not responsible if an incorrect installation and use causes injuries and damages. Always keep the instructions with the appliance for future reference. 1.
www.aeg.com • • • • • • • • Ensure that the appliance is switched off before replacing the lamp to avoid the possibility of electric shock. Do not use a steam cleaner to clean the appliance. Do not use harsh abrasive cleaners or sharp metal scrapers to clean the glass door since they can scratch the surface, which may result in shattering of the glass.
ENGLISH • • • • • • • • cable. Should the mains cable need to be replaced, this must be carried out by our Authorised Service Centre. Do not let mains cables to come in touch with the appliance door, specially when the door is hot. The shock protection of live and insulated parts must be fastened in such a way that it cannot be removed without tools. Connect the mains plug to the mains socket only at the end of the installation. Make sure that there is access to the mains plug after the installation.
www.aeg.com • Make sure the appliance is cold. There is the risk that the glass panels can break. • Replace immediately the door glass panels when they are damaged. Contact the Service. • Be careful when you remove the door from the appliance. The door is heavy! • Clean regularly the appliance to prevent the deterioration of the surface material. • Remaining fat or food in the appliance can cause fire. • Clean the appliance with a moist soft cloth. Only use neutral detergents.
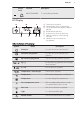
ENGLISH 3. PRODUCT DESCRIPTION 3.1 General overview 1 2 3 4 5 5 4 8 3 6 2 1 1 Control panel 2 Electronic programmer 3 Socket for the core temperature sensor 4 Heating element 5 Lamp 6 Fan 7 Shelf support, removable 8 Shelf positions 7 3.2 Accessories Nonstick wire shelf To bake and roast or as a pan to collect fat. Trivet For cookware, cake tins, roasts. Baking tray For roasting and grilling. Use the trivet only with the Grill- / Roasting pan. Core temperature sensor For cakes and biscuits.
www.aeg.com 4. CONTROL PANEL 4.1 Electronic programmer 1 2 3 4 5 6 7 8 9 10 Use the sensor fields to operate the appliance. Sensor Field 1 2 3 4 - Function Description DISPLAY Shows the current settings of the appliance. ON / OFF To activate and deactivate the appliance. OPTIONS To set an oven function, a cleaning function or an automatic programme. MY FAVOURITE PROGRAMME To store your favourite programme.
ENGLISH Sensor Field 10 Function Description MINUTE MINDER To set the Minute Minder. 4.2 Display A B G C F E D A) Oven function symbol B) Temperature / time of day display C) Clock / Residual heat display / Minute Minder D) Residual heat indicator E) Indicators for the clock functions F) Heat-up indicator / Fast Heat Up indicator G) Number of an oven function / programme Other indicators of the display: Symbol / / Name Description Functions You can choose an oven function.
www.aeg.com 4.3 Heat up indicator If you activate an oven function, the bars When the appliance is at the set temperature, the bars go off the display. come on in the display. The bars show that the temperature in the appliance increases or decreases. 5. BEFORE FIRST USE After the software version goes off, the display shows h and 12:00. WARNING! Refer to Safety chapters. 1. Touch 5.1 Initial Cleaning Remove all accessories and removable shelf supports from the appliance.
ENGLISH Oven function 11 Application Slow Cooking To prepare tender, succulent roasts. Conventional Cooking To bake and roast food on 1 shelf position. Frozen Foods To make your convenience food like e.g. French Fries, Wedges, spring rolls crispy. Turbo Grilling To roast larger meat joints or poultry with bones on 1 shelf position. Also to make gratins and to brown. Fast Grilling To grill flat food in large quantities and to toast bread. Grilling To grill flat food and to toast bread.
www.aeg.com 6.4 Changing the temperature 6.7 Energy saving Touch or to change the temperature in steps of 5 °C. When the appliance is at the set temperature, an acoustic signal sounds three times and the Heat up indicator goes out. The appliance contains features which help you save energy during everyday cooking: 6.5 Checking the temperature You can see the temperature in the appliance when the function or programme operates. 1. Touch .
ENGLISH 13 7. CLOCK FUNCTIONS 7.1 Clock functions table Clock function Application COUNT UP TIMER To set the count up, which shows how long the appliance operates. This function has no effect on the operation of the appliance. TIME OF DAY To show the time of day. To change the time of day, refer to "Setting the time". DURATION To set how long the appliance operates. END To set when the appliance deactivates.
www.aeg.com 4. Touch a sensor field or open the oven door to stop the acoustic signal. 5. Deactivate the appliance. 7.5 Setting the SET+GO You can use the SET+GO function only when the DURATION is set. 1. Set an oven function (or a programme) and temperature (refer to "Setting the oven function" and "Changing the temperature"). 2. Set the DURATION (refer to "Setting the DURATION"). 3. Touch again and again until flashes in the display. to set the SET+GO 4. Touch function.
ENGLISH Programme number Programme name 3 ROAST VEAL 4 ROAST LAMB 5 ROAST GAME 6 CHICKEN, WHOLE 7 WHOLE FISH 8 PIZZA 9 QUICHE LORRAINE 10 LEMON SPONGE CAKE 11 CHEESE CAKE 12 ROLLS 13 FARMER BREAD 14 DOUGH PROVING 15 POTATO GRATIN 16 LASAGNE 17 CANNELLONI 18 CONVENIENCE CAKE 19 CONVENIENCE PIZZA 20 CONVENIENCE POTATO TYPES 8.2 Recipes online You can find the recipes for the automatic programmes specified for this appliance on our website.
www.aeg.com The display shows: the cooking time, the duration symbol , a default weight, a unit of measurement (kg, g). 4. Touch or the settings save automatically after five seconds. The appliance activates. 5. You can change the default weight or . Touch . value with 6. When the set time ends, an acoustic signal sounds for two minutes. flashes. The appliance deactivates. 7. Touch a sensor field or open the door to stop the acoustic signal. 8.
ENGLISH 4. Touch or temperature. to set the core 5. Touch or the settings save automatically after 5 seconds. You can set the core temperature only when flashes. If is in the display but does not flash before you set the core temperature, touch and or to set a new value. 6. Set the oven function and the oven temperature. The display shows the current core temperature and the heat up symbol . While the appliance calculates the approximate duration time, the display shows the count up time.
www.aeg.com 1. Put the trivet into the deep pan so that the supports of the wire shelf point up. • All accessories have small indentations at the top of the right and left side to increase safety. The indentations are also antitip devices. • The high rim around the shelf is a device which prevents cookware from slipping. 2. Put the deep pan into the oven on the necessary shelf position. You can use the trivet to grill flat dishes in large quantities and to toast. 1.
ENGLISH An acoustic signal sounds. Loc comes on in the display. To deactivate the Function Lock repeat step 3. If the Pyrolysis function operates, the door is locked. A message comes on in the display when you touch a sensor field. If the Pyrolysis function operates, the door is locked. A message comes on in the display when you touch a sensor field. 1. To activate the function deactivate the appliance with oven function. . Do not set an and at the 2. Touch and hold same time for 2 seconds.
www.aeg.com Temperature (°C) Switch-off time (h) 30 - 115 12.5 120 - 195 8.5 200 - 245 5.5 250 - maximum 1.5 After the Automatic switch-off, touch a sensor field to operate the appliance again. The Automatic switch-off does not work with the functions: core temperature sensor, Light, Slow Cooking, Duration, End, Time delay. 10.6 Brightness of the display There are two modes of display brightness: display is lower between 10 PM and 6 AM. • Day brightness: – when the appliance is activated.
ENGLISH 21 11.3 Tips on baking Baking results Possible cause Remedy The bottom of the cake is not browned sufficiently. The shelf position is incorrect. Put the cake on a lower shelf. The cake sinks and becomes The oven temperature is too The next time you bake, set soggy, lumpy or streaky. high. a slightly lower oven temperature. The cake sinks and becomes The baking time is too short. Set a longer baking time. soggy, lumpy or streaky.
www.aeg.com Food Function Temperature (°C) Time (min) Shelf position Flan base - short True Fan Cookpastry ing 170 - 1801) 10 - 25 2 Flan base sponge mixture True Fan Cooking 150 - 170 20 - 25 2 Apple pie / Apple pie (2 tins Ø20 cm, diagonally off set) True Fan Cooking 160 60 - 90 2 Apple pie / Apple pie (2 tins Ø20 cm, diagonally off set) Conventional Cooking 180 70 - 90 1 Cheesecake Conventional Cooking 170 - 190 60 - 90 1 1) Preheat the oven.
ENGLISH Food Function Temperature (°C) Time (min) Shelf position 150 35 - 55 3 170 35 - 55 3 Fruit flans made True Fan Cookwith short pastry ing 160 - 170 40 - 80 3 Yeast cakes with Conventional delicate topCooking pings (e.g.
www.aeg.com Food Function Temperature (°C) Time (min) Shelf position Puff pastries True Fan Cooking 170 - 1801) 20 - 30 3 Rolls True Fan Cooking 1601) 10 - 25 3 Rolls Conventional Cooking 190 - 2101) 10 - 25 3 Small cakes / Small cakes (20 per tray) True Fan Cooking 1501) 20 - 35 3 Small cakes / Small cakes (20 per tray) Conventional Cooking 1701) 20 - 30 3 1) Preheat the oven. 11.
ENGLISH 25 11.6 Moist Fan Baking Food Type of food Temperature (°C) Time (min) Shelf position Pasta bake 180 - 200 45 - 60 2 Lasagne 180 - 200 45 - 60 2 Potato gratin 190 - 210 55 - 80 2 Sweet dishes 180 - 200 45 - 60 2 Ring cake or brioche 160 - 170 50 - 70 1 Plaited bread / bread crown 170 - 190 40 - 50 2 Cake with crumble topping (dry) 160 - 170 20 - 40 3 Biscuits made with yeast dough 160 - 170 20 - 40 2 11.7 Multilevel Baking Use the function True Fan Cooking.
www.aeg.com Food Temperature (°C) Time (min) Biscuits made with egg white, meringues 80 - 100 Macaroons Shelf position 2 positions 3 positions 130 - 170 1/4 - 100 - 120 40 - 80 1/4 - Biscuits made with yeast dough 160 - 170 30 - 60 1/4 - Puff pastries 170 - 1801) 30 - 50 1/4 - Rolls 180 20 - 30 1/4 - Small cakes / Small cakes (20 per tray) 1501) 23 - 40 1/4 - 1) Preheat the oven. 11.
ENGLISH 27 11.
www.aeg.com 11.11 Roasting tables Beef Food Quantity Function Temperature (°C) Time (min) Shelf position Pot roast 1 - 1.5 kg Conventional Cooking 230 120 - 150 1 Roast beef or fil- per cm of let: rare thickness Turbo Grilling 190 - 2001) 5-6 1 Roast beef or fil- per cm of let: medium thickness Turbo Grilling 180 - 1901) 6-8 1 Roast beef or fil- per cm of let: well done thickness Turbo Grilling 170 - 1801) 8 - 10 1 1) Preheat the oven.
ENGLISH Food Quantity (kg) Function Temperature Time (min) (°C) Shelf position Shelf position Saddle of lamb 1 - 1.5 Turbo Grilling 160 - 180 1 Food Quantity Function Temperature Time (min) (°C) Saddle / Leg of hare up to 1 kg Conventional 2301) Cooking 30 - 40 1 Saddle of venison 1.5 - 2 kg Conventional 210 - 220 Cooking 35 - 40 1 Haunch of venison 1.5 - 2 kg Conventional 180 - 200 Cooking 60 - 90 1 40 - 60 Game Shelf position 1) Preheat the oven.
www.aeg.com 11.12 Grilling • Grill only flat pieces of meat or fish. • Always preheat the empty oven with the grill functions for 5 minutes. • Always grill with the maximum temperature setting. • Set the shelf into the shelf position as recommended in the grilling table. • Always set the pan to collect the fat into the first shelf position. CAUTION! Always grill with the oven door closed.
ENGLISH Food Temperature (°C) Time (min) Shelf position French Fries, thin 200 - 220 20 - 30 3 French Fries, thick 200 - 220 25 - 35 3 Wedges / Croquettes 220 - 230 20 - 35 3 Hash Browns 210 - 230 20 - 30 3 Lasagne / Cannelloni, fresh 170 - 190 35 - 45 2 Lasagne / Cannelloni, frozen 160 - 180 40 - 60 2 Oven baked cheese 170 - 190 20 - 30 3 Chicken Wings 190 - 210 20 - 30 2 31 Frozen ready meals Food Function Temperature (°C) Time (min) Temperature (°C) Frozen pizza
www.aeg.com Food Quantity Defrosting time (min) Further deComments frosting time (min) Chicken 1 kg 100 - 140 20 - 30 Put the chicken on an upturned saucer in a big plate. Turn halfway through. Meat 1 kg 100 - 140 20 - 30 Turn halfway through. Meat 500 g 90 - 120 20 - 30 Turn halfway through.
ENGLISH 33 Vegetables Food Temperature (°C) Cooking time until simmering (min) Continue to cook at 100 °C (min) Carrots1) 160 - 170 50 - 60 5 - 10 Cucumbers 160 - 170 50 - 60 - Mixed pickles 160 - 170 50 - 60 5 - 10 Kohlrabi / Peas / Asparagus 160 - 170 50 - 60 15 - 20 1) Leave standing in the oven after it is deactivated. 11.16 Drying - True Fan Cooking • Cover trays with grease proof paper or baking parchment.
www.aeg.
ENGLISH 12.1 Notes on cleaning • Clean the front of the appliance with a soft cloth with warm water and a cleaning agent. • To clean metal surfaces, use a usual cleaning agent. • Clean the appliance interior after each use. Fat accumulation or other food remains may result in a fire. The risk is higher for the grill pan. • Clean stubborn dirt with a special oven cleaner. • Clean all accessories after each use and let them dry. Use a soft cloth with warm water and a cleaning agent.
www.aeg.com Option Description 1 1:00 h for a low degree of dirt 2 1:30 h for a usual degree of dirt 3 2:30 h for a high degree of dirt You can use the End function to delay the start of the cleaning procedure. 5. Touch to activate the Pyrolysis function. 12.4 Cleaning reminder A A 3. Close the oven door to the first opening position (approximately 70° angle). 4. Hold the door with one hand on each side and pull it away from the appliance at an upwards angle. 5.
ENGLISH 12.6 Replacing the lamp 4. Install the glass cover. Put a cloth on the bottom of the interior of the appliance. It prevents damage to the lamp glass cover and the cavity. The side lamp WARNING! Danger of electrocution! Disconnect the fuse before you replace the lamp. The lamp and the lamp glass cover can be hot. 37 1. Remove the left shelf support to get access to the lamp. 2. Use a narrow, blunt object (e.g. a teaspoon) to remove the glass cover. 1. Deactivate the appliance. 2.
www.aeg.com Problem Possible cause Remedy The oven does not heat up. The fuse is released. Make sure that the fuse is the cause of the malfunction. If the fuse releases again and again, contact a qualified electrician. The lamp does not operate. The lamp is defective. Replace the lamp. The display does not show the time during the off status. The display is deactivated. Touch and at the same time to activate the display again.
ENGLISH 39 Problem Possible cause Remedy The display shows an error code that is not in this table. There is an electrical fault. • Deactivate the oven with the house fuse or the safety switch in the fuse box and activate it again. • If the display shows the error code again, contact the Customer Care Department. 13.2 Service data If you cannot find a solution to the problem yourself, contact your dealer or an Authorised Service Centre. on the front frame of the appliance cavity.
867302703-A-082014 www.aeg.