EHBZR EN User manual
www.aeg.com CONTENTS 1. 2. 3. 4. 5. 6. 7. 8. 9. 10. 11. 12. 13. SAFETY INFORMATION . . . . . . . . . . . . . . . . . . . . . . . . . . . . . . . . . . . . . . . . . . . . . . . . . . . . . . 3 SAFETY INSTRUCTIONS . . . . . . . . . . . . . . . . . . . . . . . . . . . . . . . . . . . . . . . . . . . . . . . . . . . . . . 4 PRODUCT DESCRIPTION . . . . . . . . . . . . . . . . . . . . . . . . . . . . . . . . . . . . . . . . . . . . . . . . . . . . . 6 BEFORE FIRST USE . . . . . . . . . . . . . . . . . . . .
ENGLISH 3 1. SAFETY INFORMATION Before the installation and use of the appliance, carefully read the supplied instructions. The manufacturer is not responsible if an incorrect installation and use causes injuries and damages. Always keep the instructions with the appliance for future reference. 1.1 Children and vulnerable people safety WARNING! Risk of suffocation, injury or permanent disability.
www.aeg.com scratch the surface, which may result in shattering of the glass. • To remove the shelf supports first pull the front of the shelf support and then the rear end away from the side walls. Install the shelf supports in the opposite sequence. 2. SAFETY INSTRUCTIONS 2.1 Installation WARNING! Only a qualified person must install this appliance. • Remove all the packaging. • Do not install or use a damaged appliance. • Obey the installation instruction supplied with the appliance.
ENGLISH 2.2 Use WARNING! Risk of injury, burns or electric shock or explosion. • Use this appliance in a household environment. • Do not change the specification of this appliance. • Make sure that the ventilation openings are not blocked. • Do not let the appliance stay unattended during operation. • Deactivate the appliance after each use. • Be careful, when you open the appliance door while the appliance is in operation. Hot air can release.
www.aeg.com • Only use lamps with the same specifications. 2.5 Disposal WARNING! Risk of injury or suffocation. • Disconnect the appliance from the mains supply. • Cut off the mains cable and discard it. • Remove the door catch to prevent children and pets to get closed in the appliance. • Dispose of the appliance at any shop that sells new appliances or at the official SENS collection point. You can find the list of the official SENS collection points at www.sens.ch. 3.
ENGLISH 7 Grill- / Roasting pan To bake and roast or as a pan to collect fat. 4. BEFORE FIRST USE WARNING! Refer to the Safety chapters. 4.1 Initial Cleaning • Remove all parts from the appliance. • Clean the appliance before first use. Refer to chapter "Care and Cleaning". 4.2 Setting the time You must set the time before you operate the appliance. cut, the Time function indicator flashes automatically. Press the + or - button to set the correct time.
www.aeg.com 5.2 Oven Functions Oven function Application Light To activate the lamp without a cooking function. True Fan Cooking To bake on up to 3 oven levels at the same time and to dry food. Set the oven temperatures 20 - 40 °C lower than when using Conventional Cooking. Pizza Setting To bake food on one shelf position for a more intensive browning and a crispy bottom. Set the temperature 20 - 40 °C lower than for Conventional Cooking.
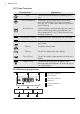
ENGLISH If you do not use the appliance for 3 minutes, the brightness of the display decreases to lower the power consumption. When you press a button, the display goes back to the active mode. 5.4 Cooking zones You can operate the hob with the control knobs for the cooking zones. Refer to the user manual for hob. Control knob 9 Function Double zone switch Operating the hob: 1. Turn the knob to a necessary heat setting. 2. To complete the cooking process, turn the knob to the off position. 5.
www.aeg.com 3. Press + or - to set the time for the necessary clock function. The display shows the indicator for the clock function you set. When the set time ends, the indicator flashes and an acoustic signal sounds for two minutes. With the Duration and End functions, the appliance deactivates automatically. 4. Press a button to stop the signal. 5. Turn the knob for the oven functions and the knob for the temperature to the off position. 6.2 Cancelling the clock functions 1.
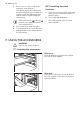
ENGLISH 11 Wire shelf and baking tray together: Push the baking try between the guide bars of the shelf support and the wire shelf on the guide bars above. • All accessories have small indentations at the top of the right and left side to increase safety. The indentations are also anti-tip devices. • The high rim around the shelf is a device which prevents cookware from slipping. 8. ADDITIONAL FUNCTIONS 8.
www.aeg.com Heat setting Use to: Time (min) Hints 6-7 Gentle fry: escalope, veal cordon bleu, cutlets, rissoles, sausages, liver, roux, eggs, pancakes, doughnuts as required Turn halfway through 7-8 Heavy fry, hash browns, loin steaks, steaks 5 - 15 Turn halfway through 9 Boil large quantities of water, cook pasta, sear meat (goulash, pot roast), deep fry chips The temperature and baking times in the tables are guidelines only.
ENGLISH Baking results 13 Possible cause Remedy The cake is too dry. The oven temperature is too low. The next time you bake, set a higher oven temperature. The cake is too dry. The baking time is too long. The next time you bake, set a shorter baking time. The cake browns unevenly. The oven temperature is Set a lower oven tempertoo high and the baking ature and a longer baktime is too short. ing time. The cake browns unevenly. The mixture is unevenly distributed.
www.aeg.com Cakes / pastries / breads on baking trays Oven function Shelf position Temperature (°C) Time (min) Plaited bread / bread crown Conventional Cooking 3 170 - 190 30 - 40 Christmas stollen Conventional Cooking 2 160 - 180 1) 50 - 70 Bread (rye bread): 1. First part of baking process. 2. Second part of baking process. Conventional Cooking 1 1. 230 1) 2. 160 - 180 1. 20 2.
ENGLISH 15 Type of baking Oven function Shelf position Temperature (°C) Time (min) Short bread / Short bread / Pastry Stripes Conventional Cooking 3 160 1) 20 - 30 Biscuits made with sponge mixture True Fan Cooking 3 150 - 160 15 - 20 Pastries made with egg white, merungues True Fan Cooking 3 80 - 100 120 - 150 Macaroons True Fan Cooking 3 100 - 120 30 - 50 Biscuits made with yeast dough True Fan Cooking 3 150 - 160 20 - 40 Puff pastries True Fan Cooking 3 170 - 180 1) 20
www.aeg.com 1) Preheat the oven 9.5 Multileveled Baking Cakes / pastries / breads on baking trays True Fan Cooking Type of baking Shelf position Temperature (°C) Time (min) 2 levels 3 levels Cream puffs / Eclairs 1/4 --- 160 - 180 1) 25 - 45 Dry streusel cake 1/4 --- 150 - 160 30 - 45 1) Preheat the oven.
ENGLISH 17 Shelf position Temperature (°C) Time (min) Pizza (with a lot of topping) 2 180 - 200 20 - 30 Tarts 1 180 - 200 40 - 55 Spinach flan 1 160 - 180 45 - 60 Quiche Lorraine 1 170 - 190 45 - 55 Swiss Flan 1 170 - 190 45 - 55 Apple cake, covered 1 150 - 170 50 - 60 Vegetable pie 1 160 - 180 50 - 60 Unleavened bread 2 230 - 250 1) 10 - 20 Puff pastry flan 2 160 - 180 1) 45 - 55 Flammekuchen (Pizza-like dish from Alsace) 2 230 - 250 1) 12 - 20 Piroggen (Russian
www.aeg.com Type of meat Quantity Oven function Shelf position Temperature (°C) Time (min) Roast beef or fillet: medium per cm of thickness Turbo Grilling 1 180 - 190 1) 6-8 Roast beef or fillet: well done per cm of thickness Turbo Grilling 1 170 - 180 1) 8 - 10 1) Preheat the oven Pork Type of meat Quantity Oven function Shelf position Temperature (°C) Time (min) Shoulder, neck, ham joint 1 - 1.5 kg Turbo Grilling 1 160 - 180 90 - 120 Chop, spare rib 1 - 1.
ENGLISH 19 Game Type of meat Quantity Oven function Shelf position Temperature (°C) Time (min) Saddle of hare, leg of hare up to 1 kg Conventional Cooking 1 230 1) 30 - 40 Saddle of venison 1.5 - 2 kg Conventional Cooking 1 210 - 220 35 - 40 Haunch of venison 1.
www.aeg.
ENGLISH Shelf position Temperature (°C) Time (min) Lasagne / Cannelloni, frozen Convenience food 2 160 - 180 40 - 60 Oven baked cheese 3 170 - 190 20 - 30 Chicken Wings 2 190 - 210 20 - 30 21 Frozen Ready Meals Food to be cooked Oven functions Shelf position Temperature (°C) Time (min) Frozen pizza Conventional Cooking 3 as per manufacturer’s instructions as per manufacturer’s instructions Chips 1) (300 - 600 g) Conventional Cooking or Turbo Grilling 3 200 - 220 as per manufa
www.aeg.com Dish Weight (g) Defrosting time (min) Further defrosting time (min) Comment Cream 2 x 200 80 - 100 10 - 15 Cream can also be whipped when still slightly frozen in places Gateau 1400 60 60 --- 9.12 Preserving - Bottom Heat Things to note: • Use only preserve jars of the same dimensions available on the market. • Do not use jars with twist-off and bayonet type lids, or metal tins. • Use the first shelf from the bottom for this function.
ENGLISH 23 For best results: deactivate the appliance after half the time required. Open the appliance door and let the appliance cool down. After that finish the drying process. 9.13 Drying - True Fan Cooking Cover the oven shelves with baking parchment.
www.aeg.com WARNING! Do not attempt to clean catalytic surface with oven sprays, abrasive cleaners, soap or other cleaning agents. This will damage the catalytic surface. Spots or discolouration of the catalytic surface have no effect on the catalytic properties. 10.2 Shelf supports Removing the shelf supports You can remove the shelf supports to clean the side walls. 1. Pull the front of the shelf support away from the side wall. 2.
ENGLISH A A Removing the door and the glass panels 1. Open the door fully. 2. Fully press the clamping levers (A) on the two door hinges. 3. Close the door to the first opening position (approximately 70° angle). 4. Hold the door with one hand on each side and pull it away from the appliance at an up angle. 5. Put the door with the outer side down on a soft cloth on a stable surface. This is to prevent scratches. 6. 2 7.
www.aeg.com 4. Install the glass cover. 11. WHAT TO DO IF… WARNING! Refer to the Safety chapters. Problem Possible cause Remedy The cooking zone do not Refer to the user manual for the hob. operate. The appliance does not heat up. The appliance is not acti- Activate the appliance. vated. Refer to the chapter "Daily use". The appliance does not heat up. The clock is not set. Set the clock. Refer to "Setting the time". The appliance does not heat up. The necessary settings are not set.
ENGLISH 27 The handle profile can be replaced to match the décor of your kitchen. The change must be done by an authorized person. Use only genuine replacement parts. min. 3 mm To lift the appliance, do not use the door handle. 12.1 Installing the oven under a work surface WARNING! Installation into flammable material must agree with NIN SEV 1000 (Association of Cantonal Fire Insurers) fire protection guidelines and regulations. B 180 A A ca.50 N 600 A 595 442 115 N min.
www.aeg.com A min. 20 B 4. WARNING! When installing next to a woodfuelled boiler, a heatproof and heat-insulating plate must be mounted at the height of the appliance and at least 30 cm deep. 10 20 A 12.2 Electrical connection Use a power cable of H05VV-F or higher. Connect the appliance to a socket supply line. If there is no socket supply line, the electrical installation must have an isolation device which lets you disconnect the appliance from the power supply.
ENGLISH 29 2 3 4 1 1 = 45 mm 2 = 45 mm 3 = 60 mm 4 = 60 mm = 70 mm 1 2 3 4 13. CH GARANTIE, GARANZIA, GUARANTEE 13.1 Kundendienst, service-clientèle, Servizio clienti, Customer Service Centres Servicestellen Points de Service Servizio dopo vendita 5506 Mägenwil/Zürich In- 3018 Bern Mordustriestrasse 10 genstrasse 131 9000 St. Gallen Zürcherstrasse 204e 4052 Basel St.
www.aeg.com Servicestellen Points de Service Servizio dopo vendita Point of Service 6020 Emmenbrücke Seetalstrasse 11 7000 Chur Comercialstrasse 19 Ersatzteilverkauf/Points de vente de rechange/Vendita pezzi di ricambio/ spare parts service: 5506 Mägenwil, Industriestrasse 10, Tel. 0848 848 111 Fachberatung/Verkauf/Demonstration/Vente/Consulente (cucina)/Vendita 8048 Zürich, Badenerstrasse 587, Tel. 044 405 81 11 Garantie Für jedes Produkt gewähren wir ab Verkauf bzw.
ENGLISH 31
892956608-B-522012 www.aeg.