HKP65310XB USER MANUAL EN User Manual Hob
www.aeg.com CONTENTS 1. SAFETY INFORMATION............................................................................................. 2 2. CONDITIONS OF USE................................................................................................ 4 3. SAFETY INSTRUCTIONS.............................................................................................4 4. PRODUCT DESCRIPTION...........................................................................................7 5. DAILY USE.......
ENGLISH 3 usage. Always keep the instructions in a safe and accessible location for future reference. 1.1 Children and vulnerable people safety • • • • • • • This appliance can be used by children aged from 8 years and above and persons with reduced physical, sensory or mental capabilities or lack of experience and knowledge if they have been given supervision or instruction concerning the use of the appliance in a safe way and understand the hazards involved.
www.aeg.com • • • • • • • • CAUTION: The cooking process has to be supervised. A short term cooking process has to be supervised continuously. WARNING: Danger of fire: Do not store items on the cooking surfaces. Metallic objects such as knives, forks, spoons and lids should not be placed on the hob surface since they can get hot. Do not use a steam cleaner to clean the appliance. After use, switch off the hob element by its control and do not rely on the pan detector.
ENGLISH • Protect the bottom of the appliance from steam and moisture. • Do not install the appliance adjacent to a door or under a window. This prevents hot cookware to fall from the appliance when the door or the window is opened. • If the appliance is installed above drawers make sure that the space, between the bottom of the appliance and the upper drawer, is sufficient for air circulation. • The bottom of the appliance can get hot.
www.aeg.com • Do not rely on the pan detector. • Do not put cutlery or saucepan lids on the cooking zones. They can become hot. • Do not operate the appliance with wet hands or when it has contact with water. • Do not use the appliance as a work surface or as a storage surface. • If the surface of the appliance is cracked, disconnect immediately the appliance from the power supply. This to prevent an electrical shock.
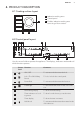
ENGLISH 7 4. PRODUCT DESCRIPTION 4.1 Cooking surface layout 1 Induction cooking zone 2 Control panel 3 Flexible induction cooking area consisting of four sections 1 3 2 4.2 Control panel layout 1 2 3 4 5 6 13 7 12 8 11 10 9 Use the sensor fields to operate the appliance. The displays, indicators and sounds tell which functions operate. Sensor Function field Comment 1 ON / OFF To activate and deactivate the hob. 2 Lock / The Child Safety Device To lock / unlock the control panel.
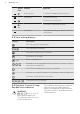
www.aeg.com Sensor Function field 9 10 - 11 / 12 - 13 Comment Power function To activate and deactivate the function. Control bar To set a heat setting. - To select the cooking zone. - To increase or decrease the time. Control bar To set the heat setting for flexible induction cooking area. 4.3 Heat setting displays Display Description The cooking zone is deactivated. The cooking zone operates. - Automatic Heat Up function operates. Power function operates.
ENGLISH 9 5. DAILY USE WARNING! Refer to Safety chapters. 5.1 Activating and deactivating Touch the control bar at the correct heat setting or move your finger along the control bar until you reach the correct heat setting. Touch for 1 second to activate or deactivate the hob. 5.
www.aeg.com 5.6 Power function with a double ring cooking zone The function is activated for the inner ring when the hob senses the cookware with a smaller diameter than the inner ring. The function is activated for the outer ring when the hob senses the cookware with a bigger diameter than the inner ring. 5.7 Timer Count Down Timer You can use this function to set how long the cooking zone should operate for a single cooking session.
ENGLISH 5.9 The Child Safety Device This function prevents an accidental operation of the hob. To activate the function: activate the hob with . Do not set the heat setting. for 4 seconds. Touch Deactivate the hob with comes on. . To deactivate the function: activate the hob with Touch . Do not set the heat setting. for 4 seconds. Deactivate the hob with comes on. . 11 • Each phase has a maximum electricity loading of 3700 W.
www.aeg.com Automatic modes Automatic light Boiling1) Frying2) Mode H0 Off Off Off Mode H1 On Off Off Mode H2 3) Fan speed 1 Fan speed 1 Mode H3 On Off Fan speed 1 On When you finish cooking and deactivate the hob, the hood fan may still operate for a certain period of time. After that time the system deactivates the fan automatically and prevents you from accidental activation of the fan for the next 30 seconds.
ENGLISH 13 can be combined into two cooking zones with different size, or into one large cooking area. You choose the combination of the sections by choosing the mode applicable to the size of the cookware you want to use. There are three modes: Standard (activated automatically when you activate the hob), Big Bridge and Max Bridge. To set the heat setting use two left side control bars. Switching between the modes 100-160mm To switch between the modes use sensor field: .
www.aeg.com Incorrect cookware position: Incorrect cookware position: 6.3 FlexiBridge Big Bridge mode To activate the mode press until you see the correct mode indicator . This mode connects three rear sections into one cooking zone. The one front section is not connected and operates as a separate cooking zone. You can set the heat setting for each zone separately. Use two left side control bars. 6.4 FlexiBridge Max Bridge mode To activate the mode press until you see the correct mode indicator .
ENGLISH 15 General information: Incorrect cookware position: • 160 mm is the minimum bottom diameter of the cookware for this function. • Heat setting display for the left rear control bar shows the position of the cookware on the induction cooking area. Front , middle , rear . 6.5 PowerSlide function This function allows you to adjust the temperature by moving the cookware to a different position on the induction cooking area.
www.aeg.com Activating the function Deactivating the function To activate the function place the cookware in the correct position on the To deactivate the function touch cooking area. Touch . The indicator above the symbol comes on. If you do not place the cookware on the cooking above the symbol set the heat setting to or . The indicator goes off. comes on and after 2 minutes area the flexible induction cooking area is set to . 7. HINTS AND TIPS WARNING! Refer to Safety chapters. 7.
ENGLISH 7.4 Examples of cooking applications The relation between the heat setting and the cooking zone consumption of power is not linear. When you increase the heat setting, it is not proportional to the increase of the cooking zone Heat setting 17 consumption of power. It means that the cooking zone with the medium heat setting uses less than a half of its power. The data in the table is for guidance only. Use to: Time (min) Hints Keep cooked food warm. as necessary Put a lid on the cookware.
www.aeg.com Cooker hoods with the Hob²Hood function To find the full range of cooker hoods which work with this function refer to our consumer website. The AEG cooker hoods that work with this function must have the symbol . It may happen that other remote controlled appliances may block the signal. To avoid it do not operate the remote of the appliance and the hob at the same time. 8. CARE AND CLEANING WARNING! Refer to Safety chapters. 8.1 General information • Clean the hob after each use.
ENGLISH 19 9.1 What to do if... Problem Possible cause You cannot activate or oper- The hob is not connected to ate the hob. an electrical supply or it is connected incorrectly. The fuse is blown. Remedy Check if the hob is correctly connected to the electrical supply. Refer to the connection diagram. Make sure that the fuse is the cause of the malfunction. If the fuse is blown again and again, contact a qualified electrician. Activate the hob again and set the heat setting in less than 10 seconds.
www.aeg.com Problem Possible cause Remedy There is no signal when you touch the panel sensor fields. The signals are deactivated. Activate the signals. Refer to "Daily use" chapter. The flexible induction cooking area does not heat up the cookware. The cookware is in the wrong position on the flexible induction cooking area. Place the cookware in the correct position on the flexible induction cooking area. The position of the cookware depends on the activated function or function mode.
ENGLISH Problem Possible cause 21 Remedy PowerSlide function operUse only one pot. ates. Two pots are placed on Refer to "Flexible induction the flexible induction cook- cooking area" chapter. ing area. and a number come on. There is an error in the hob. Disconnect the hob from the electrical supply for some time. Disconnect the fuse from the electrical system of the house. Connect it again. If comes on again, speak to an Authorised Service Centre. comes on.
www.aeg.com • To replace the damaged mains cable, use the cable type: H05V2V2-F which withstands a temperature of 90°C or higher. Speak to your local Service Centre. 10.4 Assembly min. 500mm min. 50mm min. 2mm min. 2 mm A min. 2 mm A B < 20 mm > 20 mm min. 500 mm B 57 mm 41 mm 31 mm A 12 mm 28 mm 38 mm B min 30 mm min. 500 mm A 12 mm 28 mm 38 mm B 57 mm 41 mm 31 mm min. 38 mm min. 2 mm R 5mm min.
ENGLISH 23 min. 12 mm min. 2 mm 10.5 Protection box If you use a protection box (an additional accessory), the front airflow space of 2 mm and the protective floor directly below the hob are not necessary. The protection box accessory may not be available in some countries. Please contact your local supplier. You can not use the protection box if you install the hob above an oven. 11. TECHNICAL DATA 11.1 Rating plate Model HKP65310XB Typ 60 GAD CL AU Induction 7.4 kW Ser.Nr. .................
www.aeg.com 11.2 Cooking zones specification Cooking zone Nominal power Power function (maximum heat [W] setting) [W] Power function Cookware diammaximum dura- eter [mm] tion [min] Right front 1800 3500 2800 3700 5 5 145 - 245 245 - 280 Flexible induction cooking area 2300 3200 10 minimum 100 The power of the cooking zones can be different in some small range from the data in the table. It changes with the material and dimensions of the cookware.
ENGLISH • If it is possible, always put the lids on the cookware. • Before you activate the cooking zone put the cookware on it. • Put the smaller cookware on the smaller cooking zones. 25 • Put the cookware directly in the centre of the cooking zone. • Use the residual heat to keep the food warm or to melt it. 13. WARRANTY FOR SALES IN AUSTRALIA AND NEW ZEALAND ALL AEG BRANDED APPLIANCES This document sets out the terms and conditions of the product warranties for AEG Appliances.
www.aeg.com 6. 7. 8. 9. b) transportation and delivery of the Appliance to and from Electrolux or its ASC. In all instances, unless the Appliance is transported by Electrolux or an AEG authorised representative, the Appliance is transported at the owner’s cost and risk while in transit to and from Electrolux or its ASC. Proof of purchase is required before you can make a claim under this warranty.
ENGLISH 27 Important Notice Before calling for service, please ensure that the steps listed in clause 13 above have been followed. AEG SERVICE AUSTRALIA www.aeg.com/au FOR SERVICE or to find the address of your nearest state service centre in Australia PLEASE CALL 1300 363 664 OR EMAIL customercare@aegaustralia.com.
867333145-A-032017 www.aeg.