
Operation Manual


21
D
GR
NL
F
GB
GB
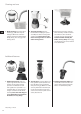
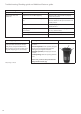
3. Close the lid and (A) insert the
measuring cup in the ller hole and
(B) lock into position. (You can use
the measuring cup to add ingredi-
ents while the blender is running.
Close the ller hole immediately
after, to avoid splashing.)
Caution! When processing hot
liquids, see paragraph 4.
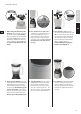
2. Place the blender on a at surface
and lock the jug into position on the
motorhousing.Whenthearrowis
aligned with the “Locked” indicator,
the jug is locked in position. Put the
ingredients in the jug. (Do not exceed
the maximum level as indicated on
the jug.)
1. Before using the blender for the
rst time,washallpartsexceptfor
the motor housing. Assembling:
place the rubber seal on the blade
assembly and (A) insert it holding
the blender downwards. Turn the
blade assembly clockwise (B) to fas-
ten. Caution! The blades are very
sharp!
5. Start the blender by pressing the
on/o button. Start at low speed,
then progress to a higher speed
if required. To increase the speed
press the + button, press the − but-
ton to decrease it. To use the PULSE
function, press the PULSE button.
6. Ice crushing: press the PULSE but-
ton for 3-5 seconds several times
until you obtain a satisfactory re-
sult. You can add more ice through
the ller hole while the blender is
running.
4. Processing hot liquids: allow hot
liquids to cool down until lukewarm
before lling the jug. Fill the jug
only half full and start processing
on low speed. The blender jug can
become very warm – take care to
protect your hands and to ventilate
steam out through the ller hole.
Always replace the lid before use.
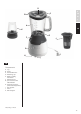
Getting started
AA
B
AB