
Installation Sheet
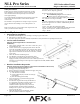

NLL Pro Series LED Undercabinet Fixture
Models NLLP9, NLLP14, NLLP22, NLLP32 & NLLP40 Plug-in or Hard Wire, Linkable
Page 2 of 2 8060795 Rev 0
Limited Factory Warranty
AFX Inc. warrants this fixture is free from defects in materials and workmanship when installed and used under normal operating conditions for a period
of 5 years from date of purchase. This warranty covers all component parts and extends only to replacement of defective fixture or components; it does
not cover failure due to improper installation, misuse, mishandling or damage incurred in transit.
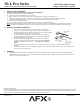
4. Link-to-Fixture Installation
(Skip this step if using Hardwire or Cord to Outlet Installation.)
A. First fixture in series can be Corded or Hardwired
B. Second fixture must be located within 12” of first fixture.
C. Make sure power is off on all fixtures. The fixture switch should not be engaged in either direction (7) .
D. Connect the Linking cord (6) to the “Out” connector of the first fixture and into the “In” connector of the second fixture.
(The connectors are keyed to only fit one way. Do not force the connections, they should snap in easily.)
E. Follow directions in Mounting Section.
F. Once mounting is completed, energize the first fixture. (Each fixture is controlled individually.)
Note: Injury to persons and damage to the mounting surface may result if the fixture or mounting hardware is pulled from the mounting
location. To reduce the possibility of such injury, be sure to mount the fixture only on a surface that is mechanically, structurally sound.
5. Hardwire Installation Completion
a. Pull 3 wires out of the fixture to allow connection to the branch circuit.
b. Connect the Green ground input supply wire to the fixture Green ground wire.
Do this by inserting it into the open hole in the push-in wire connector (included)
that is attached to the Green ground wire in the fixture.
c. Connect the White input supply wire to the fixture White wire. Do this by
inserting it into the open hole in the push-in wire connector (included) that is
attached to the White wire in the fixture.
d. Connect the Black input supply wire to the fixture Black wire. Do this by
inserting it into the open hole in the push-in wire connector (included) that is
attached to the Black wire in the fixture. Do not mix wires or change
polarity.
e. Pull on each wire lead to make sure connections are secure. Make certain no bare wires are exposed outside of the wire
connectors.
f. Feed wires back into fixture, reattach adapter plate tighten screw, and attach the fixture to the base of the cabinet, with screws (2
& 3) as defined in mounting section.
6. Mounting
A. Using captive screw hole locations for mounting the fixture (2 & 3), position the fixture in location intended for mounting. Mark hole
locations by using the screw-holes as a guide. Drill suitable holes in the marked positions. Mount the housing to desired surface with the 2
captive screws (Ref # 2 & 3 in Figure 1).