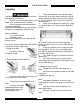
Aga-Heartland 1050 Fountain St. North, Cambridge, ON, N3H 4R7 Phone 877-650-5775 Fax 877-650-3773 Installation and Operating Instructions Aga Bottom Mount Refrigerators Model: AFHR-36 36” Bottom Mount Refrigerator Save these instructions for future use Keep sales receipt and/or cancelled check as proof of purchase. If service is required, have complete model and serial number identification of your refrigerator.
Contents Important Safety Instruction.............................................................................................3 What You Need to Know About Safety Instructions..................................................3 Recognize Safety Symbols, Words, Labels..............................................................3 Power Cord...............................................................................................................3 Installation...........................................
Use & Care Guide Important Safety Instructions What You Need to Know About Safety Instructions Power Cord This appliance is equipped with a 5 ft. (1.5 m) power cord with three-prong grounding plug for your protection against possible electrical shock hazards. It must be plugged into a 115 Volts 60Hz 10 amp grounding receptacle.
Use & Care Guide Important Safety Instructions To reduce risk of fire, electric shock, serious injury or death when using your refrigerator, follow these basic precautions, including the following: 1) Read all instructions before using the refrigerator. 13) Always disconnect refrigerator from electrical supply before attempting any service. Disconnect power cord by grasping the plug, not the cord. 2) Observe all local codes and ordinances. 3) Be sure to follow grounding instructions.
Use & Care Guide Installation Your refrigerator has been packed carefully for shipment. Remove and discard shelf packaging and tape. Do not remove the serial plate. The following pages contain “Measuring and Opening” instructions particular to each of the models and sizes. Ensure you choose the correct instructions for your model.
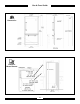
Use & Care Guide Leveling 3. Using hex head driver, turn the front adjustTo protect property and refrigerator from dam- ment screws (A) on each side clockwise to raise or counter-clockwise to lower the front of the refrigeraage, observe the following: • Protect vinyl or other flooring with card- tor. (ensure the back of the unit is firmly under the anti-tip bracket.) board, rugs, or other protective material. There are rear adjustment screws (B). Using • Do not use power tools when perform- 4.
Use & Care Guide Transporting Your Refrigerator • NEVER transport refrigerator on its side. If an upright position is not possible, lay refrigerator on its back. Allow refrigerator to sit upright for approximately 30 minutes before plugging it in to ensure oil returns to the compressor. Plugging the refrigerator in immediately may cause damage to internal parts. To avoid property damage or possible injury, follow basic precautions, including the following: • Consult a plumber to connect 1/4” O.D.
Use & Care Guide 2. Remove plastic cap from water valve inlet port. • Set the freezer control on 4. • 3. Place brass nut (A) and sleeve (B) on copper tube end as illustrated. Reminder: Do not use an old sleeve. Set the refrigerator control on 4. • Let the refrigerator run at least 8 to 12 hours before adding food. 4. Place end of copper tubing into water valve inlet port. Shape tubing slightly. Do not kink – so that tubing feeds straight into inlet port.
Use & Care Guide Fresh Food Features Dairy Center The Dairy Center provides convenient door storage for spreadable items such as butter and margarine. This compartment can be moved to different locations to accommodate storage needs. To use the dairy center, raise the cover. Shelves To avoid personal injury or property damage, observe the following: • Never attempt to adjust a shelf that is loaded with food. • Confirm shelf is secure before placing items on shelf .
Use & Care Guide Dimensions Rough In Measurements 10
Use & Care Guide Beverage Chiller™ Crisper Drawers The Beverage Chiller™ keeps beverages and other items cooler than the rest of the fresh food section. A cold air inlet allows air from the freezer section to pass into the beverage chiller. The Beverage Chiller™ control is located on the left wall of the fresh food compartment. The control adjusts the amount of cold air allowed into the beverage chiller. For a cooler temperature in the Beverage Chiller™ slide the control down.
Use & Care Guide Temperature-Controlled Drawer The Chef’s Pantry™ drawer is a full-width drawer with adjustable temperature control. This drawer can be used for large party trays, deli items, beverages or other miscellaneous items. A divider is included to organize the Chef’s Pantry™ into sections: To Remove: • Pull drawer completely out and raise the front of the divider to unhook it from the rear wall of the pantry and lift it out.
Use & Care Guide Freezer Features Ice and Water Automatic Ice Maker • To prevent accidental child entrapment or suffocation risk, do not remove the divider in the top freezer basket. Note Energy rating guides that are posted on the refrigerator at the time of purchase do not include optional ice maker energy usage. Only 36” models come equipped with an automatic ice maker. Lower Wire Basket To Remove: • Pull open the freezer door to full extension and lift up and out of the door rail to remove.
Use & Care Guide • • Certain sounds may accompany the various cycles of the ice maker. The motor may have a slight hum, the cubes will rattle as they fall into an empty storage pan and the water valve may click or “buzz” occasionally. • If the ice is not used frequently, the ice cubes will become cloudy, shrink, stick together and taste stale. Empty the ice storage bin periodically and wash it in lukewarm water. Be sure to dry the bin thoroughly before replacing it .
Use & Care Guide Water Filter Replacing Water Filter IMPORTANT: Air trapped in system may cause water and cartridge to eject. Always dispense water for two minutes before removing the filter for any reason. Use caution when removing. To avoid serious illness or death, do not use refrigerator where water is unsafe or of unknown quality without adequate disinfection before or after use of filter. 1. Turn filter counter clockwise until it releases from filter head. 2.
Use & Care Guide Food Storage Tips Dairy Food Fresh Food Storage • Most dairy foods such as milk, yogurt, sour cream and cottage cheese have freshness dates on their cartons for appropriate length of storage. Store these foods in the original carton and refrigerate immediately after purchasing and after each use.
Use & Care Guide Food Storage Chart Storage times are approximate and may vary depending on type of packaging, storage temperature, and the quality of the food when purchased.
Use & Care Guide Sources: United States Department of Agriculture; Food Marketing Institute; Cooperative Extension Service, Iowa State University.
Use & Care Guide To avoid personal injury or property damage, observe the following: • Read and follow manufacturer’s direc tions for all cleaning products. • Do not place buckets, shelves or acces sories in dishwasher. Cracking or warping of accessories may result. To avoid electrical shock which can cause severe personal injury or death, disconnect power to refrigerator before cleaning. After cleaning, reconnect power.
Use & Care Guide Care and Cleaning Replacing Light Bulbs To avoid electrical shock which can cause severe personal injury or death, disconnect power to refrigerator before replacing light bulb. After replacing light bulb, reconnect power. To avoid electrical shock which can cause severe personal injury or death, discon nect power to refrigerator before clean ing. After cleaning, reconnect power. Cleaning the Outside Circuit breakers must be shut off before cleaning.
Use & Care Guide For long vacations, absences (more than three months) OR if the room temperature will drop below 55º F (13° C): 1. Remove food. Freezer (style of light shield varies) 1. Reach behind the light cover. 2. With firm pressure, press forward on the notches at the back of the cover and pull down the cover will open from the back. 2. Ice maker: • Shut off the water supply to the ice maker at least one day ahead of time.
Use & Care Guide Preparing to move: After a long vacation or absence: • If your refrigerator has an automatic ice maker, reconnect the water supply and turn on supply valve (see page 8). • Plug the refrigerator back in and reset con trols (see page 8). • • Follow the above instructions for long vaca tions/absences, through step 7. • Secure all loose items such as shelves and drawers by taping them securely in place to prevent damage. Monitor water connection for 24 hours and correct leaks, if necessary.
Use & Care Guide System Specification and Performance Data Sheet Refrigerator Water Filter Cartridge Model UKF8001AXX Specifications Service Flow Rate (Maximum) Rated Service Life UKF8001AXX-750 (Maximum) Maximum Operating Temperature Minimum Pressure Requirement Minimum Operating Temperature Maximum Operating Pressure 0.78 GPM (2 9 L/min) 750 gallons/2839 liters 100° F / 38° C 35 psi /241 kPA 33° F/1° C 100 psi / 689 kPA * Tested using a flow rate of 0.78 gpm; pressure of 60 psig; pH of 7.5 + 0.5; temp.
Use & Care Guide State of California Department of Health Services Water Treatment Device Certificate Number 03 - 1583 Date Issued:September 16,2003 Date Revised:April 22,2004 Trademark /Model Designation UKF8001AXX750 469006-750 67003523-750 Replacement Elements UKF8001AXX 46 9006 67003523 Manufacturer: PentaPure Inc.
Use & Care Guide Operating Sounds Improvements in refrigeration design may produce sounds in your new refrigerator that are different or were not present in an older model. These improvements were made to create a refrigerator that is better at preserving food, is more energy efficient, and is quieter overall. Because new refrigerators run quieter, sounds may be detected that were present in older refrigerators, but were masked by higher sound levels. Many of these sounds are normal.
Use & Care Guide Troubleshooting 26
Use & Care Guide 27
Use & Care Guide Ice 28
Warranty REFRIGERATOR MODELS AFHR-36Entire Product – Limited One Year Warranty Aga-Heartland warrants that it will supply all necessary parts and labour to repair or replace in your home, any component which proves to be defective in material or workmanship, with the exception of painted or porcelain enamel finish, or plated surfaces. Subject to the conditions and exclusions stated below, for the period of one year from date of sale.
Use & Care Guide If You Need Service Warranty & Service What is Not Covered By These Warranties: 1. Conditions and damages resulting from any of the following: • Call the dealer from whom your appliance was purchased or call Aga Ranges Customer Assistance locate an author ized servicer. • Be sure to retain proof of purchase to verify warranty status. Refer to Warranty for further information on owner’s respon sibilities for warranty service.