
Specifications


5
Calibration of the noise figure
measurement personality
In order to make accurate measure-
ments, the personality must first be
calibrated. Calibration is required
because the NF of the measurement
system has to be known before a DUT
can be measured. The measured
instrument noise figure is then
removed from the total noise figure
measurement so that only the DUT
noise figure and gain is displayed.
Following is the calibration process:
1. Select the frequency range.
2. Set the number of points and set
the number of averages.
3. If the device under test does not
have gain or if the gain is low,
turn on the built-in preamplifier
before calibration.
Instructions Keystrokes
Connect the noise source to the PSA with a Connect BNC cable between 346 series
BNC cable to the source driver on the rear panel. noise source and the rear panel connector
labeled Noise Source Drive Out +28 V (Pulsed).
Set the start frequency. [Frequency] {Start Freq} [10] {MHz}
Set the stop frequency. {Stop Freq} [3] {GHz}
Set the number of points at which to measure. {Points} [30] [Enter]
Set the averaging function to 15 averages. [Meas Setup] {Avg Number On} [15] [enter]
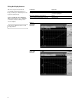
Calibrate the measurement personality. [Meas Setup] {Calibrate} {Calibrate}
Perform a system calibration.
Figure 1.
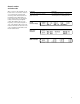
DUT set up
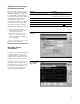
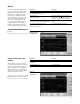
Figure 2.
Typical noise figure
and gain graph
Now that the measurement personality
is calibrated with the noise source
connected directly to the input, it is
a simple matter to make noise figure
and gain measurements on a device.
Disconnect the noise source from the
input and connect the DUT to the
input and connect the noise source
to the DUT as shown in Figure 1. The
noise figure and gain of the device
under test is shown in Figure 2.
Noise figure and gain
measurements