45-02993 48" PLUG AERATOR ...................................................................4 ESPAÑOL ........................................................ 11 ENGLISH ...........................................................4 FRANÇAIS ......................................................14 PRINTED IN USA FORM NO. 3-31 rev.
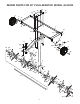
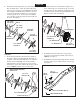
REPAIR PARTS FOR 48" PLUG AERATOR MODEL 45-02993 13 12 8 9 12 13 12 14 12 14 27 3 1 21 17 19 3 5 27 13 34 27 30 28 25 20 4 17 8 26 17 7 9 22 17 23 20 33 24 28 10 28 12 18 32 10 28 23 2 17 17 12 27 22 9 29 31 27 28 6 28 10 32 28 28 30 21 36 2 37 27
REPAIR PARTS FOR 48" PLUG AERATOR MODEL 45-02993 REF PART NO. QTY 1 2 3 4 5 6 7 8 9 10 12 13 14 17 18 19 20 21 28647OR1 24623 24619OR1 24624BL1 28642BL3 2-24 23687BL1 41863 68589BL1 63929BL1 43087 43001 44072 HA21362 44685 43182 R19171616 47810 1 1 2 1 1 1 1 2 3 4 6 6 4 12 1 8 4 40 DESCRIPTION REF PART NO.
ENGLISH RULES FOR SAFE OPERATIONS Remember, any power equipment can cause injury if operated improperly or if the user does not understand how to operate the equipment. CAUTION: VEHICLE BRAKING AND STABILITY MAY BE AFFECTED WITH THE ADDITION OF AN ATTACHMENT CAUTION: AERATOR KNIVES ARE EXTREMELY SHARP! Exercise caution at all times when using power equipment. 1. Read this owners manual carefully for operating and service instructions before attempting to assemble or operate this equipment.
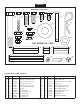
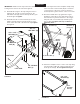
ENGLISH SHOWN FULL SIZE A C B D E F G H O L M I J N P K NOT SHOWN FULL SIZE R Q T U S V HARDWARE PACKAGE CONTENTS REF QTY PART NO. DESCRIPTION A 2 46526 Hex Bolt, 1/2" x 3-1/4" Lg. B 3 1509-69 Hex Bolt, 1/4" x 1-3/4" Lg. C 6 43087 Hex Bolt, 3/8" x 1-1/4" Lg. D 6 43001 Hex Bolt, 3/8" x 1" Lg. E 8 43182 Hex Bolt, 5/16" x 3/4" Lg.
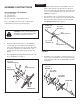
ENGLISH ASSEMBLY INSTRUCTIONS 3. Assemble a wheel bracket to the middle hole in the shaft so that the hub of the bracket faces the short end of the shaft. Fasten the bracket to the shaft using a 1/4" x 1-3/4" hex bolt (B) and a 1/4" nylock nut (L). Tighten. See figure 2. TOOLS REQUIRED FOR ASSEMBLY (2) 7/16" wrenches (2) 1/2" wrenches (2) 9/16" wrenches (2) 3/4" wrenches or adjustable wrenches 4.
ENGLISH 8. Assemble a wheel to a wheel bracket using a 1/2" x 3-1/4" hex bolt (A), two 1/2" washers (P), a 1/2" jam nut (M) and a 1/2" nylock jam nut (I). Adjust the nuts so that the wheel is held securely but will spin freely. Repeat on other side. See figure 6. 6. Assemble a 2.38" long spacer (S), a 3/4" flat washer (O), the middle brace, a 3/4" flat washer (O) and a 3.90" long spacer (Q) onto the long end of the shaft. The bent lip of the middle brace must face the short end of the shaft.
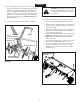
ENGLISH IMPORTANT: Make sure the tray is turned so that the locking notch is at the front as shown in figure 8. 13. Place the tray between the end plates. Temporarily insert one 5/16" x 3/4" hex bolt (E) into each back corner and one of the front corners of the tray to hold end plates together at three of the four corners. 11. Assemble the tongue to the tray using two 3/8" x 1" hex bolts (D), two 3/8" x 1-1/4" hex bolts (C), two 3/8" whizloc nuts (N), and four 3/8" nylock nuts (J) as shown in figure 8.
ENGLISH 16. Place the lift handle through the slot in the tray. Fasten the lift handle to the smaller, inner hole in the middle wheel bracket using the bolt and nut which you pre-assembled earlier (figure 2). Fasten the lift handle to the larger, outer hole in the wheel bracket using a 3/8" x 1-1/4" hex bolt (C), the shoulder spacer (U), and a 3/8" nylock nut (J). Tighten both nylock nuts. See figure 11. CAUTION: the lift handle can drop to the rear unexpectedly.
ENGLISH OPERATION MAINTENANCE Aerating means pulling small soil plugs, ranging up to three inches in length, from the soil to create small reservoirs that will bring oxygen, fertilizer and water down into the roots. For best aerator performance, the following lawn preparations and operating procedures are recommended. 1. Plugger points can periodically be sharpened with a small grinder to maintain good penetration. Points should be removed to sharpen.
ESPAÑOL NORMAS PARA UNA OPERACIÓN SEGURA Recuerde que los equipos eléctricos o motorizados pueden causar lesiones si no se operan correctamente o si el usuario no sabe cómo operar el equipo. PRECAUCIÓN: el sistema de freno y la estabilidad del vehículo pueden verse afectados con la adición de un accesorio. Preste atención a las condiciones cambiantes en las pendientes. Preste atención a este símbolo ya que indica precauciones de seguridad importantes.
ESPAÑOL INSTRUCCIONES DE ARMADO 7. Rote el soporte de la rueda instalado en el medio del eje de manera que apunte hacia arriba. Instale una placa final, una arandela plana (O) de 3/4 pulg. y un segundo soporte de rueda en el lado largo del eje. Oriente este soporte de rueda como aparece en la figura 5. Asegúrelo al eje con un perno hexagonal (B) de 1/4 pulg. x 1-3/4 pulg. y una tuerca de cierre de nylon (L) de 1/4 pulg. Apriete. Repita este procedimiento en el lado corto del eje. 8.
ESPAÑOL 8. Para aumentar la profundidad de penetración de la púas, puede añadir hasta 140 lbs. de peso a la bandeja, con bolsas de arena o (4) bloques de concreto. Puede asegurar la pesa a la bandeja con ataduras o correas amarradas al frente y atrás de la bandeja. Asegure la pesa de manera que las ataduras no se enreden con las partes rotativas. 9. Si la tierra está extremadamente dura y seca, se recomienda regar por una a dos horas antes de airear. 10.
FRANÇAISE RÈGLES POUR LA SÉCURITÉ DE FONCTIONNEMENT Ne pas oublier qu’un matériel motorisé peut causer des blessures s’il est mal utilisé ou si son utilisateur ne comprend pas comment s’en servir. ATTENTION: Le freinage et la stabilité du véhicule Ce symbole indique des consignes de sécurité importantes. Il signifie: ATTENTION! SOYEZ VIGILANT! Votre sécurité en dépend. risquent d’être affectés en raccordant un accessoire. Tenir compte des conditions changeantes sur les pentes.
FRANÇAISE FONCTIONNEMENT IMPORTANT: Veiller à ce que la fente de verrouillage de la platine soit vers l’avant, comme indiqué par la figure 8. L’aération consiste à extraire de petites « carottes » de terre, d’une longueur pouvant atteindre 8 cm, afin de créer de petits réservoirs qui apporteront de l’oxygène, de l’engrais et de l'eau aux racines. Pour obtenir les meilleurs résultats de l’aérateur, la préparation de la pelouse et les procédures d’utilisation ci-dessous sont préconisées. 11.
the fastest way to purchase parts www.speedepart.com REPAIR PARTS Agri-Fab, Inc. 809 South Hamilton Sullivan, IL 61951 217-728-8388 www.agri-fab.com This document (or manual) is protected under the U.S. Copyright Laws and the copyright laws of foreign countries, pursuant to the Universal Copyright Convention and the Berne convention.