
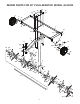
Instruction Manual


8
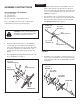
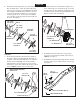
IMPORTANT: Make sure the tray is turned so that the
locking notch is at the front as shown in gure 8.
11. Assemble the tongue to the tray using two 3/8" x 1"
hex bolts (D), two 3/8" x 1-1/4" hex bolts (C), two
3/8" whizloc nuts (N), and four 3/8" nylock nuts (J) as
shown in gure 8. Tighten.
12. Assemble two 3/8" x 1-1/4" hex bolts (C), two 3/8"
whizloc nuts (N) and two 3/8" nylock nuts (J) to the
holes on the other side of the slot in the tray. Tighten.
See gure 8.
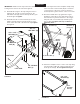
FIGURE 10
FIGURE 8
FIGURE 9
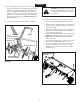
15. Fasten the end plates to the corners of the tray using,
from the inside, eight 5/16" x 3/4" hex bolts (E) and
5/16" nylock nuts (K). Do not tighten till step 18.
5/16" x 3/4"
HEX BOLT (E)
(Temporary)
3/8" x 1"
HEX BOLT (D)
MIDDLE
BRACE
3/8" NYLOCK NUT (J)
3/8" NYL
OCK
NUT (J)
RIGHT SIDE
LEFT SIDE
3/8" x 1-1/4"
HEX BOLT (C)
3/8"WHIZLOC
NUT (N)
3/8" x 1"
HEX BOL
T (D)
13. Place the tray between the end plates. Temporarily
insert one 5/16" x 3/4" hex bolt (E) into each back
corner and one of the front corners of the tray to
hold end plates together at three of the four corners.
14. Rotate the middle brace up against the tongue,
aligning it on the side of the tongue that is next to
the slot in the tray. Fasten the brace to the tongue
using two 3/8" x 1" hex bolts (D) and 3/8" nylock
nuts (J). Do not tighten until step 18. Remove
temporary bolts.
ENGLISH
5/16" x 3/4"
HEX BOLT (E)
5/16"
NYLOCK
NUT (K)