
Manual


ASSEMBLY INSTRUCTIONS
TOOLS REQUIRED FOR ASSEMBLY
(1) Screwdriver
(1) Pliers
(2) 7/1 6" Wrenches
(2) 1/2" Wrench
(2) 9/1 6" Wrenches
(1) Grease Gun with general purpose grease
1. Remove the hardware pack and all loose parts
from the carton. Be sure the carton is empty
before discarding.
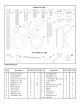
2. Lay out all parts as shown. Extra pieces of some
items may be included in hardware pack.
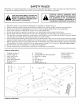
CAUTION
Do not leave the cart unattended in the upright
position. A falling cart can cause personal injury!
Pay close attention to the stability of the cart while
it remains in an upright position. For best stability,
assemble on a smooth, level surface.
NOTE: To prevent scratching paint, cover work surface
with a mat or cardboard.
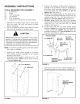
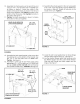
3. Position cart body halves upright on a smooth
level surface such as a garage floor or a paved
driveway. See figure 1.
4. Assemble halves together using five 1/4" x 1/2"
hex bolts and 1/4" SEMS nuts as shown in figure
1. Do not tighten yet.
i
114" x 112" HEX BOLT
114" SEMS NUT
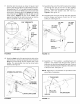
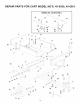
5. Position the tailgate reinforcement bracket on
outside of cart as shown in figure 3. Assemble to
the bottom of the cart body using four 5/16" x 3/4"
truss head bolts and 5/16" SEMS nuts. Do not
tighten yet. See figure 2.
6. Position the tailgate guides on the inside of the
cart bodies with guide channels to the front. As-
semble using four 1/4" x 1/2" hex bolts and 1/4"
SEMS nuts. Do not tighten yet. See figure 2.
7. (45-0351 only) Fasten the ends of the tailgate
reinforcement bracket to the top flange of the cart
using two 1/4" x 1/2" hex nuts and 1/4" SEMS
washers. See figure 2.
8. At this time, with the cart body halves pulled
together, tighten the truss head bolts assembled
in step 5 and then tighten the hex bolts as-
sembled in steps 6 and 7. Do not tighten the bolts
that were assembled in step 4.
TAILGATE GUIDE
1/4" SEMS NUT
I
i
5116"SEMS NUT
114"x 112"
1/4" x 1/2" HEX BOLT
HEX BOLT (45-0351 only)
\
5116" x 314" \
\
TRUSS HEAD
/ BOLT ._
TAILGATE 114" SEMS NUT
REINFORCEMENT (45-0351 only)
BRACKET
FIGURE 2
9. Carefully turn the cart over so that the tailgate rein-
forcement bracket is on the bottom. See figure 3.
}
8
@
0
@
TAILGATE
REINFORCEMENT
BRACKET
/
FIGURE 1 FIGURE 3
4