
Manual
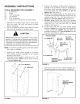
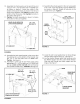

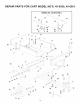

22.Assemblea 1" thin washer,a spacer,a 1" thick
washer(model45-0350only),awheelwiththevalve
stemfacingout, andanother1" thinwasherontoa
wheelaxle. Insert a cotter pin into the axle and
spreadtheends.Repeatfor theotherthreewheels.
Seefigure12.
NOTE:Eightextra1"thinwashersareprovidedtotake
upendplayif necessary.
23.Pressahubcapontotheflatwasheroneachof the
fourwheels.Seefigure12.
24.Checktirepressure(max.psiprintedontire).
25.Pumpthewheelhubsfullofgeneralpurposegrease.
1"THIN
SPACER
WASHER
HUB CAP
\
1" THICK _-_
WASHER
(45-0350 ONLY)
1/8" x 1-1/2" 1" THIN WHEEL
COTTER PIN WASHER (45-0350 SHOWN)
FIGURE 12
IMPORTANT: Make sure the drawbar tongue is locked
to the latch stand bracket by the latch lock lever.
26. Turn cart over onto its wheels.
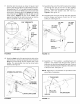
27. (Model 45-0350 only) Press the protective edging
strips onto the ends of the tailgate. See figure 13.
28. Slide the tailgate down into the tailgate guides so that
the holes in the bottom of the tailgate fit over the
screws in the bottom of the cart bed. See figure 13.
PROTECTIVE EDGING (45-0350
FIGURE 13
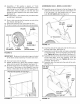
ASSEMBLING RAILS - MODEL 45-0350 ONLY
29. Assemble seven rail braces to the top flange on the
sides and the front of the cart bed. Use thirteen 1/4"
x 3/4" hex bolts, 1/4" flat washers and 1/4" nylock
nuts. Do not tighten yet. See figure 14.
I/4"NYLOCK NUT
FIGURE 14
5/16" FLAT
WASHER
30. Insert the ends of the side rails into the front rail so
that the holes align. See figure 15.
31. Assemble the rails to the side rail braces using eight
curved head bolts, 5/16" lock washers and 5/16" hex
nuts. Tighten all loose nuts and bolts. See figure 15.
32. Assemble the rails to the front rail braces using two
curved head bolts, 5/16" lock washers, 5/16" flat
washers and 5/16" hex nuts. Tighten all loose nuts
and bolts. See figure 15.
33. Assemble two vinyl caps onto the ends of the rails.
See figure 15.
CURVED
HEAD
BOLT
VINYL
CAP
FIGURE 15
5/16" LOCK
WASHER
5/16" HEX NUT