
Instructions


Page 46
pressing this key will bring up either the Set by Keypad screen or the Set by Tab/Jog
screen depending upon which one was last used for setting that frequency
parameter.
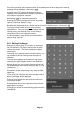
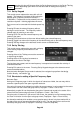
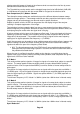
7.3.1 Set by Keypad
This control screen replaces the menu with a 0 to 9
keypad. The frequency is entered in MHz using the
decimal point if required (maximum resolution
0.0001MHz). Frequencies can be entered just to the
resolution required – following digits become zeros.
Entry errors can be corrected with the back-space key
().
Pressing OK sets the entered frequency without
leaving the control screen. The frequency value is
cleared ready for entering a new value.
Pressing OK & Exit sets the entered frequency and
returns to the menu.
Pressing Exit/Cancel returns to the menu without setting the entered frequency.
Pressing Toggle Last returns the frequency to the value directly prior to the last frequency entry.
Pressing Tab/Jog changes to the alternate control screen as detailed below.
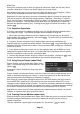
7.3.2 Set by Tab/Jog
This control screen replaces the menu with a display
of the existing frequency and enables it to be
changed.
Pressing either of the Tab keys moves the arrows left
or right along the digits.
Pressing either of the Jog keys increments or
decrements the value of that digit.
The Jog keys auto-repeat, and the new frequency is accepted and executed after a delay of
around two seconds.
Pressing Exit returns to the menu. Pressing Set by Keypad changes to the alternate control
screen as detailed above.
Note that when Navigate Screen mode is selected, the navigator keys perform the tab/jog
function directly - see section 7.1.
7.3.3 Shortcuts to setting a Specific Frequency Span
Narrower Span
Having set a frequency span in which the signals of interest are visible, the user may wish to
examine a specific part of the span at greater resolution.
If the point of interest is the highest level within the current sweep, it can be moved to the centre
of the screen from the Centre sub-group menu (Freq/Span > Centre > Set C=Pk).
Alternatively, marker M1 can be placed at the point of interest and moved to the centre of the
screen from the Centre sub-group menu (Freq/Span > Centre > Set C=M1).
Once the point of interest is in the centre of the screen, the resolution can be increased using
the Zoom In function from the Span sub-group menu (Freq/Span > Span > Zoom In/Out).
An alternative method which enables a more precise span to be set is to place marker M1 at
the start of the area of interest and marker M2 at its end. The new span is then set from the
Start/Stop sub-group menu (Freq/Span > Start/Stop > Start=M1,Stop=M2).
Set
Centre